The module lifecycle stage: General Availability
The module has requirements for installation
This guide describes how to create and modify virtualization module resources in a project or cluster namespace.
Quick start on creating a virtual machine
This section walks through a minimal scenario: you create an Ubuntu 24.04 image, a disk from that image, and a virtual machine (VM), connect to it over the console, and then delete the created resources.
- Using the CLI
- Using the web interface
-
Create a VirtualImage from an external source:
d8 k apply -f - <<EOF apiVersion: virtualization.deckhouse.io/v1alpha2 kind: VirtualImage metadata: name: ubuntu spec: storage: ContainerRegistry dataSource: type: HTTP http: url: https://cloud-images.ubuntu.com/noble/current/noble-server-cloudimg-amd64.img EOF -
Create a VirtualDisk from that image. Make sure the cluster has a default StorageClass, then apply the manifest:
d8 k apply -f - <<EOF apiVersion: virtualization.deckhouse.io/v1alpha2 kind: VirtualDisk metadata: name: linux-disk spec: dataSource: type: ObjectRef objectRef: kind: VirtualImage name: ubuntu EOF -
Create a VirtualMachine. The example uses a cloud-init script that creates the
clouduser:d8 k apply -f - <<EOF apiVersion: virtualization.deckhouse.io/v1alpha2 kind: VirtualMachine metadata: name: linux-vm spec: virtualMachineClassName: generic cpu: cores: 1 memory: size: 1Gi provisioning: type: UserData userData: | #cloud-config ssh_pwauth: True users: - name: cloud passwd: <PASSWORD_HASH> shell: /bin/bash sudo: ALL=(ALL) NOPASSWD:ALL lock_passwd: False blockDeviceRefs: - kind: VirtualDisk name: linux-disk EOFWhere
<PASSWORD_HASH>is the hash of the user password, in quotes. Generate it withmkpasswd --method=SHA-512 --rounds=4096: the command prompts for the password and prints the ready value. The script format is described in the cloud-init documentation. -
Verify that the image and the disk are created and the VM is running. Resources don’t become ready instantly, so wait for the expected values in the
PHASEcolumn:d8 k get vi,vd,vmExample output:
NAME PHASE CDROM PROGRESS AGE virtualimage.virtualization.deckhouse.io/ubuntu Ready false 100% 7h50m NAME PHASE CAPACITY VIRTUALMACHINE AGE virtualdisk.virtualization.deckhouse.io/linux-disk Ready 4Gi linux-vm 7h40m NAME PHASE UPTIME NODE IPADDRESS AGE virtualmachine.virtualization.deckhouse.io/linux-vm Running 7h30m virtlab-pt-2 10.66.10.2 7h46m -
Connect to the VM over the console:
d8 v console linux-vmExample output:
Successfully connected to linux-vm console. The escape sequence is ^]

linux-vm login: cloud
Password:
...
cloud@linux-vm:~$
To exit the console, press
Ctrl+]. -
Delete the created resources:
d8 k delete vm linux-vm
d8 k delete vd linux-disk
d8 k delete vi ubuntu
-
Create an image from an external source:
- Go to the Projects tab and select the project you need.
- Go to Virtualization → Images.
- Click Create.
- In the Source block, select By link.
- In the form that opens, enter
ubuntuin the Image name field. - In the Storage block, select
ContainerRegistryin the Storage type field. - In the URL field, paste
https://cloud-images.ubuntu.com/noble/current/noble-server-cloudimg-amd64.img. - Click Create.
- Check the image status on its page.
-
Create a disk from that image. You can skip this step and create the disk while creating the VM.
- Go to Virtualization → Disks.
- Click Create.
- In the form that opens, enter
linux-diskin the Disk name field. - In the Source field, select the
ubuntuimage from the drop-down list. - If required, specify a larger size in the Size field, for example
5Gi. - In the Storage class field, select a StorageClass or keep the default one.
- Click Create.
- Check the disk status on its page.
If the selected StorageClass uses the
WaitForFirstConsumermode, the disk waits for the VM that uses it. Until then, the disk shows the “CREATING 0%” status, but you can already select it when creating a VM. -
Create a virtual machine:
-
Go to Virtualization → Virtual machines.
-
Click Create.
-
In the form that opens, enter
linux-vmin the Name field. -
In the Platform and Resources sections, keep the default settings.
-
In the Disks section, click Add.
If the disk is already created, select Existing in the Disks / Images window that opens and pick
linux-diskfrom the list.If the disk isn’t created, select Create from in the same window and set the parameters:
- In the Name field, enter
linux-disk. - In the Source field, select the
ubuntuimage from the drop-down list. The list shows the resource type. - If required, specify a larger size in the Size field, for example
5Gi. - In the Storage field, select a StorageClass or keep the default one.
Click Add.
- In the Name field, enter
-
Scroll down to the Cloud-init toggle and enable it.
-
Paste the script into the field that appears, replacing
<PASSWORD_HASH>with the password hash in quotes, generated withmkpasswd --method=SHA-512 --rounds=4096:#cloud-config ssh_pwauth: True users: - name: cloud passwd: <PASSWORD_HASH> shell: /bin/bash sudo: ALL=(ALL) NOPASSWD:ALL lock_passwd: False -
Click Create.
-
Check the VM status on its page.
-
-
Connect to the VM over the console:
- Go to Virtualization → Virtual machines.
- Select the VM from the list and click its name.
- In the form that opens, go to the TTY tab and log in to the console window.
-
Delete the created resources:
- Go to Virtualization and select the section you need, for example Virtual machines, Disks, or Images.
- In the resource row, click the ellipsis button and select Delete. In some lists, for example in the list of VM snapshots, deletion is a separate button.
- In the confirmation window, click Delete or cancel the action with Don’t delete.
Important: Deleting a resource is irreversible. A disk attached to a running virtual machine can’t be deleted, and the Delete item is inactive for it.
Images
An image holds the contents of a disk that you use to create virtual machine disks. A VirtualImage is created in a project and available only in the project or namespace where it was created.
To make the same image available to every project in the cluster, you need a cluster image, ClusterVirtualImage. Only an administrator can create it; the procedure is described in the admin guide.
A virtual machine accesses an attached image in read-only mode.
An image appears in a project in three steps:
- You create a VirtualImage resource and specify a data source in it.
- Deckhouse Platform (DP) downloads the image from that source to the storage, which is either DVCR or a PVC, depending on the selected type.
- The downloaded image becomes available for creating disks.
Sources and storage options
The image source can be an HTTP server hosting the image file, a container image registry, or a file on your computer that you upload from the command line. You can also create an image from another image, from a virtual machine disk, or from a disk snapshot.
Image types, supported file formats, and compression algorithms are described in Image types and formats in the admin guide.
The downloaded image is stored in one of two ways, set by the .spec.storage parameter:
ContainerRegistry: The default option, the image is stored in DVCR.PersistentVolumeClaim: The image is stored in a PVC. This option is preferable if the storage can clone PVCs quickly, because disks are created from such an image faster.
An image stored with storage: PersistentVolumeClaim can only be used to create disks in the same storage class.
The PHASE column in the d8 k get vi output shows the progress of image creation; for its values, see the .status.phase field. To follow the creation in real time, add the -w flag. If an image stays not ready for a long time, check the .status.conditions block and the d8 k describe vi output for the reason.
Until an image reaches the Ready phase, you can change its .spec block, and the download restarts after each change. For a ready image, the .spec block can no longer be changed. For all image parameters, see VirtualImage.
Creating an image from an HTTP server
The simplest way to create an image is to provide a link to a file hosted on an HTTP server.
- Using the CLI
- Using the web interface
-
Create a VirtualImage resource. In the example, the image is stored in DVCR:
d8 k apply -f - <<EOF apiVersion: virtualization.deckhouse.io/v1alpha2 kind: VirtualImage metadata: name: ubuntu-24-04 spec: # Store the image in DVCR. storage: ContainerRegistry # Source for the image. dataSource: type: HTTP http: url: https://cloud-images.ubuntu.com/noble/current/noble-server-cloudimg-amd64.img EOF -
Verify that the image is created:
d8 k get virtualimage ubuntu-24-04

# Short form of the command.
d8 k get vi ubuntu-24-04
Example output:
NAME           PHASE   CDROM   PROGRESS   AGE
ubuntu-24-04   Ready   false   100%       23h
- Go to the Projects tab and select the project you need.
- Go to Virtualization → Images.
- Click Create.
- In the Source block, select By link.
- In the form that opens, enter the image name in the Image name field.
- In the Storage block, select
ContainerRegistryin the Storage type field. - In the URL field, specify the link to the image.
- Click Create.
- Check the image status on its page.
Verifying the integrity of a downloaded image
The checksum block makes DP verify what it downloaded from the HTTP server. The image reaches the Ready phase only if the downloaded file matches every specified checksum, otherwise the resource ends up in the Failed phase:
d8 k apply -f - <<EOF
apiVersion: virtualization.deckhouse.io/v1alpha2
kind: VirtualImage
metadata:
  name: ubuntu-24-04
spec:
  storage: ContainerRegistry
  dataSource:
    type: HTTP
    http:
      url: https://cloud-images.ubuntu.com/noble/current/noble-server-cloudimg-amd64.img
      checksum:
        sha256: 78be890d71dde316c412da2ce8332ba47b9ce7a29d573801d2777e01aa20b9b5
EOF
Take the checksum from the mirror that publishes the image and put it in the field of the matching algorithm:
| Field | Algorithm | Verification speed |
|---|---|---|
sha1 |
SHA-1 | ~1.6 GB/s |
sha256 |
SHA-256 | ~1.5 GB/s |
md5 |
MD5 | ~700 MB/s |
sha512 |
SHA-512 | ~570 MB/s |
streebog256 |
GOST R 34.11-2012 (Streebog), 256-bit | ~17 MB/s |
streebog512 |
GOST R 34.11-2012 (Streebog), 512-bit | ~17 MB/s |
The speeds are an order of magnitude, not a promise. They were measured on an x86-64 CPU with the SHA instruction set, and a CPU without it computes SHA-1 and SHA-256 several times slower. What holds on any CPU is the distance between the rows. SHA-1 and SHA-256 are computed by dedicated instructions, MD5 and SHA-512 by hand-written assembly, and all four hash data faster than it arrives over the network, so their cost stays invisible against the download itself.
The Streebog algorithms have no hardware support anywhere and are about two orders of magnitude slower. For a 10 GiB image, that’s around ten minutes of hashing alone, and image creation becomes CPU-bound rather than network-bound. Use them only when a GOST checksum is actually required. Both lengths cost the same, because GOST R 34.11-2012 uses one compression function for 256 and 512 bits, and the shorter variant differs only in the initial value.
Checksums are computed in a single pass over the downloaded data, so specifying several checksums at once costs the sum of their times. Empty fields cost nothing.
The same block is available for the Upload source in the dataSource.upload.checksum parameter and works the same way. The uploaded data is verified against every specified checksum, and on a mismatch the resource stays in the Failed phase.
Storing an image in a PVC
To create disks from an image faster, store it in a PVC. DP can then clone the volume instead of unpacking the image again.
- Using the CLI
- Using the web interface
-
Create a VirtualImage resource with the
PersistentVolumeClaimstorage type:d8 k apply -f - <<EOF apiVersion: virtualization.deckhouse.io/v1alpha2 kind: VirtualImage metadata: name: ubuntu-24-04-pvc spec: # Storage settings for the project image. storage: PersistentVolumeClaim persistentVolumeClaim: # Specify the name of your StorageClass. storageClassName: rv-thin-r2 # Source for the image. dataSource: type: HTTP http: url: https://cloud-images.ubuntu.com/noble/current/noble-server-cloudimg-amd64.img EOFIf the
.spec.persistentVolumeClaim.storageClassNameparameter isn’t set, DP uses the cluster-wide default StorageClass or the class set for images in the module settings. -
Verify that the image is created:
d8 k get vi ubuntu-24-04-pvcExample output:
NAME               PHASE   CDROM   PROGRESS   AGE
ubuntu-24-04-pvc   Ready   false   100%       23h
- Go to the Projects tab and select the project you need.
- Go to Virtualization → Images.
- Click Create.
- In the Source block, select By link.
- In the form that opens, enter the image name in the Image name field.
- In the Storage block, select
PersistentVolumeClaimin the Storage type field. - In the Storage class field, select a StorageClass or keep the default one.
- In the URL field, specify the link to the image.
- Click Create.
- Check the image status on its page.
Creating an image from a container image registry
DP can pull an image from an external container image registry, but the disk file must be located in the container image under the /disk path. The following steps show how to prepare such a container image and create a project image from it.
- Using the CLI
- Using the web interface
-
Download the image file to your local machine:
curl -L https://cloud-images.ubuntu.com/minimal/releases/noble/release/ubuntu-24.04-minimal-cloudimg-amd64.img -o ubuntu2404.img -
Create a
Dockerfilewith the following contents:FROM scratch COPY ubuntu2404.img /disk/ubuntu2404.img -
Build the container image. The example uses the docker.com registry, which requires an account and a configured environment:
docker build -t docker.io/<USERNAME>/ubuntu2404:latestWhere
<USERNAME>is the username you specified when registering in the registry. -
Push the built container image to the registry:
docker push docker.io/<USERNAME>/ubuntu2404:latest -
Create a VirtualImage resource that points to the container image:
d8 k apply -f - <<EOF
apiVersion: virtualization.deckhouse.io/v1alpha2
kind: VirtualImage
metadata:
  name: ubuntu-2404
spec:
  storage: ContainerRegistry
  dataSource:
    type: ContainerImage
    containerImage:
      image: docker.io/<USERNAME>/ubuntu2404:latest
EOF
DP works only with registries that have TLS enabled. If the registry uses its own certificate authority, provide the certificate chain in the caBundle parameter, and take the credentials for a private registry from the secret specified in the imagePullSecret parameter.
- Go to the Projects tab and select the project you need.
- Go to Virtualization → Images.
- Click Create.
- In the Source block, select From registry.
- In the form that opens, enter the image name in the Image name field.
- In the Storage block, select
ContainerRegistryin the Storage type field. - In the Image in container registry field, specify the path to the container image.
- Click Create.
- Check the image status on its page.
Uploading an image from the command line
If the image file is on your computer, upload it directly. DP creates a temporary upload endpoint for this and waits for the data.
- Using the CLI
- Using the web interface
-
Create a VirtualImage resource with the
Uploadsource:d8 k apply -f - <<EOF apiVersion: virtualization.deckhouse.io/v1alpha2 kind: VirtualImage metadata: name: some-image spec: # Storage settings for the project image. storage: ContainerRegistry # Image source settings. dataSource: type: Upload EOFThe resource moves to the
WaitForUserUploadphase and is ready to accept the file. Start the upload within 10 minutes, otherwise the resource moves to theFailedphase and you have to create it again. -
Get the addresses that accept the file:
d8 k get vi some-image -o jsonpath="{.status.imageUploadURLs}" | jqExample output:
{
  "external": "https://virtualization.example.com/upload/<SECRET_URL>",
  "inCluster": "http://10.222.165.239/upload"
}
Use the
inClusteraddress if you upload the file from one of the cluster nodes, andexternalin all other cases. -
Upload the file to the selected address. The example first downloads the Cirros image and then sends it to the cluster:
curl -L http://download.cirros-cloud.net/0.5.1/cirros-0.5.1-x86_64-disk.img -o cirros.img
curl https://virtualization.example.com/upload/<SECRET_URL> --progress-bar -T cirros.img | cat
Where
<SECRET_URL>is the last part of the address from the previous step. -
Verify that the image has reached the
Readyphase:d8 k get vi some-imageExample output:
NAME         PHASE   CDROM   PROGRESS   AGE
some-image   Ready   false   100%       1m
You can also verify the uploaded file against a checksum. To do this, specify the checksum block in the data source. The checksums are computed over the bytes the client sends, and on a mismatch the resource stays in the Failed phase, so the upload has to be repeated on a recreated resource.
- Go to the Projects tab and select the project you need.
- Go to Virtualization → Images.
- Click Create, then select Upload in the Source block.
- In the Image name field, enter the image name.
- In the Upload file block, drag the file to the highlighted area or click select on your computer.
- Select the file in the file manager that opens.
- Click Create.
- Wait until the image reaches the Ready state.
Creating an image from a disk
You can create an image from a disk if the disk isn’t attached to any virtual machine, or if the machine it’s attached to is powered off.
- Using the CLI
- Using the web interface
Create an image using the required disk as the source:
d8 k apply -f - <<EOF
apiVersion: virtualization.deckhouse.io/v1alpha2
kind: VirtualImage
metadata:
  name: linux-vm-root
spec:
  storage: ContainerRegistry
  dataSource:
    type: ObjectRef
    objectRef:
      kind: VirtualDisk
      name: linux-vm-root
EOF- Go to the Projects tab and select the project you need.
- Go to Virtualization → Images.
- Click Create.
- In the Source block, select Create from.
- In the form that opens, enter
linux-vm-rootin the Image name field. - In the Storage block, select
ContainerRegistryin the Storage type field. - In the Source field, select the disk you need from the drop-down list.
- Click Create.
- Check the image status on its page.
Creating an image from a disk snapshot
You can create an image from a disk snapshot if the snapshot is in the Ready phase.
- Using the CLI
- Using the web interface
Create an image using the disk snapshot as the source:
d8 k apply -f - <<EOF
apiVersion: virtualization.deckhouse.io/v1alpha2
kind: VirtualImage
metadata:
  name: linux-vm-root
spec:
  storage: ContainerRegistry
  dataSource:
    type: ObjectRef
    objectRef:
      kind: VirtualDiskSnapshot
      name: linux-vm-root-snapshot
EOF- Go to the Projects tab and select the project you need.
- Go to Virtualization → Images.
- Click Create.
- In the form that opens, enter the image name in the Image name field.
- In the Storage block, select the image storage type in the Storage type field.
- In the Source block, select Create from.
- In the Source field, expand the list and select the snapshot you need in the Disk snapshots group.
- Click Create.
- Check the image status on its page.
Image properties are convenient to review in the web interface, in Virtualization → Images:
- The list shows the image name, status, size, format in the Type column, and visibility scope in the Availability column, and the filters narrow it down by status, image, and type.
- On the image page, the Information tab collects the creation parameters in the Storage and Source blocks, and the State block shows the average download speed, format, unpacked size, size in storage, creation time, the CD-ROM flag, and the image path in DVCR.
- The Meta and YAML tabs show labels with annotations and the full resource specification.
Disks
A disk stores virtual machine (VM) data, including the operating system and application files. A disk is described by the VirtualDisk resource, and its specification consists of two blocks:
persistentVolumeClaim: Storage parameters, that is, the StorageClass and the size.dataSource: The data source, which can be an image, another disk, or a snapshot.
Without the dataSource block, an empty disk is created, and then you have to specify at least the size in persistentVolumeClaim. If a source is set, you can omit the persistentVolumeClaim block, and DP takes the size from the source and picks the storage class based on it too. When no class can be picked, DP uses the cluster-wide default StorageClass or the class set for disks in the module settings.
The PHASE column in the d8 k get vd output shows the progress of disk creation; for its values, see the .status.phase field. If a disk stays not ready for a long time, the .status.conditions block tells you the reason.
Until a disk reaches the Ready phase, you can change any field of the .spec block, and the creation restarts after the change. For a ready disk, only the size and the storage class remain editable, in the .spec.persistentVolumeClaim.size and .spec.persistentVolumeClaim.storageClassName parameters.
You can’t create a disk from an ISO image.
How storage affects a disk
Disk behavior depends on the storage behind the selected StorageClass. The differences show up in two properties.
The volume type determines the format in which DP creates the disk. On file system volumes (FileSystem, for example NFS), the disk is created in the qcow2 format, and on block devices (Block, for example iSCSI or Ceph RBD), data is written directly. Some storage types support both.
The volume binding mode determines when the disk is created:
-
Immediate: The disk is created right away, independently of virtual machines, and you can attach it to a machine on any cluster node.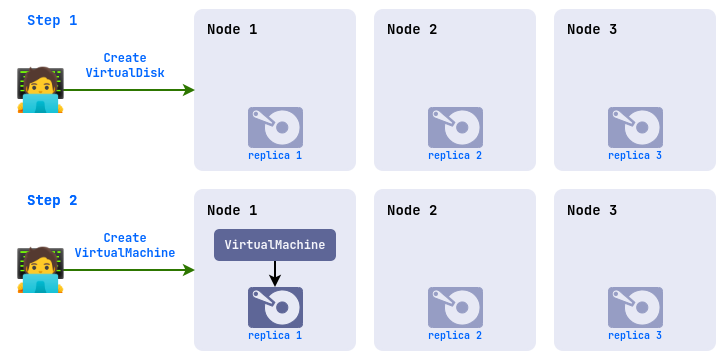
-
WaitForFirstConsumer: The disk is created only after it’s attached to a virtual machine, and it’s placed on the node where that machine starts.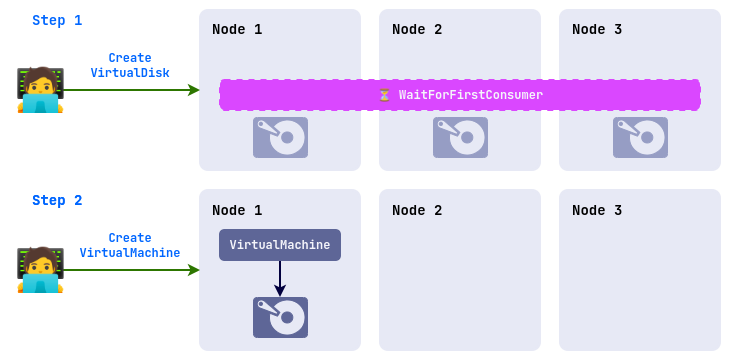
DP determines the remaining parameters, including the disk format, on its own from the capabilities of the selected StorageClass.
To view the available storage types, run the following command:
d8 k get storageclassExample output:
NAME                   PROVISIONER                           RECLAIMPOLICY   VOLUMEBINDINGMODE      ALLOWVOLUMEEXPANSION   AGE
rv-thin-r1 (default)   replicated.csi.storage.deckhouse.io   Delete          Immediate              true                   48d
rv-thin-r2             replicated.csi.storage.deckhouse.io   Delete          Immediate              true                   48d
nfs-4-1-wffc           nfs.csi.k8s.io                        Delete          WaitForFirstConsumer   true                   30d
In the web interface, the same list is available on the System tab, in Storage → Storage classes.
Creating an empty disk
An empty disk is what you need to install an operating system on it or to store data separately from the system disk.
- Using the CLI
- Using the web interface
-
Create a VirtualDisk resource with the size and the storage class:
d8 k apply -f - <<EOF apiVersion: virtualization.deckhouse.io/v1alpha2 kind: VirtualDisk metadata: name: blank-disk spec: # Disk storage parameters. persistentVolumeClaim: # Specify the name of your StorageClass. storageClassName: rv-thin-r2 size: 100Mi EOF -
Verify that the disk is created:
d8 k get vd blank-diskExample output:
NAME         PHASE   CAPACITY   VIRTUALMACHINE   AGE
blank-disk   Ready   100Mi                       1m2s
You can skip this step and create the disk while creating the VM.
- Go to the Projects tab and select the project you need.
- Go to Virtualization → Disks.
- Click Create.
- In the form that opens, enter
blank-diskin the Disk name field. - In the Size field, specify the size with units, for example
100Mi. - In the Storage class field, select a StorageClass or keep the default one.
- Click Create.
- Check the disk status on its page.
Creating a disk from an image
You can fill a disk with data from an image created earlier, either a project VirtualImage or a cluster ClusterVirtualImage.
Specifying the disk size is optional. If you don’t set it, DP creates the disk exactly at the unpacked size of the image, and if you do set it, the size must be no smaller than the unpacked one.
- Using the CLI
- Using the web interface
-
Check the unpacked image size in the
UNPACKEDSIZEcolumn:d8 k get vi ubuntu-24-04 -o wideExample output:
NAME PHASE CDROM PROGRESS STOREDSIZE UNPACKEDSIZE REGISTRY URL TARGETPVC AGE ubuntu-24-04 Ready false 100% 285.9Mi 2.5Gi dvcr.d8-virtualization.svc/vi/default/ubuntu-24-04:eac95605-7e0b-4a32-bb50-cc7284fd89d0 122m -
Create a disk with a size larger than the unpacked one:
d8 k apply -f - <<EOF apiVersion: virtualization.deckhouse.io/v1alpha2 kind: VirtualDisk metadata: name: linux-vm-root spec: # Disk storage parameters. persistentVolumeClaim: # The size is larger than the unpacked image size. size: 10Gi # Specify the name of your StorageClass. storageClassName: rv-thin-r2 # The source the disk is created from. dataSource: type: ObjectRef objectRef: kind: VirtualImage name: ubuntu-24-04 EOF -
Create a second disk without specifying the size:
d8 k apply -f - <<EOF apiVersion: virtualization.deckhouse.io/v1alpha2 kind: VirtualDisk metadata: name: linux-vm-root-2 spec: # Disk storage parameters. persistentVolumeClaim: # Specify the name of your StorageClass. storageClassName: rv-thin-r2 # The source the disk is created from. dataSource: type: ObjectRef objectRef: kind: VirtualImage name: ubuntu-24-04 EOF -
Compare the sizes of the created disks:
d8 k get vdExample output:
NAME              PHASE   CAPACITY   VIRTUALMACHINE   AGE
linux-vm-root     Ready   10Gi                        7m52s
linux-vm-root-2   Ready   2590Mi                      7m15s
The first disk got the specified 10 GiB, and the second one got the unpacked image size.
You can skip this step and create the disk while creating the VM.
- Go to the Projects tab and select the project you need.
- Go to Virtualization → Disks.
- Click Create.
- In the form that opens, enter
linux-vm-rootin the Disk name field. - In the Source field, select the image you need from the drop-down list.
- If required, specify a larger size in the Size field or keep the default value.
- In the Storage class field, select a StorageClass or keep the default one.
- Click Create.
- Check the disk status on its page.
Uploading a disk from the command line
If the image file is on your computer, upload it straight into a disk. DP creates a temporary upload endpoint for this and waits for the data.
- Using the CLI
- Using the web interface
-
Create a VirtualDisk resource with the
Uploadsource:d8 k apply -f - <<EOF apiVersion: virtualization.deckhouse.io/v1alpha2 kind: VirtualDisk metadata: name: uploaded-disk spec: dataSource: type: Upload EOFThe resource moves to the
WaitForUserUploadphase and is ready to accept the file. Start the upload within 10 minutes, otherwise the resource moves to theFailedphase and you have to create it again. -
Get the addresses that accept the file:
d8 k get vd uploaded-disk -o jsonpath="{.status.imageUploadURLs}" | jqExample output:
{
  "external": "https://virtualization.example.com/upload/<SECRET_URL>",
  "inCluster": "http://10.222.165.239/upload"
}
Use the
inClusteraddress if you upload the file from one of the cluster nodes, andexternalin all other cases. -
Upload the file to the selected address:
curl https://virtualization.example.com/upload/<SECRET_URL> --progress-bar -T <IMAGE_FILE> | catWhere
<SECRET_URL>is the address from the previous step, and<IMAGE_FILE>is the path to the image file on your computer. -
Verify that the disk has reached the
Readyphase:d8 k get vd uploaded-diskExample output:
NAME            PHASE   CAPACITY   VIRTUALMACHINE   AGE
uploaded-disk   Ready   3Gi                         7d23h
- Go to the Projects tab and select the project you need.
- Go to Virtualization → Disks.
- Click Create.
- In the form that opens, enter the disk name in the Disk name field.
- In the Disk block, select Upload in the Data source field.
- Drag the file to the highlighted area, or click it and select the file on your computer.
- In the Size field, specify the disk size, and in the Storage class field, select a StorageClass.
- Click Create.
If the selected storage class uses the
WaitForFirstConsumervolume binding mode, the Upload option isn’t available. Without a consumer, the disk isn’t created and there’s nowhere to upload the file, so select a storage class with theImmediatemode or upload the data as an image.For the same reason, an empty disk created in advance with such a storage class stays in the “WAITING FOR VM” status and isn’t offered in the Disks / Images window when attaching to a virtual machine, because only a ready disk can be selected. Create such disks right from the virtual machine form with the Blank or Create from options.
Disk properties are convenient to review in the web interface, in Virtualization → Disks:
- The list shows the disk name, status, size, storage class in the Class column, the virtual machine that uses the disk in the Used by column, and the resource age.
- On the disk page, the Configuration tab shows the data source, size, storage class, and the list of VMs in the Used in row.
- The Diagnostics tab shows the PVC name, its phase, size, storage class, PV name, and age, as well as the duration of the disk creation stages in the Diagnostics summary block.
Changing the disk size
You can grow a disk even while it’s attached to a running virtual machine (VM). You can’t shrink a disk.
- Using the CLI
- Using the web interface
-
Check the current disk size:
d8 k get vd linux-vm-rootExample output:
NAME PHASE CAPACITY VIRTUALMACHINE AGE linux-vm-root Ready 10Gi linux-vm 10m -
Set the new size in the
.spec.persistentVolumeClaim.sizeparameter:d8 k patch vd linux-vm-root --type merge -p '{"spec":{"persistentVolumeClaim":{"size":"11Gi"}}}' # You can achieve the same result by editing the resource. d8 k edit vd linux-vm-root -
Verify that the size has changed:
d8 k get vd linux-vm-rootExample output:
NAME            PHASE   CAPACITY   VIRTUALMACHINE   AGE
linux-vm-root   Ready   11Gi       linux-vm         12m
You can change the size from the virtual machine page:
- Go to the Projects tab and select the project you need.
- Go to Virtualization → Virtual machines.
- Select the VM the disk is attached to from the list and click its name.
- On the Configuration tab, in the Disks section, click the pencil icon next to the disk size.
- In the window that opens, specify a larger size.
- Click Apply.
Or from the disk page itself:
- Go to Virtualization → Disks.
- Select the disk you need and click its name.
- On the Configuration tab, specify a larger size in the Size field.
- Click the Save button that appears.
- Check the disk status on its page.
Migrating disks to other storage
In commercial DP editions, you can move a disk to another storage by changing its storage class. The move works both for disks defined in the VM specification and for disks attached as a separate resource.
The virtual machine must be in the Running phase, and the source and target storage must be of the same type. You can’t move a disk from a file system volume to a block device or the other way around.
To move a disk, specify the new storage class in the .spec.persistentVolumeClaim.storageClassName parameter:
d8 k patch vd disk --type=merge --patch '{"spec":{"persistentVolumeClaim":{"storageClassName":"new-storage-class-name"}}}'

# You can achieve the same result by editing the resource.
d8 k edit vd disk
After that, a live migration of the VM starts, during which the disk moves to the new storage.
If you need to move several disks of the same machine, change the storage class one disk at a time:
d8 k patch vd disk1 --type=merge --patch '{"spec":{"persistentVolumeClaim":{"storageClassName":"new-storage-class-name"}}}'
d8 k patch vd disk2 --type=merge --patch '{"spec":{"persistentVolumeClaim":{"storageClassName":"new-storage-class-name"}}}'
DP retries a failed migration with a growing delay. The first attempt runs immediately, the next ones after 5 and 10 seconds, then the delay doubles and from the seventh attempt stays at 300 seconds. To cancel the migration, restore the previous storage class in the specification.
Exporting a disk or a snapshot
Export writes the contents of a disk or its snapshot to a file so that you can move the data outside the cluster. For this feature to work, the storage-volume-data-manager module has to be enabled, and the command line requires the d8 utility version 0.20.7 or later.
The disk must not be in use at the moment of export. If the disk is attached to a virtual machine, stop the VM first.
To import a downloaded disk back into the cluster, upload it as an image or as a disk.
- Using the CLI
- Using the web interface
An example of exporting a disk, with the command run on a cluster node:
d8 data export download -n <NAMESPACE> vd/<VD_NAME> -o file.imgAn example of exporting a disk snapshot, with the command run on a cluster node:
d8 data export download -n <NAMESPACE> vds/<VD_SNAPSHOT_NAME> -o file.imgIf you export data from somewhere other than a cluster node (for example, from your local machine), use the --publish flag.
- Go to the Projects tab and select the project you need.
- Stop the virtual machine the disk is attached to. While the disk is in use, the Download item isn’t available.
- Go to Virtualization → Disks.
- In the row of the disk you need, click the ellipsis button and select Download.
- Wait until the Preparing… step in the Download window changes to Ready: the file downloads automatically as soon as it’s created. If that doesn’t happen, click Download in the window.
While an export is active, the disk is in the Exporting phase and a virtual machine with this disk won’t start. The export ends when its lifetime expires or when the DataExport resource created for it is deleted.
Virtual machines
To create a virtual machine (VM), use the VirtualMachine resource. Its parameters let you configure:
- the virtual machine class;
- the resources required for the virtual machine to run (CPU, memory, disks, and images);
- the placement rules for the virtual machine on cluster nodes;
- the bootloader settings and optimal parameters for the guest OS;
- the virtual machine startup policy and the policy for applying changes;
- the initial configuration scripts (cloud-init);
- the list of block devices.
For a full description of virtual machine configuration parameters, see the configuration reference.
Creating a virtual machine
The following steps show how to start an Ubuntu 24.04 virtual machine on the disk you created earlier. The cloud-init script installs the qemu-guest-agent agent and the nginx service, and creates the cloud user with the cloud password.
- Using the CLI
- Using the web interface
-
Create a VirtualMachine resource:
d8 k apply -f - <<"EOF"
apiVersion: virtualization.deckhouse.io/v1alpha2
kind: VirtualMachine
metadata:
  name: linux-vm
spec:
  # VM class name.
  virtualMachineClassName: generic
  # OS type: Generic for Linux and Windows for Windows. Generic by default.
  # osType: Generic
  # Bootloader type: BIOS, EFI, or EFIWithSecureBoot. BIOS by default.
  # bootloader: BIOS
  # VM initialization script.
  provisioning:
    type: UserData
    userData: |
      #cloud-config
      package_update: true
      packages:
        - nginx
        - qemu-guest-agent
      runcmd:
        - systemctl daemon-reload
        - systemctl enable --now nginx.service
        - systemctl enable --now qemu-guest-agent.service
      ssh_pwauth: True
      users:
        - name: cloud
          passwd: <PASSWORD_HASH>
          shell: /bin/bash
          sudo: ALL=(ALL) NOPASSWD:ALL
          lock_passwd: False
      final_message: "The system is finally up, after $UPTIME seconds"
  # VM resource settings.
  cpu:
    # Number of CPU cores.
    cores: 1
    # Guaranteed share of the CPU time of one core.
    coreFraction: 10%
  memory:
    # Amount of RAM.
    size: 1Gi
  # List of disks and images attached to the VM.
  blockDeviceRefs:
    # The order in this block sets the boot priority.
    - kind: VirtualDisk
      name: linux-vm-root
EOF
Where
<PASSWORD_HASH>is the hash of theclouduser password, in quotes, generated withmkpasswd --method=SHA-512 --rounds=4096. -
Verify that the machine has started:
d8 k get vm linux-vmExample output:
NAME       PHASE     UPTIME   NODE           IPADDRESS     AGE
linux-vm   Running   11m      virtlab-pt-2   10.66.10.12   11m
The machine gets an IP address automatically from the range that the administrator sets in the module settings.
-
Go to the Projects tab and select the project you need.
-
Go to Virtualization → Virtual machines.
-
Click Create.
-
In the form that opens, enter
linux-vmin the Name field. -
In the Resources section, set
1in the CPU cores field,10%in the Core fraction field, and1Giin the Memory size field. -
In the Disks section, click Add.
-
In the Disks / Images window that opens, select Existing and pick the
linux-vm-rootdisk from the list. -
Scroll down to the Cloud-init toggle and enable it.
-
Paste the script into the field that appears, replacing
<PASSWORD_HASH>with the password hash in quotes:#cloud-config package_update: true packages: - nginx - qemu-guest-agent runcmd: - systemctl daemon-reload - systemctl enable --now nginx.service - systemctl enable --now qemu-guest-agent.service ssh_pwauth: True users: - name: cloud passwd: <PASSWORD_HASH> shell: /bin/bash sudo: ALL=(ALL) NOPASSWD:ALL lock_passwd: False final_message: "The system is finally up, after $UPTIME seconds" -
Click Create.
-
Check the VM status on its page.
Virtual machine life cycle
From creation to deletion, a virtual machine goes through several phases. The current one is shown by the .status.phase field, and the details of what’s happening to the machine are in the .status.conditions block.
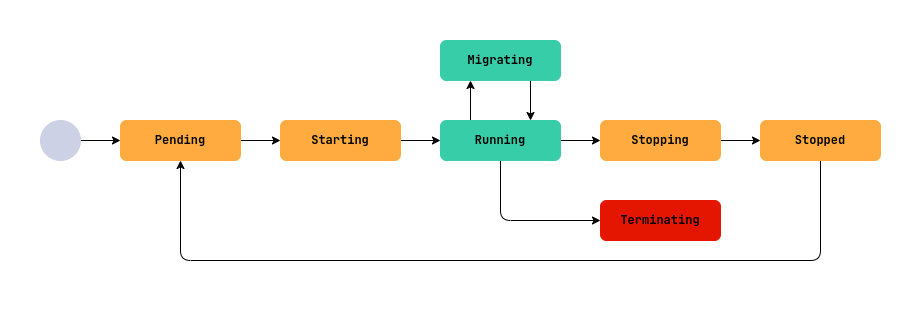
The conditions in the .status.conditions block answer the question of why the machine is in its current phase. To view the ones that have a message, run the following command:
d8 k get vm <VM_NAME> -o json | jq '.status.conditions[] | select(.message != "")'Where <VM_NAME> is the virtual machine name.
Diagnostics by phase
While a VM is in the Pending phase, it waits for its dependent resources to become ready, that is, disks, images, the VM class, and the secret with the initial configuration script. A delay in this phase means that one of the resources isn’t ready or that the namespace or project quotas are exhausted. The conditions ending in Ready show what exactly blocks the startup:
d8 k get vm <VM_NAME> -o json | jq '.status.conditions[] | select(.type | test(".*Ready"))'In the Starting phase, the dependent resources are ready and DP starts the VM on one of the nodes. If the startup drags on, there’s no suitable node, or the suitable nodes lack CPU or memory. The Running condition reports the reason:
d8 k get vm <VM_NAME> -o json | jq '.status.conditions[] | select(.type=="Running")'In the Migrating phase, the machine moves to another node by live migration. The migration doesn’t start or gets interrupted if the CPU instruction sets on the nodes are incompatible, the kernel versions differ, no node matches the placement rules, or the suitable nodes lack resources. The Migrating condition together with the .status.migrationState block shows the migration progress:
d8 k get vm <VM_NAME> -o json | jq '.status | {condition: .conditions[] | select(.type=="Migrating"), migrationState}'The Terminating phase is irreversible, all resources associated with the VM are released, but the resources themselves aren’t deleted.
Conditions of a running VM
For a running machine, a few conditions are worth watching:
AgentReadywith theTruestatus means thatqemu-guest-agentis running in the guest system, and then the.status.guestOSInfoblock contains information about the guest OS.FirmwareUpToDatewith theFalsestatus means that it’s time to update the VM firmware.ConfigurationAppliedwith theFalsestatus means that the specified configuration hasn’t been applied to the running machine yet.AwaitingRestartToApplyConfigurationwith theTruestatus means that some of the changes apply only after a restart, and you have to perform it manually.SizingPolicyMatchedwith theFalsestatus means that the machine resources don’t match the sizing policy of its class. Until you bring the parameters in line with the policy, you can’t save configuration changes.Migratableshows whether the machine can be moved by live migration. The condition is computed only for a running VM, and a powered-off one doesn’t have it. TheFalsestatus with theVirtualMachineNoMigrationTargetreason means that the machine itself is suitable for migration, but there’s no suitable node in the cluster. TheTruestatus with theVirtualMachineWaitingForMigrationTargetreason means that suitable nodes exist, but none of them can accept the machine right now, and this state resolves on its own.
Eviction from a node
The EvictionRequired condition appears when the node with your VM is put into maintenance mode. If the node was only made unschedulable with the d8 k cordon command but maintenance hasn’t started, the condition doesn’t appear.
The condition message tells you what will happen to the machine, namely a live migration without stopping the guest OS, a restart by DP with the cluster administrator’s permission, or waiting until the machine is restarted. A machine that can be moved by live migration isn’t restarted just to free the node. Until the eviction starts, the condition is only a warning, because maintenance can be canceled.
After a restart, the machine starts on another suitable node. If there’s no such node, it stays in the Pending phase, and the Running condition shows the reason from the scheduler. A node in maintenance mode doesn’t accept new machines, so a VM pinned to it by placement rules or using a device passed through from it starts only after the node returns to service.
Viewing the state in the web interface
The web interface shows the phase of a machine, its resources, and current problems on the machine page.
- Go to the Projects tab and select the project you need.
- Go to Virtualization → Virtual machines.
- Select the VM you need from the list and click its name.
The page header shows the current VM phase, its IP address, class, resource configuration, the number of attached disks and images, the node it’s placed on, whether the guest OS agent is running, and the time since startup. The page itself is split into the Configuration, Monitoring, Operations, Events, VNC, TTY, Network policies, Snapshots, Diagnostics, Meta, and YAML tabs.
On the Configuration tab of a running VM, usage charts appear next to the CPU cores and Memory size fields. In the Disks block, each device shows its boot order number, name, size, status, attachment method, storage class, and current disk load. In the Networks block, the network name, its status, and the IP and MAC addresses are shown, and the main cluster network is labeled Main.
Configuring CPU and coreFraction
Two parameters set the CPU resources of a machine. The .spec.cpu.cores parameter sets the number of virtual cores, and .spec.cpu.coreFraction sets the guaranteed share of the power of each of them.
spec:
  cpu:
    cores: 2
    coreFraction: 20%
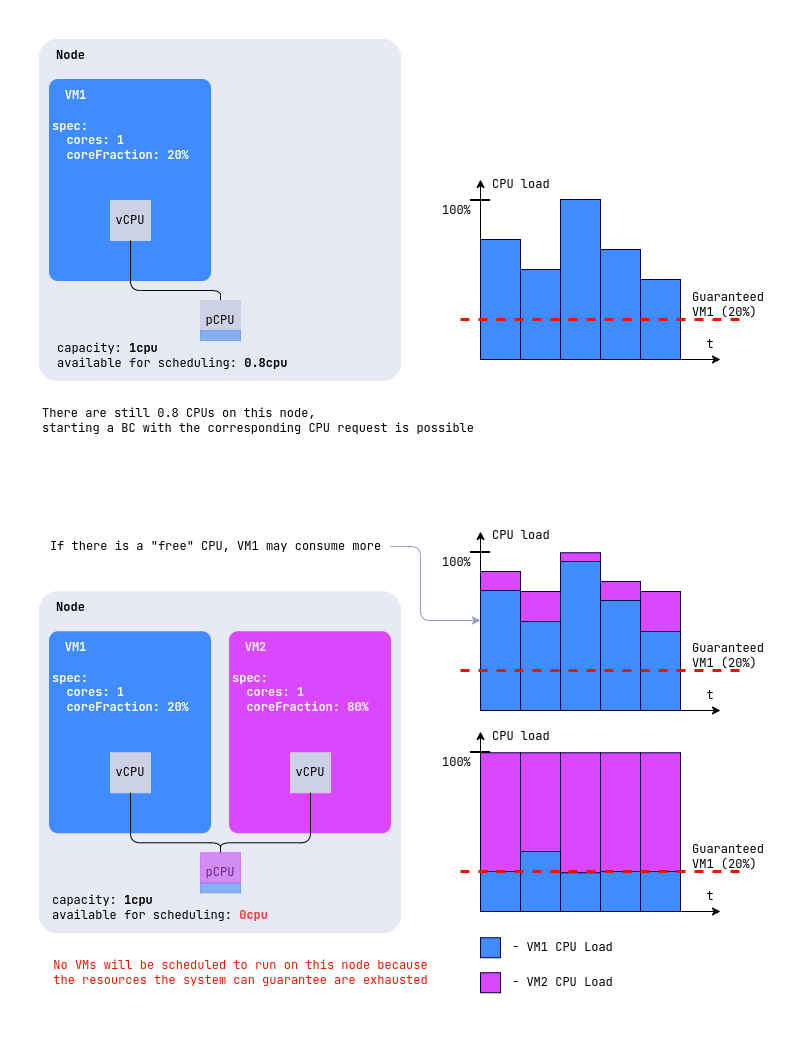
In this example, the machine gets two virtual cores and a guaranteed 20% of the power of each, that is, 0.4 cores in total, regardless of the node load. When the node has free resources, the machine can take both cores in full. Such a reserve lets you keep more machines on a node than it has physical cores, without losing stability under load.
If coreFraction isn’t set, each virtual core gets 100% of a physical one.
An administrator can restrict the set of allowed coreFraction values in the sizing policy of the VM class, and then you have to choose from them.
The guaranteed share is taken into account when selecting a node, so a machine doesn’t start where the node can’t provide the guarantees to all machines placed on it. The figure shows two machines with one core each, the first with coreFraction: 20% and the second with coreFraction: 80%.
Automatic coreFraction (Auto)
DP can pick the CPU time share on its own, following how much the machine consumes.
The feature is available in commercial DP editions and is in the Alpha stage. It requires the enabled vertical-pod-autoscaler module, which picks the core fraction, and the HotplugCPUAndMemoryWithInPlaceResize feature in the module settings. The feature works with Kubernetes 1.33 or later, both on the control plane and on every node running VMs.
Instead of a fixed percentage, you can set coreFraction: Auto. Then DP picks the fraction, raising it when the machine lacks CPU and lowering it when the machine is idle. The number of cores and the amount of memory stay unchanged, and the new fraction applies without a restart.
spec:
  cpu:
    cores: 4
    coreFraction: Auto
The selection works as follows:
- The initial core fraction is 10% or the nearest value allowed by the sizing policy.
- The fraction changes in steps. If the class sizing policy defines a
coreFractionslist, its values become the steps, otherwise 5%, 10%, 15%, 20%, 30%, 40%, 50%, 60%, 70%, 80%, 90%, and 99% are used. - The 100% value is never selected automatically, because at that value the CPU requests equal the limits, and such a machine can’t be changed without a restart. If 100% is listed in
coreFractions, it simply isn’t used, and the ceiling becomes the next value down, while without a sizing policy the ceiling is 99%. - For the same reason, the sizing policy has to leave at least two values to choose from. A policy that allows only 50%, or 50% and 100%, would pin the machine at 50% forever, so such a combination is rejected and you have to set the fraction explicitly.
- The recommended value is published in the
.status.recommendedResources.cpu.coreFractionfield, and the applied one in.status.resources.cpu.coreFraction. Every change is reported by theCoreFractionScalingevent. - If the node doesn’t have room for the new requests, the machine moves to another node and keeps running.
The CoreFractionAutoscaling condition shows whether the selection is running. While it works, the condition has the True status, and for the first few minutes, until statistics accumulate, the reason is WaitingForRecommendation, and then CoreFractionAutoscalingEnabled.
If the selection becomes unavailable, the condition switches to False, and the reason explains why:
CoreFractionAutoscalingDisabled: Vertical autoscaling is disabled.InPlaceResizeDisabled: In-place resource changes are disabled.SizingPolicyHasNoSteps: The sizing policy is narrowed down to a single value.
The machine keeps running with its current fraction, but stops following the load.
To opt out of automatic selection, set an explicit percentage. Switching between 100% and Auto in either direction requires a machine restart, because it changes the QoS class, and the other transitions apply on the fly.
Sizing policy
An administrator can restrict the resource combinations available to machines of a certain class by setting a sizing policy in the .spec.sizingPolicies parameter of the VirtualMachineClass resource. If there’s no policy, resources are set freely.
The policy splits the number of cores into ranges and sets the allowed amount of memory and the allowed coreFraction values for each of them:
spec:
  sizingPolicies:
    - cores:
        min: 1
        max: 4
      memory:
        min: 1Gi
        max: 8Gi
      coreFractions: [5, 10, 20, 50, 100]
    - cores:
        min: 5
        max: 8
      memory:
        min: 5Gi
        max: 16Gi
      coreFractions: [20, 50, 100]
With such a policy, a machine with two cores falls into the first range, gets from 1 to 8 GiB of memory and one of the values 5%, 10%, 20%, 50%, or 100%. A machine with six cores falls into the second range, where 5 to 16 GiB of memory is available and the core fraction is 20%, 50%, or 100%.
The policy also limits oversubscription. For example, the minimum value coreFraction: 20% guarantees each machine one fifth of a core, which means oversubscription doesn’t exceed 5 to 1.
If the machine configuration doesn’t match the policy, the SizingPolicyMatched condition with the False status appears in the status. Such a machine keeps running, but you can’t save changes to its configuration until the resources are brought in line with the policy. The same happens when an administrator changes the policy of a class whose machines are already running.
Besides the bounds, a range can set a grid step in the cores.step and memory.step parameters, and memory bounds per single core in the memory.perCore block.
A request that violates the policy is rejected with a message that names the parameter and the allowed values. Every message ends with the hint check the sizing policy of the VirtualMachineClass or contact the administrator for more information, which is omitted below.
For the supercpu class with the policy above, the messages look like this:
- the number of cores is outside all ranges,
cores: 10:does not match any sizing policy of VirtualMachineClass "supercpu": its 10 CPU core(s) fall outside the allowed ranges (1-4, 5-8); set the number of cores (spec.cpu.cores) accordingly; - an unsupported core fraction,
cores: 2andcoreFraction: 30%:the CPU core fraction "30%" is not allowed; set the core fraction (spec.cpu.coreFraction) to one of: 5%, 10%, 20%, 50%, 100%; - memory outside the range,
cores: 2andsize: 16Gi:the memory size (16Gi) is out of the range allowed by the sizing policy; set the memory size (spec.memory.size) between 1Gi and 8Gi.
If a range defines a step or per-core memory bounds, four more messages become possible:
- cores off the step grid:
the number of CPU cores (7) does not match the sizing policy step; set the number of cores (spec.cpu.cores) to 6 or 8; - memory off the step grid:
the memory size (1536Mi) does not match the sizing policy step; set the memory size (spec.memory.size) to 1Gi or 2Gi; - memory per core outside the range:
the memory size (18Gi) is not allowed for 6 CPU core(s); set the memory size (spec.memory.size) between 6Gi and 12Gi, or change the number of cores (spec.cpu.cores) (the sizing policy allows between 1Gi and 2Gi of memory per core); - memory per core off the step grid:
the memory size (2560Mi) does not match the per-core sizing policy step for 2 CPU core(s); set the memory size (spec.memory.size) to 2Gi or 4Gi, or change the number of cores (spec.cpu.cores).
When there are several violations, all the reasons are listed in one message under the does not match the sizing policy of VirtualMachineClass "supercpu" for several reasons: heading.
CPU topologies
The topology determines how the CPU cores of a machine are distributed across sockets, and compatibility with applications sensitive to the CPU configuration depends on it. You set only the total number of cores in the .spec.cpu.cores parameter, and DP calculates the number of sockets itself:
spec:
  cpu:
    cores: 20
The more cores there are, the more sockets they’re split across, and the larger the step with which you can change their number. The total number of cores has to be a multiple of the number of sockets, otherwise the request is rejected.
| Number of cores | Sockets | Multiple of | Cores per socket |
|---|---|---|---|
1 ≤ cores ≤ 16 |
1 | 1 | 1 to 16 |
16 < cores ≤ 32 |
2 | 2 | 9 to 16 |
32 < cores ≤ 64 |
4 | 4 | 9 to 16 |
64 < cores ≤ 248 |
8 | 8 | 9 to 31 |
For example, 20 cores give two sockets of 10 cores, and 80 cores give eight sockets of 10. The maximum for one machine is 248 cores.
DP publishes the calculated topology in the status:
status:
  resources:
    cpu:
      topology:
        coresPerSocket: 10
        sockets: 2
The memory overhead depends on the actually active cores and amounts to 8 MiB per logical core, that is, per the product of the number of sockets, cores per socket, and threads per core.
Configuring the OS type and bootloader
The osType parameter defines the operating system type and applies the optimal set of virtual devices and parameters for a virtual machine (VM) to work correctly.
Supported values:
Generic(default): For Linux and other operating systems. The standard virtual device configuration is used.Windows: For Microsoft Windows operating systems. Automatically enables Hyper-V features, a TPM device, and other settings optimized for Windows.Legacy: For operating systems without built-in AHCI and virtio drivers: Windows XP, Windows 2000, Windows Server 2003, DOS-era systems, and Linux with a kernel older than 2.6.19. Such a VM gets the i440fx chipset, and withenableParavirtualization: falseit also gets the IDE bus for disks and CD-ROM and the RTL8139 network adapter, whose drivers these operating systems have.
A virtual machine gets an emulated TPM whose state is kept in memory and isn’t persisted. When the VM restarts or migrates, the TPM state is reset. Keep this limitation in mind when using Windows security features that depend on TPM.
The set of virtual devices the guest OS sees:
| Device | Generic |
Windows |
Legacy |
|---|---|---|---|
| Chipset | q35 | q35 | i440fx |
| Bootloader | BIOS, EFI, EFIWithSecureBoot |
BIOS, EFI, EFIWithSecureBoot |
BIOS only |
| Disk bus | virtio-scsi, SATA with enableParavirtualization: false |
virtio-scsi, SATA with enableParavirtualization: false |
virtio-blk, IDE with enableParavirtualization: false |
| CD-ROM bus | virtio-scsi, SATA with enableParavirtualization: false |
virtio-scsi, SATA with enableParavirtualization: false |
IDE |
Block devices in .spec.blockDeviceRefs |
up to 16 | up to 16 | up to 16, up to 4 with enableParavirtualization: false |
| Network adapter | virtio-net, e1000 with enableParavirtualization: false |
virtio-net, e1000 with enableParavirtualization: false |
virtio-net, RTL8139 with enableParavirtualization: false |
| USB controller | xHCI (USB 3.0) | xHCI (USB 3.0) | UHCI (USB 1.1) |
| TPM | no | TPM 2.0 | no |
| Random number generator | virtio-rng | no | no |
| Hyper-V features | no | yes | no |
| Attaching disks on the fly | yes | yes | only with enableParavirtualization: true and only if the guest OS has the virtio-scsi driver |
| Changing CPU and memory on the fly | yes | yes | no |
USB device passthrough works for Legacy, but the UHCI controller is limited to the USB 1.1 speed of 12 Mbps, so fast storage in such a VM hits the bus limit.
Choose Legacy when the guest operating system can’t work with an AHCI controller, not just because it’s old. For Linux with kernel 2.6.19 and newer, osType: Generic with enableParavirtualization: false is a fit, because there’s no four-device limit there and attaching disks on the fly through VirtualMachineBlockDeviceAttachment remains available.
For Legacy, the following isn’t available:
- Changing the number of CPU cores and the amount of memory on a running VM, because these guest operating systems don’t bring them into service. The change is accepted, the VM shows it in
.status.restartAwaitingChangesalong with theAwaitingRestartToApplyConfigurationcondition, and it applies after a restart. - Changing the contents of
.spec.blockDeviceRefson a running VM, because these disks stay static in both paravirtualization modes, so add a block device before the VM starts. - The
EFIandEFIWithSecureBootbootloaders, as well as initialization (cloud-initand Sysprep), because these guest operating systems don’t support them. - Guest OS information in the VM status and file system information.
You can install the QEMU guest agent in such an OS from an archived virtio-win release, and the VM does show AgentReady, but its version is too old for DP. The VM gets the AgentVersionNotSupported condition, guest OS information isn’t collected, and there’s nothing to update the agent to.
A snapshot with requiredConsistency: true also doesn’t complete successfully, but for a different reason. DP requests a file system freeze, and the agent replies that the command is disabled in its build with the guest-fsfreeze-status has been disabled for this instance message. On Windows, the freeze goes through the VSS provider, which isn’t in this build. The snapshot waits in the InProgress phase for about ten minutes and moves to Failed, so set requiredConsistency: false for such VMs.
With enableParavirtualization: false, one more limitation applies. There can be no more than four block devices in total, because the IDE bus provides two channels with two devices each.
Example configuration for a Windows XP virtual machine:
spec:
  osType: Legacy
  bootloader: BIOS
  enableParavirtualization: false
  # other parameters...
The bootloader parameter defines the bootloader type of the virtual machine:
BIOS(default): Uses the legacy BIOS.EFI: Uses the Unified Extensible Firmware Interface (UEFI/EFI).EFIWithSecureBoot: Uses UEFI/EFI with Secure Boot support.
Example configuration for a Windows virtual machine:
spec:
  osType: Windows
  bootloader: EFI
  # other parameters...
Example configuration for a Linux virtual machine (you can omit the default values):
spec:
  osType: Generic
  bootloader: BIOS
  # other parameters...
For modern Linux distributions, choose bootloader: EFI, and for Windows, choose bootloader: EFI or bootloader: EFIWithSecureBoot.
EFIWithSecureBoot needs a persistent volume for the Secure Boot state, and creating it needs a default StorageClass in the cluster. If there’s none, the virtual machine doesn’t start and stays in the Pending state, and its status says that the default StorageClass isn’t found. As soon as a default StorageClass appears, the machine starts automatically.
The enableParavirtualization parameter controls the use of the virtio bus for attaching the virtual devices of the VM. A change to this parameter takes effect only after the VM restarts.
true(default): Thevirtiobus is used for disks, network interfaces, and other devices, which gives better performance. You can change the contents of.spec.blockDeviceRefson a running VM without a restart, adding and removing devices, if the disk is available on the node where the VM runs.false: Standard device emulation is used (SATA for disks, e1000 for network interfaces; IDE and RTL8139 for theLegacyOS type), which may be required for compatibility with older operating systems that lackVirtIOdrivers. Changes to.spec.blockDeviceRefson a running VM (adding and removing disks and images, including ISO) take effect after the VM restarts. To attach and detach disks without a restart, use the VirtualMachineBlockDeviceAttachment (vmbda) resource, without changing the list in the VM specification.
To use the paravirtualization mode (virtio), some operating systems require the matching drivers to be installed. If the drivers aren’t installed, the VM may fail to boot or the devices may work incorrectly.
For the Legacy OS type, the default value true isn’t a fit, because these operating systems have no built-in virtio drivers, so for a VM you’re going to install from the original media, set enableParavirtualization: false, otherwise the installer reports that it found no hard drives. A warning is issued when creating and modifying such a VM.
Keep enableParavirtualization: true for a VM with the Legacy OS type only when the virtio drivers are already installed in the guest OS. Then the VM keeps the i440fx chipset and the BIOS bootloader, but gets disks on virtio-blk, the virtio-net adapter, and loses the four-device limit. The CD-ROM stays on the IDE bus, because virtio-blk has no drive.
To switch a system that’s already installed:
- Install the virtio drivers in the guest OS. For Windows XP, 2000, and Server 2003, take an archived virtio-win release, because the current releases no longer contain drivers for these systems, and install
viostor, the virtio-blk driver. The package has no virtio-scsi driver for these operating systems. - Power off the VM.
- Set
enableParavirtualization: true. - Start the VM.
The order of the steps matters. The disk controller driver has to appear in the guest OS before the switch, not after, because the VM boots from that very controller. If the VM doesn’t boot after the switch, set enableParavirtualization: false back and restart it. The disks return to the IDE bus and the guest OS boots as before.
Example configuration with paravirtualization disabled:
spec:
  enableParavirtualization: false
  # other parameters...
VM initialization scripts
Initialization scripts are designed for the initial configuration of a virtual machine when it starts.
The following initialization scripts are supported:
Cloud-Init
Cloud-Init is a tool for automatically configuring virtual machines at first boot. It performs a wide range of configuration tasks without manual intervention.
The Cloud-Init configuration is written in YAML and has to start with the #cloud-config header at the beginning of the configuration block. For other possible headers and their purpose, see the official cloud-init documentation.
Key Cloud-Init capabilities:
- creating users, setting passwords, adding SSH keys for access;
- automatically installing the required software at first boot;
- running arbitrary commands and scripts to configure the system;
- automatically starting and enabling system services (for example,
qemu-guest-agent).
Here are the typical scenarios.
-
Adding an SSH key for a preinstalled user that may already be present in a cloud image (for example, the
ubuntuuser in official Ubuntu images). The name of such a user depends on the image. Check it in the documentation for your distribution.#cloud-config ssh_authorized_keys: - ssh-rsa AAAAB3NzaC1yc2EAAAADAQABAAABAQD... your-public-key ... -
Creating a user with a password and an SSH key:
#cloud-config
users:
  - name: cloud
    passwd: <PASSWORD_HASH>
    lock_passwd: false
    sudo: ALL=(ALL) NOPASSWD:ALL
    shell: /bin/bash
    ssh-authorized-keys:
      - ssh-rsa AAAAB3NzaC1yc2EAAAADAQABAAABAQD... your-public-key ...
ssh_pwauth: True
Where
<PASSWORD_HASH>is the password hash in quotes, generated with themkpasswd --method=SHA-512 --rounds=4096command. -
Installing packages and services:
#cloud-config
package_update: true
packages:
  - nginx
  - qemu-guest-agent
runcmd:
  - systemctl daemon-reload
  - systemctl enable --now nginx.service
  - systemctl enable --now qemu-guest-agent.service
The following example shows how to pass the script to a virtual machine:
- Using the CLI
- Using the web interface
You can embed a Cloud-Init script directly into the virtual machine specification, but such a script is limited to 2048 bytes:
spec:
  provisioning:
    type: UserData
    userData: |
      #cloud-config
      package_update: true
      ...
For longer scripts or scripts with private data, create the virtual machine initialization script in a Secret resource. Here is an example of a Secret resource with a Cloud-Init script:
apiVersion: v1
kind: Secret
metadata:
  name: cloud-init-example
data:
  userData: <base64 data>
type: provisioning.virtualization.deckhouse.io/cloud-init
A fragment of the virtual machine configuration that uses a Cloud-Init initialization script stored in a Secret resource:
spec:
  provisioning:
    type: UserDataRef
    userDataRef:
      kind: Secret
      name: cloud-init-example
The value of the
.data.userDatafield has to be Base64-encoded. To encode it, use thebase64 -w 0orecho -n "content" | base64command.
- Go to the Projects tab and select the project you need.
- Go to Virtualization → Virtual machines.
- Create a virtual machine or select an existing one and click its name.
- On the Configuration tab, scroll down to the Cloud-init toggle and enable it.
- Select the input mode:
- Basic setup: Fill in the Username, Password, and Public SSH key fields, and enable the Unrestricted sudo access toggle if required. DP builds the cloud-init configuration itself.
- Editing: Enter the cloud-init configuration manually in the Parameters field. The used volume is shown below the field (no more than 2048 bytes). In the Linked secret field, you can select an existing initialization script, and its contents load into the field. If no secret is linked, the configuration is stored in the VM specification.
- Click the Save button that appears (or Create when creating the VM).
You can store a script as a separate resource and reuse it for several VMs. To create such a resource:
- Go to the Projects tab and select the project you need.
- Go to Virtualization → Initialization scripts.
- Click Create.
- In the Name field, enter the script name, and in the Type field, select
cloud-initorsysprep. - In the Files block, set the key in the File name field (
userDataby default), and enter the contents manually, drag a file to the field, or click it to upload a file. - Click Create.
The Initialization scripts section shows secrets of the provisioning.virtualization.deckhouse.io/* type, each with its name, type (cloud-init or sysprep), the list of keys, and the resource age. To make a virtual machine use such a script, reference it in the .spec.provisioning.userDataRef parameter.
Sysprep
To configure virtual machines running Windows with Sysprep, only the Secret resource option is supported.
Here is an example of a Secret resource with a Sysprep script:
apiVersion: v1
kind: Secret
metadata:
  name: sysprep-example
data:
  unattend.xml: <base64 data>
type: provisioning.virtualization.deckhouse.io/sysprep
The value of the .data.unattend.xml field has to be Base64-encoded. To encode it, use the base64 -w 0 or echo -n "content" | base64 command.
A fragment of the virtual machine configuration that uses a Sysprep initialization script in a Secret resource:
spec:
  provisioning:
    type: SysprepRef
    sysprepRef:
      kind: Secret
      name: sysprep-example
Guest OS agent
Install QEMU Guest Agent in the guest system so that DP can interact with the operating system inside the VM. The agent is needed for three things:
- it makes consistent disk and VM snapshots possible;
- it reports information about the running system, and that information lands in the
.status.guestOSInfoblock; - it shows that the operating system has actually booted, rather than just the virtual machine having started.
DP works with qemu-guest-agent version 5.2.0 and later. To check the installed version, run the following command:
qemu-guest-agent --versionGuest system information looks like this:
status:
  guestOSInfo:
    id: fedora
    kernelRelease: 6.11.4-301.fc41.x86_64
    kernelVersion: "#1 SMP PREEMPT_DYNAMIC Sun Oct 20 15:02:33 UTC 2024"
    machine: x86_64
    name: Fedora Linux
    prettyName: Fedora Linux 41 (Cloud Edition)
    version: 41 (Cloud Edition)
    versionId: "41"
The AGENT column shows whether the agent is running:
d8 k get vm -o wideExample output:
NAME     PHASE     UPTIME   CORES   COREFRACTION   MEMORY   NEED RESTART   AGENT   MIGRATABLE   NODE           IPADDRESS    AGE
fedora   Running   5d21h    6       5%             8000Mi   False          True    True         virtlab-pt-1   10.66.10.1   5d21h
Install the agent with the command for your distribution and start the service:
# Debian and derivatives.
sudo apt install qemu-guest-agent

# CentOS and derivatives.
sudo yum install qemu-guest-agent

sudo systemctl enable --now qemu-guest-agent
For Linux, it’s convenient to automate the installation with an initialization script:
#cloud-config
package_update: true
packages:
  - qemu-guest-agent
runcmd:
  - systemctl enable --now qemu-guest-agent.service
The agent doesn’t need any configuration after installation. If your snapshots need application data consistency, put the preparation scripts in the /etc/qemu-ga/hooks.d/ directory on Debian and Ubuntu, or /etc/qemu/fsfreeze-hook.d/ on RHEL, CentOS, and Fedora. The scripts have to be executable, and the agent runs them before the file system freeze and after the thaw, so you don’t have to stop the application services.
Connecting to a virtual machine
You can connect to a virtual machine (VM) in four ways. The first is a remote management protocol such as SSH, which you configure in the guest OS yourself. The second is the serial console. The third is VNC. The fourth is SPICE, if it is enabled for the machine.
- Using the CLI
- Using the web interface
Serial console:
d8 v console linux-vmExample output:
Successfully connected to linux-vm console. The escape sequence is ^]
linux-vm login: cloud
Password: cloud
To exit the console, press Ctrl+].
Connecting over VNC:
d8 v vnc linux-vmConnecting over SPICE:
d8 v spice linux-vmConnecting over SSH:
d8 v ssh cloud@linux-vm- Go to the Projects tab and select the project you need.
- Go to Virtualization → Virtual machines.
- Select the VM you need from the list and click its name.
- Go to the TTY tab to work with the serial console, or to the VNC tab to connect over VNC.
The serial console and VNC are exclusive, only one user works in them, and a new connection disconnects whoever is already working with the machine.
Before connecting, d8 v console and d8 v vnc report who took the stream and since when, and offer a choice:
The serial console of linux-vm is in use:
  user       serviceaccount default/alice
  connected  12 minutes ago (14:32), from the d8 v command line

Connect and disconnect them? [y] yes  [N] no  [w] wait until free:
The w answer means waiting until the other user disconnects and connecting automatically. Pressing Enter cancels the connection, because the safe option is selected by default. The --force flag connects without asking, and it’s also what you need for a non-interactive run in a script.
The serial console doesn’t resize the terminal automatically. If the command output wraps incorrectly, set the size manually with the stty rows <ROWS> cols <COLUMNS> command, for example stty rows 50 cols 200. When the xterm package is installed in the system, the resize command does the same job.
SPICE
SPICE is a second remote display protocol that, unlike VNC, brings the sound of the guest system, redirects USB devices from your computer into it, and shares a clipboard with it. It works alongside VNC, so open VNC sessions and the web interface keep working.
SPICE is disabled by default. To turn it on, set the .spec.spice.enabled parameter and restart the machine:
spec:
  spice:
    enabled: true
Together with SPICE, the machine gets a virtio-gpu video adapter. If the guest system has no driver for it, as in Windows 7 and Windows XP, set another adapter model with the virtualization.deckhouse.io/video annotation, using the vga, bochs, or ramfb value.
A shared clipboard, a resize to the client window, and a local cursor are added by the SPICE guest agent. Install it in the guest system, on Linux it’s the spice-vdagent package, on Windows it’s spice-guest-tools.
Connecting requires the remote-viewer client from the virt-viewer package, and the d8 v spice command opens it for you. If you don’t have such a client, run the proxy alone and connect with your own client to the port the command prints:
d8 v spice linux-vm --proxy-onlyThe SPICE display is exclusive the same way the serial console and VNC are, and d8 v spice warns you before disconnecting whoever is already connected.
SPICE reserves memory whether a client is connected or not. This memory is part of the machine overhead, so on the node the machine takes more memory than its specification asks for.
Startup policy and VM state management
The startup policy determines how DP maintains the machine state. It’s set by the .spec.runPolicy parameter:
AlwaysOnUnlessStoppedManually: The default option. The machine always runs, and you can stop it only manually.AlwaysOn: The machine always runs, and even after a shutdown from the guest OS DP starts it again.Manual: You manage the machine state yourself.AlwaysOff: The machine is always off, and you can’t start it.
You can manage the machine state in two ways, by creating a VirtualMachineOperation resource or by using the d8 utility. The resource describes the action declaratively, and the utility creates the same resource for you.
d8 command |
Operation type | Action |
|---|---|---|
d8 v stop |
Stop |
Stop the VM |
d8 v start |
Start |
Start the VM |
d8 v restart |
Restart |
Restart the VM |
d8 v evict |
Evict |
Evict the VM to another node |
d8 v migrate |
Migrate |
Migrate the VM to another node |
The following example shows how to perform an operation on a virtual machine:
- Using the CLI
- Using the web interface
The easiest way to restart a machine is with the d8 utility:
d8 v restart linux-vmThe same operation with a resource:
d8 k create -f - <<EOF
apiVersion: virtualization.deckhouse.io/v1alpha2
kind: VirtualMachineOperation
metadata:
  generateName: restart-linux-vm-
spec:
  virtualMachineName: linux-vm
  # Type of the operation to perform.
  type: Restart
EOF
The list of operations shows the result:
d8 k get virtualmachineoperation

# Short form of the command.
d8 k get vmop
The startup policy is set on the machine page:
- Go to the Projects tab and select the project you need.
- Go to Virtualization → Virtual machines.
- Select the VM you need from the list and click its name.
- On the Configuration tab, scroll down to the Life cycle section.
- Select the policy you need from the Startup policy list.
Operations are available from the machine list:
- Go to Virtualization → Virtual machines.
- Select the virtual machine you need from the list and click the ellipsis button.
- In the menu that opens, select the operation.
Only one operation runs at a time for a single machine. A new operation either supersedes the active one or fails, and which of the two happens depends on the pair of types:
| Active operation | What can supersede it |
|---|---|
Start |
Stop |
Stop or Restart without force |
Stop or Restart with force: true |
Migrate, Evict |
Stop, Restart |
Stop or Restart with force: true |
nothing |
A superseded operation moves to the Superseded phase. An operation that can’t supersede the active one moves to the Failed phase, so you have to create it again after the active one finishes. Restore and clone operations don’t supersede other operations.
Changing the VM configuration
You can change the configuration of a virtual machine (VM) at any time after creation. On a powered-off machine, the changes apply right away, and on a running one it depends on what exactly you changed.
| Configuration block | How it applies on a running VM |
|---|---|
.metadata.labels |
Right away, and it propagates to the VM pod |
.metadata.annotations |
Right away, and it propagates to the VM pod |
.spec.liveMigrationPolicy |
Right away |
.spec.runPolicy |
Right away |
.spec.disruptions.restartApprovalMode |
Right away |
.spec.affinity |
Right away in commercial DP editions, a restart is required in DP Open |
.spec.nodeSelector |
Right away in commercial DP editions, a restart is required in DP Open |
.spec.cpu.cores |
Without a restart if changing the number of cores without a restart is enabled in commercial DP editions, otherwise a restart is required |
.spec.networks |
Adding and removing networks applies on a running VM if the guest OS supports attaching interfaces on the fly |
Other .spec fields |
A restart is required |
The following example shows how to change the configuration of a virtual machine:
- Using the CLI
- Using the web interface
The following example changes the number of cores.
-
Check how many cores the guest OS sees now:
d8 v ssh cloud@linux-vm --command "nproc"Example output:
1 -
Set the new number of cores:
d8 k patch vm linux-vm --type merge -p '{"spec":{"cpu":{"cores":2}}}' # You can achieve the same result by editing the resource. d8 k edit vm linux-vm -
Verify that the change is accepted but not applied yet. The guest OS still sees one core, and the list of pending changes isn’t empty:
d8 k get vm linux-vm -o jsonpath="{.status.restartAwaitingChanges}" | jq .Example output:
[
  {
    "currentValue": 1,
    "desiredValue": 2,
    "operation": "replace",
    "path": "cpu.cores"
  }
]
The
NEED RESTARTcolumn shows the same:d8 k get vm linux-vm -o wideExample output:
NAME PHASE UPTIME CORES COREFRACTION MEMORY NEED RESTART AGENT MIGRATABLE NODE IPADDRESS AGE linux-vm Running 5m16s 2 100% 1Gi True True True virtlab-pt-1 10.66.10.13 5m16s -
Restart the machine:
d8 v restart linux-vm -
Check the result. After the restart, the
.status.restartAwaitingChangesblock is empty and the guest OS sees two cores:d8 v ssh cloud@linux-vm --command "nproc"Example output:
2
By default, you confirm the restart. To make DP apply the changes itself, set the .spec.disruptions.restartApprovalMode parameter to Automatic:
spec:
  disruptions:
restartApprovalMode: Automatic- Go to the Projects tab and select the project you need.
- Go to Virtualization → Virtual machines.
- Select the VM you need from the list and click its name.
- Make the changes on the Configuration tab. If the machine has to be restarted, DP shows a warning and the list of pending changes.
- To make the changes apply without your confirmation, scroll down to the Life cycle section, enable the Auto-apply changes toggle, and click Save.
Changing the number of cores without a restart
You can change the number of cores of a running machine without rebooting it, if the change is applicable through live migration. Within the current CPU topology, you can both add and remove cores.
The feature is disabled by default. To enable it, an administrator adds HotplugCPUWithLiveMigration to the .spec.settings.featureGates parameter:
kind: ModuleConfig
metadata:
  name: virtualization
spec:
  settings:
    featureGates:
      - HotplugCPUWithLiveMigration
In the web interface, the same toggle is called Change CPU without reboot and is located in the Experimental features block on the System tab, in Deckhouse → Modules → virtualization → Configuration. Only a DP administrator has the rights for this.
When the feature is enabled and the new .spec.cpu.cores value stays within the current topology, DP applies the change by live migration. If the change requires a different topology, the machine has to be rebooted. The topology calculation rules are described in CPU topologies.
- Using the CLI
- Using the web interface
Set the new number of cores:
d8 k patch vm linux-vm --type merge -p '{"spec":{"cpu":{"cores":4}}}'- Go to the Projects tab and select the project you need.
- Go to Virtualization → Virtual machines.
- Select the VM you need from the list and click its name.
- On the Configuration tab, in the Resources section, set the new value in the CPU cores field.
- Click the Save button that appears.
The guest OS doesn’t always bring new cores into service on its own, especially after a live migration. In Linux, a core is brought online through sysfs:
echo 1 > /sys/devices/system/cpu/cpu1/onlineTo make this happen automatically, add a udev rule:
cat <<'EOF' > /etc/udev/rules.d/99-hotplug-cpu.rules
SUBSYSTEM=="cpu",ACTION=="add",RUN+="/bin/sh -c '[ ! -e /sys$devpath/online ] || echo 1 > /sys$devpath/online'"
EOF
The cores brought into service appear in the output of nproc, cat /proc/cpuinfo, and top.
When you reduce the number of cores within the current topology, the distribution of cores across sockets is preserved.
Changing the amount of memory without a restart
You can increase the amount of memory of a running machine without rebooting it. Reducing it requires a restart.
The feature is disabled by default. To enable it, an administrator adds HotplugMemoryWithLiveMigration to the .spec.settings.featureGates parameter:
kind: ModuleConfig
metadata:
  name: virtualization
spec:
  settings:
    featureGates:
      - HotplugMemoryWithLiveMigration
In the web interface, the toggle is called Change memory without reboot and is located in the same place, in the Experimental features block of the module settings.
When the feature is enabled, the new .spec.memory.size value is greater than the current one, and the machine allows migration, DP applies the change by live migration. A restart is required if the memory is reduced, if the original size is less than 1 GiB, or if the machine can’t be migrated. Without a restart, memory grows up to 256 GiB, the ceiling built into the machine configuration at first start.
- Using the CLI
- Using the web interface
Set the new memory size:
d8 k patch vm linux-vm --type merge -p '{"spec":{"memory":{"size":"4Gi"}}}'- Go to the Projects tab and select the project you need.
- Go to Virtualization → Virtual machines.
- Select the VM you need from the list and click its name.
- On the Configuration tab, in the Resources section, set the new value in the Memory size field.
- Click the Save button that appears.
As with cores, the guest OS may not bring new memory blocks into service on its own. In Linux, a block is brought online through sysfs, and the device name is visible in the lsmem output or in the /sys/bus/memory/devices/ directory:
echo 1 > /sys/bus/memory/devices/memoryXXX/onlineTo make this happen automatically, add a udev rule:
cat <<'EOF' > /etc/udev/rules.d/99-hotplug-memory.rules
SUBSYSTEM=="memory",ACTION=="add",DEVPATH=="/devices/system/memory/memory[0-9]*", TEST=="state", ATTR{state}!="online", ATTR{state}="online"
EOF
Placing VMs on nodes
Four mechanisms control where exactly a virtual machine (VM) starts:
.spec.nodeSelector: The simplest way, it selects nodes with the required labels..spec.affinity.nodeAffinity: Sets the preferred nodes for placement..spec.affinity.virtualMachineAndPodAffinity: Places the machine next to other machines and workloads..spec.affinity.virtualMachineAndPodAntiAffinity: On the contrary, spreads them across different nodes.
Conditions can be hard or soft. A hard requiredDuringSchedulingIgnoredDuringExecution condition is mandatory, and the machine doesn’t start if there’s no suitable node. A soft preferredDuringSchedulingIgnoredDuringExecution condition is taken into account by the scheduler where possible.
All rules, including .spec.nodeSelector from the VM class, apply together. If at least one hard condition can’t be met, the machine stays in the Pending phase. So set consistent rules, prefer combinations of labels over single hard restrictions, and keep spare nodes for critical workloads. Also consider the startup order: if one machine has to end up next to another, the second one has to start first. If the nodes you need have taints, add the matching tolerations to the machine.
When you change the placement rules of a running machine and its current node no longer meets the new requirements, in commercial editions DP moves the machine by live migration, and in DP Open the changes apply only after a reboot. A machine that already meets the new requirements stays where it is.
To set the placement rules in the web interface:
- Go to the Projects tab and select the project you need.
- Go to Virtualization → Virtual machines.
- Select the VM you need from the list and click its name.
- On the Configuration tab, scroll down to the VM placement toggle.
- Select the input mode. In the Basic setup mode, the rules are set with the Co-location and Separate placement toggles, and in the Editing mode, the placement block is set manually as YAML.
- Enable the toggle you need and fill in the fields. The Select rule mode field offers Required (
requiredDuringSchedulingIgnoredDuringExecution) and Preferred (preferredDuringSchedulingIgnoredDuringExecution), and the Placement rule field offers placement relative to other VMs or relative to node labels. - Click the Save button that appears.
Tolerance to node restrictions
Tolerations let a VM start on nodes with restrictions (taints) that otherwise block scheduling. This is useful when you need to run VMs on special nodes (for example, test nodes) or nodes with certain characteristics.
Here is an example of using tolerations to allow a start on nodes with the node.deckhouse.io/group=:NoSchedule taint:
spec:
  tolerations:
    - key: "node.deckhouse.io/group"
      operator: "Exists"
      effect: "NoSchedule"
Each element of the tolerations list has to match a taint on the node for the VM to be placed on that node.
To view information about cluster nodes (including taints), you need a user role with access to cluster-level resources.
To view the taints on cluster nodes, run the following command:
d8 k get nodes -o custom-columns=NAME:.metadata.name,TAINTS:.spec.taintsTo view detailed information about a node, run the following command:
d8 k describe node <NODE_NAME>Simple label binding (nodeSelector)
nodeSelector is the simplest way to control the placement of virtual machines using a set of labels. It lets you specify which nodes virtual machines can start on by selecting nodes with the required labels.
spec:
  nodeSelector:
    disktype: ssd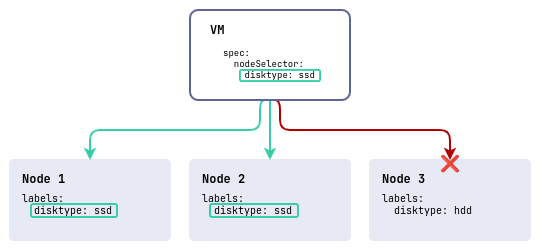
In this example, the cluster has three nodes, two of them with fast disks (disktype=ssd) and one with slow ones (disktype=hdd). The virtual machine is placed only on nodes that have the disktype label with the ssd value.
To perform the operation in the web interface in the placement section:
- Enable the Co-location toggle.
- In the Select rule mode field, select Required.
- In the Placement rule field, select On selected nodes.
- In the How to identify the node group field, select By labels and specify the node labels (for example,
disktype: ssd); the By name option lets you select specific nodes. - Click the Save button that appears.
Preferred binding (Affinity)
Affinity provides more flexible and powerful tools compared to nodeSelector. It lets you set “preferences” and “requirements” for the placement of virtual machines. Affinity supports two kinds: nodeAffinity and virtualMachineAndPodAffinity.
nodeAffinity defines the nodes to run a VM on using label selector expressions.
Here is an example of using nodeAffinity with a hard rule:
spec:
  affinity:
    nodeAffinity:
      requiredDuringSchedulingIgnoredDuringExecution:
        nodeSelectorTerms:
          - matchExpressions:
              - key: disktype
                operator: In
                values:
                  - ssd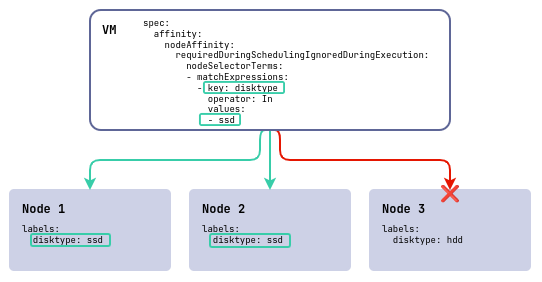
In this example, the cluster has three nodes, two of them with fast disks (disktype=ssd) and one with slow ones (disktype=hdd). The virtual machine is placed only on nodes that have the disktype label with the ssd value.
If you use a soft requirement (preferredDuringSchedulingIgnoredDuringExecution), then when there are no resources to run the VM on nodes with disktype=ssd disks, it’s scheduled on a node with disktype=hdd disks.
virtualMachineAndPodAffinity controls the placement of virtual machines relative to other virtual machines. It lets you set a preference for placing virtual machines on the same nodes where certain virtual machines are already running.
Here is an example of a soft rule:
spec:
  affinity:
    virtualMachineAndPodAffinity:
      preferredDuringSchedulingIgnoredDuringExecution:
        - weight: 1
          podAffinityTerm:
            labelSelector:
              matchLabels:
                server: database
            topologyKey: "kubernetes.io/hostname"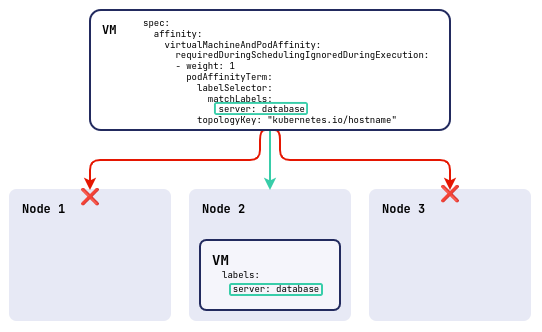
In this example, the virtual machine is placed only on nodes that already run a virtual machine with the server: database label. The rule is soft (preferred), so if there are no such nodes, the machine starts on any suitable one.
To place VMs across availability zones (instead of pinning them to specific nodes), set topologyKey: topology.kubernetes.io/zone (Placing VMs across availability zones).
To set “preferences” and “requirements” for the placement of virtual machines in the web interface, in the placement section:
- Enable the Co-location toggle, which corresponds to the
spec.affinity.virtualMachineAndPodAffinitysettings. - In the Select rule mode field, select Required or Preferred.
- In the Placement rule field, select On nodes with selected VMs.
- In the Select labels field, select the labels of the VMs you need from the list or enter your own in the
key: valueformat. - Click the Save button that appears.
Avoiding co-location (AntiAffinity)
AntiAffinity is used to prevent VMs from being placed together on nodes. It’s useful for fault tolerance or load balancing.
Be careful with hard requirements in small clusters that have few nodes to run virtual machines on. If the virtualMachineAndPodAntiAffinity parameter with the requiredDuringSchedulingIgnoredDuringExecution type is used for virtual machines, it means that each VM copy has to be placed on a separate node. With a limited number of nodes in the cluster, this can lead to a situation where some VMs can’t start because of a lack of available nodes.
The terms Affinity and AntiAffinity describe the relationships between virtual machines. There’s no such antonym for nodes, but you can achieve the same result through nodeAffinity with the NotIn operator, excluding the nodes you need.
Here is an example of using virtualMachineAndPodAntiAffinity:
spec:
  affinity:
    virtualMachineAndPodAntiAffinity:
      requiredDuringSchedulingIgnoredDuringExecution:
        - labelSelector:
            matchLabels:
              server: database
          topologyKey: "kubernetes.io/hostname"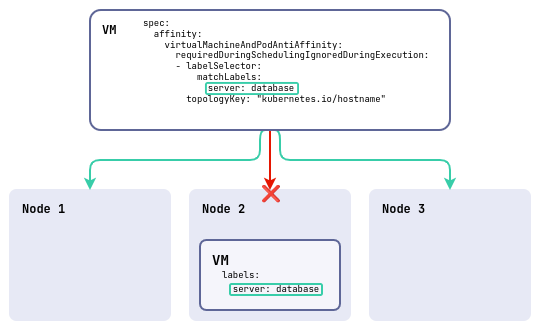
In this example, the virtual machine being created isn’t placed on the same node as a virtual machine with the server: database label.
To place VMs across availability zones (instead of pinning them to specific nodes), set topologyKey: topology.kubernetes.io/zone (Placing VMs across availability zones).
To configure the prevention of co-locating VMs on nodes in the web interface, in the placement section:
- Enable the Separate placement toggle, which corresponds to the
spec.affinity.virtualMachineAndPodAntiAffinitysettings. - In the Select rule mode field, select Required or Preferred.
- In the Placement rule field, select On nodes with selected VMs.
- In the Select labels field, select the labels of the VMs you don’t want the machine placed next to, or enter your own label in the
key: valueformat. - Click the Save button that appears.
Placing VMs across availability zones
Placement rules work not only at the node level, but also at the availability zone level.
Availability zones have to be configured on the cluster nodes in advance. To do this, the nodes have to have the topology.kubernetes.io/zone label with the availability zone specified.
The examples above use topologyKey: "kubernetes.io/hostname", which places VMs on the same node. To place VMs across availability zones instead of nodes, use topologyKey: "topology.kubernetes.io/zone".
With Affinity and topologyKey: "topology.kubernetes.io/zone", VMs are placed in the same availability zone where a virtual machine with the specified labels is present.
With AntiAffinity and topologyKey: "topology.kubernetes.io/zone", VMs aren’t placed in the same availability zone as a virtual machine with the specified labels. This is useful for fault tolerance when distributing VMs across different availability zones.
To view the availability zones on cluster nodes (if those zones are set), run the following command:
d8 k get nodes -o custom-columns=NAME:.metadata.name,ZONE:.metadata.labels.topology\.kubernetes\.io/zoneAttaching block devices (disks and images)
You can attach disks and images to a virtual machine (VM). They’re described as block devices (BlockDevices).
Block device types and access modes:
| Block device type | Comment |
|---|---|
| VirtualImage | Attached in read-only mode, or as a CD-ROM for ISO images. |
| ClusterVirtualImage | Attached in read-only mode, or as a CD-ROM for ISO images. |
| VirtualDisk | Attached in read-write mode. |
There are two ways to attach devices:
- Through the VM specification (
.spec.blockDeviceRefs): The disks are listed in the VirtualMachine configuration, and the boot order is set for them (by position in the list or through thebootOrderfield). Recommended when configuring a VM manually, and when you need control over the boot order (for example, an ISO for OS installation). - Through VirtualMachineBlockDeviceAttachment (
vmbda): The disk is attached as a separate resource and doesn’t take part in the boot order. Disks are attached through thevirtio-scsibus, regardless of theenableParavirtualizationvalue. Recommended for automation and when you don’t have the rights to edit the VM.
With enableParavirtualization: true, both ways let you attach and detach disks on a running VM without a reboot, if the disk is available on the node where it runs. With enableParavirtualization: false, the contents of .spec.blockDeviceRefs on a running VM change only after a reboot; to attach and detach disks without a reboot, use VirtualMachineBlockDeviceAttachment (vmbda).
When paravirtualization is disabled (enableParavirtualization: false), the devices from .spec.blockDeviceRefs work on the SATA bus, and on the IDE bus for the Legacy OS type. On a running VM, changes to this list, including attaching and detaching an ISO image, take effect only after a reboot.
Disks attached through VirtualMachineBlockDeviceAttachment use the virtio-scsi bus and are attached without a reboot, if the guest OS has the driver for this bus. For the Legacy OS type with paravirtualization disabled, such an attachment is rejected, because the IDE bus doesn’t support attaching on the fly: add the device to .spec.blockDeviceRefs and restart the VM.
You can attach a disk to a running VM only when the storage is available on the cluster node where the virtual machine runs. When creating and updating a VM, and when creating a VirtualMachineBlockDeviceAttachment, the placement rules (nodeSelector, affinity, tolerations) of the volume, the virtual machine, and the VM class are taken into account, and they have to share at least one valid placement. If the VM is already running on a specific node, the new disk has to be available on that node.
While a live migration of the machine is preparing the target node, a disk can be neither attached nor detached. A new VirtualMachineBlockDeviceAttachment resource stays in the Pending phase with the BlockedByMigration reason in the Attached condition, and a deleted one stays in the Terminating phase, and both finish once the migration completes. While the migration is still queued and the target node isn’t being prepared yet, attaching and detaching work as usual.
Attaching through the VM specification
The devices listed in the machine specification are attached at startup and stay in place for the whole run. Their list is set in the .spec.blockDeviceRefs field of the VirtualMachine resource.
By default, the boot order matches the order of the devices in the list, and the optional bootOrder field lets you set it explicitly (a lower value means a higher priority). If bootOrder is specified for at least one device, only the devices with a set bootOrder get into the boot chain. Integers from 1 and up are allowed, unique within the list. When a device is removed from the list, the boot order is recalculated for the remaining devices.
A change to the order of devices in the list or to the bootOrder values takes effect after the VM reboots. For example, you can attach an ISO image for OS installation with the boot priority you need, and remove it from the list after the installation. If the VM has paravirtualization disabled (enableParavirtualization: false), edits to .spec.blockDeviceRefs on a running VM, including ones with an ISO image, apply after the VM reboots.
- Using the CLI
- Using the web interface
A fragment of the virtual machine configuration with block devices and an explicit boot order:
spec:
  blockDeviceRefs:
    - kind: VirtualDisk
      name: <VD_NAME>
      bootOrder: 1
    - kind: VirtualImage
      name: <VI_NAME>
      bootOrder: 2
To attach a disk to a running virtual machine, add it to the .spec.blockDeviceRefs list:
spec:
  blockDeviceRefs:
    - kind: VirtualDisk
      name: <VD_NAME>
    - kind: VirtualImage
      name: <VI_NAME>
    - kind: VirtualDisk
      name: <ADDITIONAL_DISK_NAME>
To detach a disk, remove it from the list. With enableParavirtualization: false, a change to the list on a running VM takes effect after the VM reboots.
- Go to the Projects tab and select the project you need.
- Go to Virtualization → Virtual machines.
- Select the VM you need from the list and click its name.
- On the Configuration tab, scroll down to the Disks section.
- The following actions are available in the disk list:
- Add: Attach a new disk or image to the VM.
- Eject: Detach the device from the VM (the image or disk stays in the project, and you can attach it again to this or another VM).
- Delete: Delete the image or disk resource itself from the cluster (after deletion, you can’t reuse it).
- Change the disk size, with the pencil icon next to the current size.
- Change the boot order, by changing the position of the disk in the list.
Attaching through VirtualMachineBlockDeviceAttachment
The VirtualMachineBlockDeviceAttachment resource attaches and detaches a block device on a VM without touching its specification. It suits automation and the cases where the user doesn’t have the rights to edit the machine.
The device is attached when the resource moves to the Attached phase. The other phases are described in the .status.phase field, and the .status.conditions block shows the reason for a delay.
- Using the CLI
- Using the web interface
Create a resource that attaches the empty blank-disk disk to the linux-vm virtual machine:
d8 k apply -f - <<EOF
apiVersion: virtualization.deckhouse.io/v1alpha2
kind: VirtualMachineBlockDeviceAttachment
metadata:
  name: attach-blank-disk
spec:
  blockDeviceRef:
    kind: VirtualDisk
    name: blank-disk
  virtualMachineName: linux-vm
EOF
Check the state of your resource:
d8 k get vmbda attach-blank-diskExample output:
NAME                PHASE      VIRTUALMACHINE   AGE
attach-blank-disk   Attached   linux-vm         3m7s
Connect to the virtual machine and make sure the disk is attached:
d8 v ssh cloud@linux-vm --command "lsblk"Example output:
NAME    MAJ:MIN RM  SIZE RO TYPE MOUNTPOINTS
sda       8:0    0   10G  0 disk <--- statically attached linux-vm-root disk
|-sda1    8:1    0  9.9G  0 part /
|-sda14   8:14   0    4M  0 part
`-sda15   8:15   0  106M  0 part /boot/efi
sdb       8:16   0    1M  0 disk <--- cloudinit
sdc       8:32   0 95.9M  0 disk <--- dynamically attached blank-disk disk
To detach the disk from the virtual machine, delete the resource you created earlier:
d8 k delete vmbda attach-blank-diskImages are attached the same way, only the kind field takes the VirtualImage or ClusterVirtualImage value.
d8 k apply -f - <<EOF
apiVersion: virtualization.deckhouse.io/v1alpha2
kind: VirtualMachineBlockDeviceAttachment
metadata:
  name: attach-ubuntu-iso
spec:
  blockDeviceRef:
    kind: VirtualImage # or ClusterVirtualImage
    name: ubuntu-iso
  virtualMachineName: linux-vm
EOF- Go to the Projects tab and select the project you need.
- Go to Virtualization → Virtual machines.
- Select the VM you need from the list and click its name.
- On the Configuration tab, scroll down to the Disks section.
- The following actions are available in the disk list:
- Add: Attach a new disk or image to the VM; to attach the device as an additional one (through VirtualMachineBlockDeviceAttachment, without rebooting the VM), select the Additional checkbox in the Disks / Images window.
- Eject: Detach the device from the VM (the image or disk stays in the project, and you can attach it again to this or another VM).
- Delete: Delete the image or disk resource itself from the cluster (after deletion, you can’t reuse it).
- Change the disk size, with the pencil icon next to the current size.
Disk naming in the guest OS
Disk names in the guest system aren’t stable, so relying on them in configuration is risky.
Block device names (/dev/sda, /dev/sdb, /dev/sdc, and so on) are assigned by the Linux kernel in the order the devices are discovered at boot. This order can change between reboots, so device names can change even when the SCSI addresses stay the same.
If you use /dev/sdX in configuration files (for example, /etc/fstab) or in scripts, after a VM reboot you can mount the wrong disk or end up with a malfunctioning system.
Example:
After the first VM boot:
$ lsscsi
[0:0:0:1]  disk    QEMU     QEMU HARDDISK   /dev/sda
[0:0:0:2]  disk    QEMU     QEMU HARDDISK   /dev/sdb
After a VM reboot:
$ lsscsi
[0:0:0:1]  disk    QEMU     QEMU HARDDISK   /dev/sdb
[0:0:0:2]  disk    QEMU     QEMU HARDDISK   /dev/sda
The SCSI addresses (0:0:0:1, 0:0:0:2) stay the same, but the device names (/dev/sda, /dev/sdb) swap places.
Use stable identifiers instead of /dev/sdX:
/dev/disk/by-uuid/: By partition UUID (preferable for/etc/fstab)./dev/disk/by-path/: By the SCSI connection path./dev/disk/by-id/: By the SCSI device ID.
In configuration files and scripts, use partition UUIDs or symbolic links from /dev/disk/by-* instead of /dev/sdX names.
Network interface naming in the guest OS
In systems without predictable network interface naming, network interface names (eth0, eth1, eth2, and so on) are assigned by the Linux kernel in the order the devices are discovered at boot. When you add new network interfaces or change the order of networks in .spec.networks, the interface order can change, and IP addresses can end up assigned to the wrong interfaces.
Using ethX in configuration files (for example, /etc/network/interfaces, netplan, systemd-networkd) or in scripts when adding new interfaces or changing the order of networks can lead to network failures or a connection to the wrong network.
Modern distributions with systemd (Ubuntu 16.04+, Debian 9+, CentOS 7+, RHEL 7+) use predictable interface names by default (enpXsY, ensX, enoX), which are based on the physical characteristics of the device (PCI coordinates) and stay stable between reboots and when new interfaces are added.
But even with predictable names, bind the network configuration to the MAC addresses of the interfaces, especially if the order of networks in .spec.networks changes or new interfaces are added.
An example for systems without predictable naming:
Initially, the VM has two interfaces:
$ ip link show
1: lo: <LOOPBACK,UP,LOWER_UP> mtu 65536
2: eth0: <BROADCAST,MULTICAST,UP,LOWER_UP> mtu 1500
3: eth1: <BROADCAST,MULTICAST,UP,LOWER_UP> mtu 1500
After adding a new interface at the beginning of the .spec.networks list and rebooting the VM:
$ ip link show
1: lo: <LOOPBACK,UP,LOWER_UP> mtu 65536
2: eth0: <BROADCAST,MULTICAST,UP,LOWER_UP> mtu 1500  # New interface
3: eth1: <BROADCAST,MULTICAST,UP,LOWER_UP> mtu 1500  # Former eth0
4: eth2: <BROADCAST,MULTICAST,UP,LOWER_UP> mtu 1500  # Former eth1
The MAC addresses stay the same, but the interface names (eth0, eth1) shift, which can lead to IP addresses being assigned to the wrong interfaces.
Use stable identifiers instead of ethX:
enpXsY: Predictable names based on the physical location (systemd networkd naming scheme, enabled by default in modern systems).- Binding by MAC address: In the
netplan,systemd-networkd, or/etc/network/interfacesconfiguration (preferable for guaranteed stability).
In configuration files and scripts, use stable interface names (enpXsY) or binding by MAC address instead of ethX names.
The predictable interface order holds only in guest operating systems with systemd (for example, Ubuntu, Debian). In Alpine and other distributions without systemd, the order may differ.
To open a machine application to other machines or to users outside the cluster, configure a service or Ingress as described in Accessing applications on a virtual machine.
Live VM migration
Live migration of virtual machines (VMs) is the process of moving a running VM from one physical node to another without shutting it down. This feature plays a key role in managing virtualized infrastructure, keeping applications running during maintenance, load balancing, or updates.
How live migration works
The live migration process consists of several stages:
-
A new VM is created on the target node in a paused state. Its configuration (CPU, disks, network) is copied from the source node.
-
All the RAM of the VM is copied to the target node over the network. This is called the initial transfer.
-
While the memory is being transferred, the VM keeps running on the source node and can modify some memory pages. Such pages are called dirty pages, and the hypervisor marks them.
-
After the initial transfer, only the modified pages are sent again. This process repeats in several cycles:
- The higher the load on the VM, the more dirty pages appear, and the longer the migration takes.
- With good network bandwidth, the amount of unsynchronized data gradually decreases.
-
When the number of dirty pages becomes minimal, the VM on the source node is paused (usually for 100 milliseconds):
- The remaining memory changes are transferred to the target node.
- The state of the CPU, devices, and open connections is synchronized.
- The VM starts on the new node, and the original copy is deleted.
Until the VM switches to the new node (step 5), the VM on the source node keeps running as usual and serving users.
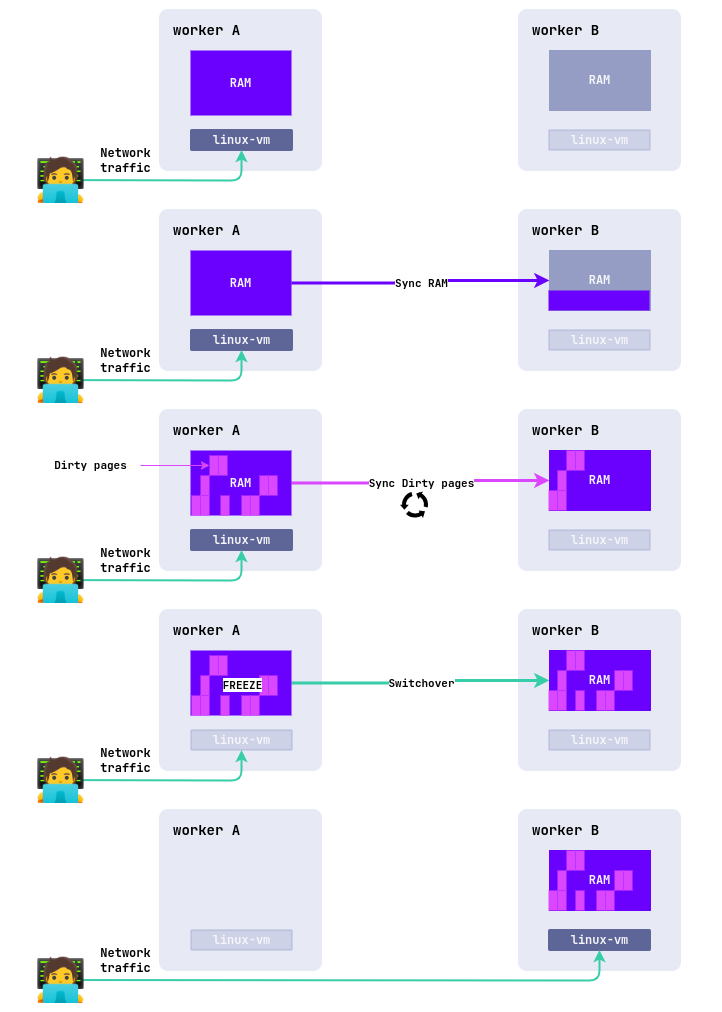
Requirements and limitations
A live migration doesn’t always succeed. The following is what has to match on the source and target nodes.
Disk availability. All disks attached to the VM have to be available on the target node. With network storage such as NFS or Ceph, this requirement is met on its own, because the disks are visible from all cluster nodes. Local storage needs to be able to create a new local volume on the target node, and if such storage exists only on the source node, the migration doesn’t run.
Attaching and detaching disks. While a migration is preparing the target node, disks can be neither attached to the machine with a VirtualMachineBlockDeviceAttachment resource nor detached by deleting one. An attachment stays in the Pending phase with the BlockedByMigration reason in the Attached condition, and a deleted one stays in the Terminating phase, until the migration completes. While the migration is still queued and the target node isn’t being prepared yet, for example when it waits for the project quota to free up, attaching and detaching work as usual. The reverse is also true, a migration waits for an attach or detach request that has already been sent, and all that time the VirtualMachineOperation resource stays in the Pending phase with the WaitingForBlockDeviceAttachment reason. If the request doesn’t complete within 5 minutes, the operation fails.
Network bandwidth. The slower the network, the more memory synchronization iterations the migration goes through and the longer the VM downtime at the final stage, and in the worst case the migration doesn’t fit into the timeout. The migration policy controls how the migration runs, and the AutoConverge mechanism helps with a slow network.
Kernel versions. All cluster nodes have to run the same Linux kernel version. Differences in versions lead to incompatible interfaces, system calls, and resource handling, which breaks the migration.
CPU compatibility. The CPU type in the virtual machine class sets the CPU requirements. The Host type allows migration only between nodes with similar CPUs, so it works neither between Intel and AMD nor between different CPU generations with different instruction sets. The HostPassthrough type requires exactly the same CPU on the target node as on the source one. To let a machine migrate between nodes with different CPUs, set the Discovery, Model, or Features type in the class.
Duration. A migration has a completion timeout of 800 seconds per gibibyte of VM memory, plus 800 seconds per gibibyte of disk when the disks move along with it. For example, a machine with 4 GiB of memory and a 20 GiB disk gets 800 × (4 + 20) = 19200 seconds, or about 5.3 hours. A migration that doesn’t fit into this time is considered failed and is canceled, which happens with a slow network or a high load on the VM.
Checking whether a VM is ready for migration
The type: Migratable condition in the VM status shows whether the VM can be moved by live migration. It takes into account both the VM itself (disks, passed-through devices, CPU type) and the state of the cluster (whether there’s a node to move it to). The True value answers the question of whether the move is possible, not whether the VM will move at this very moment, so look at the reason along with the value.
The overall picture for all VMs:
d8 k get vm -o wideThe value in the MIGRATABLE column shows the result, and the condition describes the reason:
d8 k get vm <VM_NAME> -o json | jq '.status.conditions[] | select(.type=="Migratable")'The most common reasons:
| Reason | What it means | What to do |
|---|---|---|
VirtualMachineMigratable |
The VM can be moved by live migration | — |
VirtualMachineNoMigrationTarget |
The VM is capable of migrating, but no other cluster node can host it | Check the spec.nodeSelector, spec.affinity, and spec.tolerations of the VM and the same parameters of its VirtualMachineClass |
VirtualMachineWaitingForMigrationTarget |
The VM is capable of migrating and suitable nodes exist in the cluster, but none of them can accept it right now, because the nodes are unschedulable, not ready, or don’t run virtualization | If maintenance is in progress, migration becomes possible as soon as such a node returns. In other cases, check why the nodes are unschedulable and whether virtualization runs on them |
VirtualMachineDisksNotMigratable |
The VM disks are in storage available from only one node | Move the disks to storage with the ReadWriteMany access mode |
VirtualMachineHostDevicesNotMigratable |
The VM has a device attached that can’t be moved to another node | Detach the device and restart the VM |
VirtualMachineNonMigratable |
The VM can’t be moved by live migration, and the reason is in the message field of the condition. |
Read the message of the condition. If it’s about the CPU, use the Discovery, Model, or Features types in the VM class |
VirtualMachineDisksShouldBeMigrating |
The VM can be moved, and its local disks are moved along with it | — |
Moving disks along with a VM is available in commercial DP editions, so the VirtualMachineDisksShouldBeMigrating reason appears only there. In DP Open, a VM with disks in storage available from one node gets the VirtualMachineDisksNotMigratable reason.
Specifics of the Migratable condition
A few specifics of the condition that matter when planning maintenance and reading the status:
-
The
Migratablecondition describes not only the VM but the cluster itself. If you remove the required label from the only suitable node without changing the VM parameters, the condition still becomesFalse. When a suitable node appears, the condition returns toTrue. -
When a node is made unschedulable, the VM stays capable of migrating. Cordoning, rebooting, and node maintenance happen on their own, so the condition stays
Trueand only the reason changes toVirtualMachineWaitingForMigrationTarget. Otherwise, planned maintenance of a neighboring node would turn a CPU or memory change into a VM restart. In DP Open, such changes require a reboot in any case. -
The
Truevalue means that the VM is capable of migrating, not that it’s ready to migrate right now. Before a migration, look at the reason. TheVirtualMachineMigratablereason means there’s a node to migrate to, andVirtualMachineWaitingForMigrationTargetmeans there’s no suitable node at this moment. Thed8_virtualization_virtualmachine_migratablemetric carries the same answer in thereasonlabel, so a dashboard that filters VMs only by value counts waiting VMs together with those ready to migrate. -
A migration started with the
VirtualMachineWaitingForMigrationTargetreason doesn’t wait for a node indefinitely. If the target pod can’t be scheduled within five minutes, the operation fails, and theCompletedcondition of the VirtualMachineOperation resource gets theTargetUnschedulablereason. If maintenance drags on, restart the migration. -
A stopped VM has no such condition, because the capability to migrate is computed only for a running VM. During the downtime, the disks could have moved to different storage and a device could have been detached.
-
In DP Open, placement changes are taken into account after the VM restarts. While the VM runs, it uses the parameters it was started with, and the condition describes exactly those. New
nodeSelector,affinity, or VM class values get into the calculation only after a restart. In commercial DP editions, such changes apply without a restart and get into the condition calculation right away. -
Local disks don’t prevent migration, but a node is still needed. In commercial DP editions, a VM with local disks moves along with them, so the condition stays
Truewith theVirtualMachineDisksShouldBeMigratingreason. But if no cluster node matches its placement rules, the condition isFalse, because there’s nowhere to move the disks along with the VM.
Starting a live migration
A migration is started by the Migrate operation of the VirtualMachineOperation resource, which you create manually or with a d8 command. You can interrupt the migration while it’s in the Pending or InProgress phase by deleting that resource.
Targeted migration to a specific node is available in commercial DP editions.
To keep the virtual machine schedulable, the node selector must not conflict with other placement rules, such as the virtual machine affinity, node selectors, and the node selector rules of the virtual machine class.
- Using the CLI
- Using the web interface
Before starting the migration, check the current status of the virtual machine:
d8 k get vmExample output:
NAME       PHASE     UPTIME   NODE           IPADDRESS     AGE
linux-vm   Running   79m      virtlab-pt-1   10.66.10.14   79m
At this moment it runs on the virtlab-pt-1 node.
To migrate a virtual machine from one node to another, taking its placement requirements into account, use the following command:
d8 v migrate -n <NAMESPACE> <VM_NAME> [--force] [--target-node-name string]Running this command creates a VirtualMachineOperations resource.
The --force flag activates the AutoConverge mechanism when migrating a virtual machine. This mechanism automatically reduces the load on the virtual machine CPU (throttles it) if the migration has to be sped up to complete successfully, even when the VM memory transfer is too slow. Use this flag if a standard migration can’t complete because of high VM activity.
To place the virtual machine on a specific target node, specify the name of that node in the --target-node-name option. For example, if the virtual machine has to be placed on the production-1 node:
d8 v migrate -n project-1 linux-vm --target-node-name production-1Under the hood, a virtual machine operation is created with the specific node selector kubernetes.io/hostname: production-1, where production-1 is the node name.
You can also start a migration by manually creating a VirtualMachineOperation (vmop) resource of the Migrate type:
d8 k create -f - <<EOF
apiVersion: virtualization.deckhouse.io/v1alpha2
kind: VirtualMachineOperation
metadata:
  generateName: migrate-linux-vm-
  namespace: project-1
spec:
  # Virtual machine name.
  virtualMachineName: linux-vm
  # Operation for migration.
  type: Migrate
  # Defines the virtual machine migration operation.
  migrate:
    nodeSelector:
      # You can also set any suitable node selector.
      kubernetes.io/hostname: production-1
  # Allow CPU throttling by the AutoConverge mechanism to guarantee that the migration completes.
  force: true
EOF
If you don’t need to specify target node parameters, you can omit the migrate field or evict the virtual machine to another suitable node using the d8 v evict command or by creating a VirtualMachineOperation resource of the Evict type.
To track the virtual machine migration right after the VirtualMachineOperation resource is created, run the following command:
d8 k get vm -wExample output:
NAME       PHASE       UPTIME   NODE           IPADDRESS     AGE
linux-vm   Running     79m      virtlab-pt-1   10.66.10.14   79m
linux-vm   Migrating   79m      virtlab-pt-1   10.66.10.14   79m
linux-vm   Migrating   79m      virtlab-pt-1   10.66.10.14   79m
linux-vm   Running     79m      virtlab-pt-2   10.66.10.14   79m
- Go to the Projects tab and select the project you need.
- Go to Virtualization → Virtual machines.
- Select the virtual machine you need from the list and click the ellipsis button.
- In the menu that opens, select Migrate.
- In the Virtual machine migration window that opens, select the mode:
- Migrate to an arbitrary node: The scheduler picks the target node.
- Migrate to a selected node: You pick the node manually in the Nodes available for migration field (the list contains only nodes that match the placement parameters of the VM and its class).
- Enable additional options if required:
- Migrate disks: Move the disks along with the VM (used when changing storage).
- Force (throttle guest CPU): Apply AutoConverge so that the migration completes even when network bandwidth is insufficient.
- The window shows the current migration policy of the VM, for example “VM migration policy: PreferSafe”.
- Click Migrate or cancel the operation with Cancel.
Configuring the migration policy
The migration policy determines when to use the AutoConverge mechanism (CPU throttling) to guarantee that a migration completes.
The AutoConverge mechanism helps a migration complete even with low network bandwidth, which makes a successful operation highly likely. However, it throttles the virtual machine CPU, which can affect the performance of applications running on the virtual machine.
The AutoConverge mechanism works in two stages:
-
Throttling the virtual machine CPU
The hypervisor gradually lowers the CPU frequency of the source virtual machine. This reduces the rate at which new dirty pages appear. The higher the load on the virtual machine, the stronger the throttling.
-
Automatic migration completion
As soon as the data transfer rate exceeds the memory change rate, the final synchronization starts and the virtual machine switches to the new node.
To configure the migration policy, use the .spec.liveMigrationPolicy parameter in the virtual machine configuration. Allowed values:
AlwaysSafe: The migration always runs without CPU throttling (AutoConverge isn’t used). Suitable when maximum virtual machine performance matters, but it requires high network bandwidth.PreferSafe(used as the default policy): The migration runs without CPU throttling (AutoConverge isn’t used). However, you can start a migration with CPU throttling using a VirtualMachineOperation resource with thetype=Migrateandforce=trueparameters.AlwaysForced: The migration always uses AutoConverge, that is, the CPU is throttled when required. This guarantees that the migration completes even on a poor network, but it can reduce virtual machine performance.PreferForced: The migration uses AutoConverge, that is, the CPU is throttled when required. However, you can start a migration without CPU throttling using a VirtualMachineOperation resource with thetype=Migrateandforce=falseparameters.
Migrations with insufficient network bandwidth
During a live migration of a virtual machine, the network bandwidth may not be enough to transfer data faster than it changes in the virtual machine memory. In that case, the number of dirty pages keeps growing and the migration may not complete within the timeout.
The AutoConverge mechanism, configured through the migration policy, solves this problem.
To tell that the network bandwidth isn’t enough for a live migration of a virtual machine, check the charts in Namespace / Virtual Machine → VM Status details → Live migration memory metrics:
- Processed memory rate is lower than Dirty memory rate;
- Remaining memory rate doesn’t decrease for a long time.
This means the network has become the bottleneck for the migration.
Here is an example of a situation where the migration can’t complete because of insufficient network bandwidth. Inside the virtual machine, memory changes continuously with stress-ng.
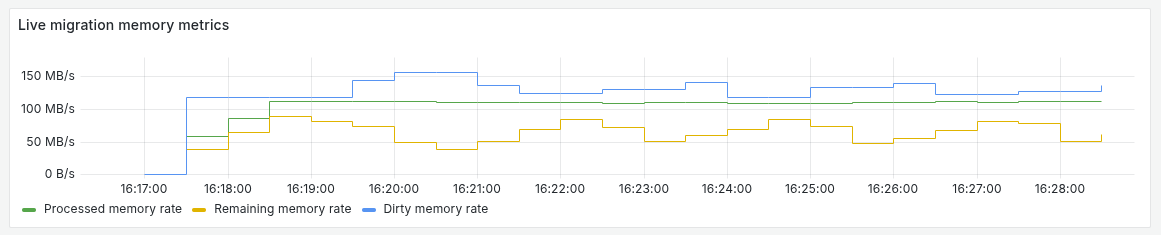
Here is an example of migrating the same virtual machine with the --force flag of the d8 v migrate command (which enables the AutoConverge mechanism). You can clearly see that the CPU frequency is lowered in stages to reduce the rate of memory content changes.
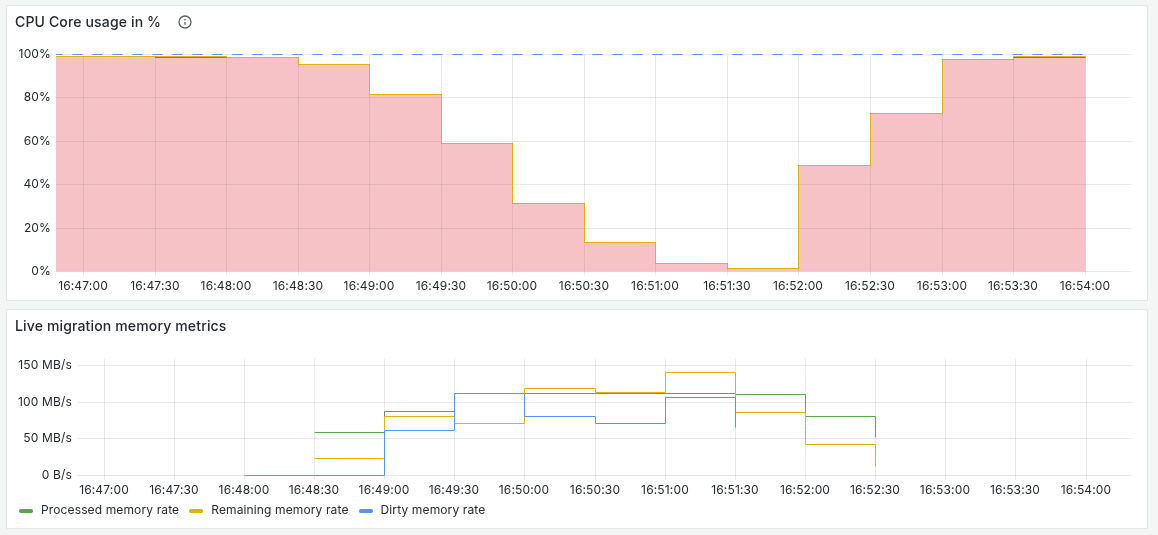
If the network limits the migration speed, you can do the following:
-
Wait until the operation fails because of a timeout.
-
Cancel the current migration operation by deleting the VirtualMachineOperation resource, where
<VMOP_NAME>is the name of that resource:d8 k delete vmop <VMOP_NAME> -
Restart the migration with the
--forceflag to enable the AutoConverge mechanism. Using the--forceflag has to match the current virtual machine migration policy.
Migrations started by the system
DP starts some migrations itself, by creating a VirtualMachineOperation resource of the Evict type. The prefix of the resource name shows what caused such a migration:
| What caused the migration | Resource name prefix |
|---|---|
| A virtual machine firmware update | firmware-update- |
| Load redistribution in the cluster | evacuation- |
| Putting a node into maintenance mode (node drain) | evacuation- |
| A change in the VM placement parameters | nodeplacement-update- |
| A change of the core count or memory size without a restart | hotplug-resources- |
| Moving disks to another storage | volume-migration- |
The migration has completed successfully when the resource moves to the Completed phase. The other phases are described in the .status.phase field, and to cancel a migration you delete the resource.
The following example shows how to view the list of such operations:
- Using the CLI
- Using the web interface
To view the active operations, run the following command:
d8 k get vmopExample output:
NAME                    PHASE       PROGRESS   TYPE    VIRTUALMACHINE   AGE
firmware-update-fnbk2   Completed   100%       Evict   linux-vm         1m
- Go to the Projects tab and select the project you need.
- Go to Virtualization → Virtual machines.
- Select the VM you need from the list and click its name.
- Go to the Operations tab.
Live VM migration on a placement parameter change
When the placement rules of a running machine change, DP moves it to a suitable node with a live migration.
The feature is available in commercial DP editions.
The following example shows the migration mechanism in a cluster with two node groups, green and blue. Suppose a virtual machine initially runs on a node of the green group, and its configuration has no placement restrictions.
First, add a requirement to be placed in the green group to the VM specification:
spec:
  nodeSelector:
    node.deckhouse.io/group: green
After you save the changes, the VM keeps running on the current node, because the nodeSelector condition is already met.
Now change the requirement to the blue group:
spec:
  nodeSelector:
    node.deckhouse.io/group: blue
The current node from the green group no longer meets the new conditions. DP creates a VirtualMachineOperation resource of the Evict type and starts a live migration of the VM to an available node of the blue group.
Example output:
NAME                         PHASE       PROGRESS   TYPE    VIRTUALMACHINE   AGE
nodeplacement-update-dabk4   Completed   100%       Evict   linux-vm         1m
Collecting debug information
If a machine doesn’t behave as expected, collect its state and the state of the related resources into a single archive.
The collect-debug-info command requires d8 v0.27.0 or later.
The archive contains the following information:
- the virtual machine configuration;
- operations on the virtual machine;
- migration information;
- block devices;
- related PVCs and PVs;
- pods related to the VM, including their logs (the last 10000 lines);
- events for all related resources;
- the XML configuration of the VM domain.
The collected data is stored in the archive in YAML format (for resources) and in text files (for logs). You can send such an archive to technical support to analyze a problem.
The following example shows how to collect such an archive:
- Using the CLI
- Using the web interface
The collect-debug-info command collects diagnostic data about a virtual machine and all related resources into a compressed archive (tar.gz) that goes to stdout, so the output has to be redirected to a file.
Usage example:
# Collect debug information for the 'linux-vm' virtual machine
d8 v collect-debug-info linux-vm > debug-info.tar.gz

# Collect debug information for a VM with the namespace specified
d8 v collect-debug-info linux-vm -n mynamespace > debug-info.tar.gz

# Collect debug information for a VM with the full name specified (name.namespace)
d8 v collect-debug-info linux-vm.mynamespace > debug-info.tar.gz
Without the output redirected to a file, the command fails, and on success you get the debug-info.tar.gz archive.
- Go to the Projects tab and select the project you need.
- Go to Virtualization → Virtual machines.
- Select the VM you need from the list and click its name.
- Go to the Diagnostics tab.
- The VM pods block shows the pods of the virtual machine, their phase, and the node they’re placed on.
- In the VM pod logs block, you can view the pod logs, filter the lines with a regular expression, and set the number of last lines.
- To download the archive with diagnostic data, click Download diagnostic data.
Current and completed operations on the VM are shown on the Operations tab: for each operation, the date, the VirtualMachineOperation resource name, the type (Start, Stop, and others), the status, the progress, and the message are shown; you can limit the list to the Day, Week, or Month period. Events are shown on the Events tab, and resource consumption charts on the Monitoring tab.
Virtual machine networking
Every virtual machine (VM) gets an address in the main cluster network and, if needed, connects to additional networks. This section describes how to manage the addresses of a machine, open access to its applications, and attach additional interfaces.
IP addresses of VMs
Two resources describe the address of a machine in the main cluster network, the cluster-wide address lease and the address reserved for the project.
The .spec.settings.virtualMachineCIDRs block in the module settings defines the subnets that machines get IP addresses from. All addresses of a subnet are available except the first and the last one.
The cluster-wide VirtualMachineIPAddressLease (vmipl) resource manages leases of IP addresses from the shared pool specified in virtualMachineCIDRs, while the project VirtualMachineIPAddress (vmip) resource reserves leased addresses and binds them to machines. An address is assigned to a machine when the resource moves to the Attached phase. The other phases are described in the .status.phase field.
By default, DP assigns an address to the machine itself and keeps it assigned until the machine is deleted. This works as follows:
- You create a virtual machine named
<VM_NAME>. - DP creates a VirtualMachineIPAddress resource named
<VM_NAME>-<HASH>to request an IP address and bind it to the virtual machine. - For this VirtualMachineIPAddress, a VirtualMachineIPAddressLease lease resource is created, which picks a random IP address from the shared pool.
- As soon as the VirtualMachineIPAddress resource is created, the virtual machine gets the assigned IP address.
After the machine is deleted, the VirtualMachineIPAddress resource is deleted too, but the address itself stays assigned to the project for a while, and you can request it again.
- Using the CLI
- Using the web interface
To view the list of IP address leases (vmipl), run the following command:
d8 k get vmiplExample output:
NAME             VIRTUALMACHINEIPADDRESS                             STATUS   AGE
ip-10-66-10-14   {"name":"linux-vm-7prpx","namespace":"default"}     Bound    12h
To view the address assigned to a machine, run the following command:
d8 k get vmipExample output:
NAME             ADDRESS       STATUS     VM         AGE
linux-vm-7prpx   10.66.10.14   Attached   linux-vm   12h
- Go to the Projects tab and select the project you need.
- Go to Virtualization → IP addresses.
- The list shows the resource name, status, address, type (
AutoorStatic), the virtual machine that uses the address, and the resource age.
Assigning a specific IP address
Instead of a random address from the pool, you can give a machine an address you choose in advance.
- Using the CLI
- Using the web interface
-
Create a VirtualMachineIPAddress resource:
d8 k apply -f - <<EOF apiVersion: virtualization.deckhouse.io/v1alpha2 kind: VirtualMachineIPAddress metadata: name: linux-vm-custom-ip spec: staticIP: 10.66.20.77 type: Static EOF -
Create a new virtual machine or modify an existing one, and specify the VirtualMachineIPAddress resource you need explicitly in the specification:
spec:
  virtualMachineIPAddressName: linux-vm-custom-ip
- Go to the Projects tab and select the project you need.
- Go to Virtualization → IP addresses.
- Click Create.
- In the Create resource window that opens, enter the resource name in the Name field.
- On the Configuration tab, select
Staticin the Type field, and specify the address you need in the Static IP address field. - Click Apply.
- Specify the name of the created resource in the
.spec.virtualMachineIPAddressNameparameter of the virtual machine.
Keeping an IP address in the project
To keep the automatically allocated IP address of a virtual machine from being deleted along with the virtual machine itself, do the following.
Get the name of the VirtualMachineIPAddress resource for the given virtual machine:
d8 k get vm linux-vm -o jsonpath="{.status.virtualMachineIPAddressName}"Example output:
linux-vm-7prpx
Remove the .metadata.ownerReferences block from the resource you found:
d8 k patch vmip linux-vm-7prpx --type=merge --patch '{"metadata":{"ownerReferences":null}}'

# Or make the same changes by editing the resource.

d8 k edit vmip linux-vm-7prpx
After the virtual machine is deleted, the VirtualMachineIPAddress resource is preserved and you can reuse it in a newly created virtual machine:
spec:
  virtualMachineIPAddressName: linux-vm-7prpx
Even if the VirtualMachineIPAddress resource is deleted, the IP address stays leased to the current project or namespace for another 10 minutes. So you can claim it again on request:
d8 k apply -f - <<EOF
apiVersion: virtualization.deckhouse.io/v1alpha2
kind: VirtualMachineIPAddress
metadata:
  name: linux-vm-custom-ip
spec:
  staticIP: 10.66.20.77
  type: Static
EOF
Accessing applications on a virtual machine
You can reach a virtual machine (VM) directly by its IP address, but this approach has limitations. You have to know the address in advance, it can change when the machine is recreated, and you can’t reach a group of machines at once. Kubernetes services solve all of these tasks.
A service gives a machine or a group of machines a permanent name that hides their addresses, and distributes requests evenly among them. The name is formed as <SERVICE_NAME>.<NAMESPACE>.svc.<CLUSTER_NAME>, and within the same namespace the short form <SERVICE_NAME> is enough.
Which service type to choose depends on the task:
Headless: Direct access to specific machines inside the cluster without a single entry point.ClusterIP: A single internal address with balancing between machines.NodePort: External access through a port on the cluster nodes.LoadBalancer: External access through an external load balancer.
If a connection to the VM from a cluster node doesn’t go through, check the NetworkPolicy in the project. The policy may deny traffic to the machine.
A machine gets into a service by labels. Assign the machine the label that the service looks for:
- Using the CLI
- Using the web interface
Assign the label with the d8 k label command:
d8 k label vm linux-vm app=nginxExample output:
virtualmachine.virtualization.deckhouse.io/linux-vm labeled
- Go to the Projects tab and select the project you need.
- Go to Virtualization → Virtual machines.
- Select the VM you need from the list and click its name.
- Go to the Meta tab.
- Click Add in the Labels or Annotations section.
- In the window that opens, set the key and the value, then press Enter.
- Click the Save button that appears.
Headless service
A headless service doesn’t allocate an IP address of its own, but returns the addresses of the machines themselves. This way you reach a specific machine by its DNS name without setting up a separate entry point for it. Even for a single machine, this is more convenient than a fixed address, because the name doesn’t change when the machine is recreated.
- Using the CLI
- Using the web interface
Create a service with clusterIP: None:
d8 k apply -f - <<EOF
apiVersion: v1
kind: Service
metadata:
  name: http
  namespace: default
spec:
  clusterIP: None
  selector:
    # The label the service uses to select virtual machines.
    app: nginx
EOF
After creation, you can reach the machine by the http.default.svc name.
- Go to the Projects tab and select the project you need.
- Go to Network → Services.
- Click Create.
- In the form that opens, enter the service name in the Name field.
- In the Type field, select
Headless. - In the Workload selector block, mark the virtual machines you need, and their labels go into the service selector.
- In the Ports block, set the Port and Target port values.
- Click Create.
Service of the ClusterIP type
A service of this type gives the machine application a stable address inside the cluster.
ClusterIP is the standard service type that provides an internal IP address for accessing the service inside the cluster. This IP address is used to route traffic between different system components and lets virtual machines interact with each other through a predictable and stable address.
- Using the CLI
- Using the web interface
Here is an example of a ClusterIP configuration:
d8 k apply -f - <<EOF
apiVersion: v1
kind: Service
metadata:
  name: http
spec:
  selector:
    # The label the service uses to decide which virtual machine to route traffic to.
    app: nginx
EOF- Go to the Projects tab and select the project you need.
- Go to Network → Services.
- In the window that opens, configure the service.
- Click Create.
Service of the NodePort type
A service of this type opens the machine application on a port of every cluster node.
NodePort is an extension of the ClusterIP service that provides access to the service through a specified port on all cluster nodes. This makes the service reachable from outside the cluster through the combination of a node IP address and a port, and it suits the cases where an external load balancer isn’t needed.
- Using the CLI
- Using the web interface
Create the following service:
d8 k apply -f - <<EOF
apiVersion: v1
kind: Service
metadata:
  name: linux-vm-nginx-nodeport
spec:
  type: NodePort
  selector:
    # The label the service uses to decide which virtual machine to route traffic to.
    app: nginx
  ports:
    - protocol: TCP
      port: 80
      targetPort: 80
      nodePort: 31880
EOF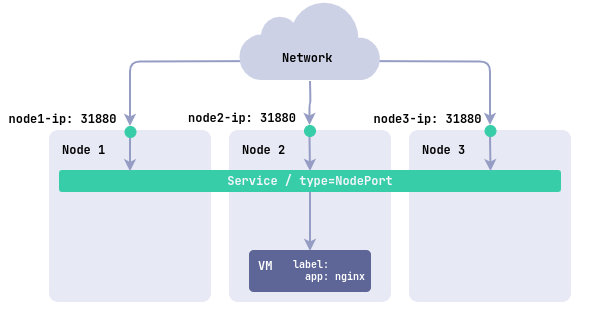
In this example, a service of the NodePort type is created, which opens external port 31880 on all nodes of your cluster. This port routes incoming traffic to internal port 80 of the virtual machine where the Nginx application runs.
If you don’t specify the nodePort value explicitly, an arbitrary port is assigned to the service, and you can see it in the service status right after creation.
- Go to the Projects tab and select the project you need.
- Go to Network → Services.
- Click Create.
- In the form that opens, enter the service name in the Name field.
- In the Type field, select
NodePort. - In the Workload selector block, mark the virtual machines you need.
- In the Ports block, set the Port, Target port, and, if required, Node port values.
- Click Create.
Service of the LoadBalancer type
A service of this type gives the application an external address through a load balancer.
LoadBalancer is a service type that automatically creates an external load balancer with a permanent IP address. This balancer distributes incoming traffic among virtual machines, making the service available from the internet.
- Using the CLI
- Using the web interface
d8 k apply -f - <<EOF
apiVersion: v1
kind: Service
metadata:
  name: linux-vm-nginx-lb
spec:
  type: LoadBalancer
  selector:
    # The label the service uses to decide which virtual machine to route traffic to
    app: nginx
  ports:
    - protocol: TCP
      port: 80
      targetPort: 80
EOF
- Go to the Projects tab and select the project you need.
- Go to Network → Services.
- Click Create.
- In the form that opens, enter the service name in the Name field.
- In the Type field, select
LoadBalancer. - In the Workload selector block, mark the virtual machines you need.
- In the Ports block, set the Port and Target port values.
- Click Create.
- The external address of the service is shown in the service list, in the External IP column.
Publishing VM services with Ingress
Ingress opens the machine application by a domain name and handles TLS termination.
Ingress lets you manage incoming HTTP/HTTPS requests and route them to different servers within your cluster. This is the most suitable method if you want to use domain names and SSL termination to access your virtual machines.
- Using the CLI
- Using the web interface
To publish a virtual machine service through Ingress, create the following resources:
An internal service to bind with Ingress. Example:
d8 k apply -f - <<EOF
apiVersion: v1
kind: Service
metadata:
  name: linux-vm-nginx
spec:
  selector:
    # the label the service uses to decide which virtual machine to route traffic to
    app: nginx
  ports:
    - protocol: TCP
      port: 80
      targetPort: 80
EOF
And an Ingress resource for publishing. Example:
d8 k apply -f - <<EOF
apiVersion: networking.k8s.io/v1
kind: Ingress
metadata:
  name: linux-vm
spec:
  rules:
    - host: linux-vm.example.com
      http:
        paths:
          - path: /
            pathType: Prefix
            backend:
              service:
                name: linux-vm-nginx
                port:
                  number: 80
EOF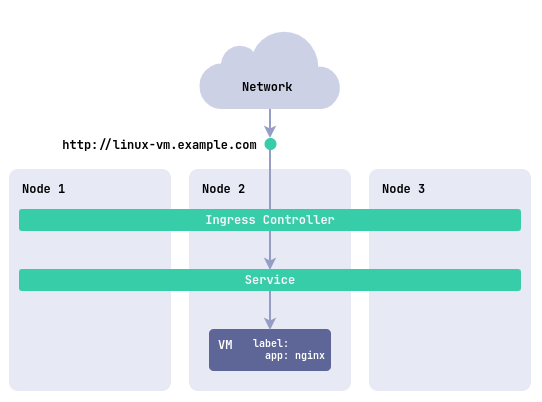
- Go to the Projects tab and select the project you need.
- Go to Network → Ingresses.
- Click Create.
- In the Create Ingress form that opens, enter the resource name in the Name field, and select the controller class (
spec.ingressClassName) in the Ingress Class field. - In the Rules block, click Add rule (host) and describe the host and the routing paths to the service you need.
- If HTTPS is required, click Add certificate in the TLS certificates block and specify the secret with the certificate; set the Default backend if required.
- Click Create.
Additional network interfaces
Besides the main cluster network, a machine can connect to additional networks, both project ones (Network) and cluster ones (ClusterNetwork). You list the networks you need in the .spec.networks block, and if that block isn’t set, the machine works only in the main cluster network.
To work with additional networks, the sdn module has to be enabled.
You don’t have to specify the main cluster network (type: Main), and a machine can work only in additional networks. But if the main network is specified, it has to be first in the list.
Specifics of additional network interfaces:
- the order of networks in
.spec.networksdetermines the order in which interfaces are attached inside the virtual machine; - adding or removing an additional network (
NetworkorClusterNetwork) on a running VM applies without a reboot. The ACPI indexes of existing interfaces are preserved when adding or removing, so interface names in the guest OS stay stable; - adding or removing the main network (
type: Main) still requires a VM reboot, because it’s bound to the main network interface of the pod and can’t be changed on a running pod; - to preserve the order of network interfaces inside the guest operating system, add new networks to the end of the
.spec.networkslist and don’t change the order of existing ones; - network security policies (NetworkPolicy) don’t apply to additional network interfaces;
- the network parameters (IP addresses, gateways, DNS, and so on) for additional networks are configured manually from inside the guest OS (for example, with Cloud-Init), unless IPAM is configured for the network, as covered in IPAM for additional network interfaces.
For each additional network interface, a unique MAC address is created and reserved automatically, which prevents MAC address collisions. The VirtualMachineMACAddress (vmmac) and VirtualMachineMACAddressLease (vmmacl) resources are used for this.
A MAC address is generated at random from a pool of allowed ranges.
- Ranges:
x2-xx-xx-xx-xx-xx,x6-xx-xx-xx-xx-xx,xA-xx-xx-xx-xx-xx,xE-xx-xx-xx-xx-xx. - The first three octets (OUI) are formed from the cluster UUID, and the last three (NIC) are picked at random from 16 million possible combinations.
The cluster-wide VirtualMachineMACAddressLease (vmmacl) resource manages leases of addresses from the shared pool, while the project VirtualMachineMACAddress (vmmac) resource reserves leased addresses and binds them to machines. An address stays assigned to the machine until it’s deleted.
When a network is removed from the VM configuration:
- The MAC address of the interface is released.
- The related VirtualMachineMACAddress and VirtualMachineMACAddressLease resources are deleted automatically.
- The allocated
IPAddressresource is deleted automatically (if IPAM was used).
The following example shows how to connect a virtual machine to an additional network:
- Using the CLI
- Using the web interface
List the networks you need in the .spec.networks block of the machine specification.
Here is an example of connecting a VM to the main cluster network and the user-net project network:
spec:
  networks:
    - type: Main # If specified, it has to be first
    - type: Network # Network type (Network \ ClusterNetwork)
      name: user-net # Network name
Here is an example of connecting to several networks, including the corp-net cluster network:
spec:
  networks:
    - type: Main # If specified, it has to be first
    - type: Network
      name: user-net
    - type: ClusterNetwork
      name: corp-net # Network name
Here is an example of connecting a VM only to additional networks (without the main cluster network):
spec:
  networks:
    - type: Network
      name: isolated-net
    - type: ClusterNetwork
      name: corp-net
You can see the information about the connected networks and their MAC addresses in the VM status:
status:
  networks:
    - type: Main
    - type: Network
      name: user-net
      macAddress: aa:bb:cc:dd:ee:01
    - type: ClusterNetwork
      name: corp-net
      macAddress: aa:bb:cc:dd:ee:02
To view the list of MAC address leases (vmmacl), run the following command:
d8 k get vmmaclExample output:
NAME                    VIRTUALMACHINEMACADDRESS                      STATUS   AGE
mac-5e-e6-19-22-0f-d8   {"name":"vm-01-fz9cr","namespace":"pr-sdn"}   Bound    45s
mac-5e-e6-19-29-89-cf   {"name":"vm-01-99qj6","namespace":"pr-sdn"}   Bound    45s
mac-5e-e6-19-54-f9-be   {"name":"vm-01-5jqxg","namespace":"pr-sdn"}   Bound    45s
To check the assigned MAC addresses, run the following command:
d8 k get vmmacExample output:
NAME          ADDRESS             STATUS     VM      AGE
vm-01-5jqxg   5e:e6:19:54:f9:be   Attached   vm-01   5m42s
vm-01-99qj6   5e:e6:19:29:89:cf   Attached   vm-01   5m42s
vm-01-fz9cr   5e:e6:19:22:0f:d8   Attached   vm-01   5m42s
- Go to the Projects tab and select the project you need.
- Go to Virtualization → Virtual machines.
- Select the VM you need from the list and click its name.
- On the Configuration tab, scroll down to the Networks section and click Add.
- In the Add network window that opens, specify the network you need in the Select network field.
- Click Add, then click the Save button that appears.
To create a project network:
- Go to the Projects tab and select the project you need.
- Go to Network → SDN → Networks.
- Click Create.
- In the Create resource window that opens, enter the network name in the Name field.
- On the Configuration tab, select the Network class in the Network class field, the network type in the Type field, and the VLAN ID in the VLAN field. Set Mtu and the parameters of the IPAM block if required.
- Click Apply.
- The created networks are shown in the list with the Status, Type, VLAN, and Network class columns.
Interface naming and ARP flux in the guest OS
When configuring network interfaces in the guest OS, use stable identifiers (predictable enpXsY names or binding by MAC address) instead of ethX names, as described in Network interface naming in the guest OS.
On a Linux guest system with several interfaces in the same subnet, the ARP flux problem can occur, where the kernel answers ARP requests through an arbitrary interface rather than the one the request arrived on, which leads to an unstable connection and packet loss because of an incorrect MAC address in the router caches.
To fix this, set the parameters that make the system answer requests strictly through the interface with the target IP and use the correct source address:
sysctl -w net.ipv4.conf.all.arp_ignore=1
sysctl -w net.ipv4.conf.all.arp_announce=2
Example for cloud-init:
write_files:
- path: /etc/sysctl.d/90-arp-strict.conf
content: |
net.ipv4.conf.all.arp_ignore=1
net.ipv4.conf.all.arp_announce=2
The parameter values are described in the IP sysctl documentation.
IPAM for additional network interfaces
DP can hand out addresses in an additional network itself, if an administrator has configured an address pool for that network.
If IPAM is configured for an additional network in the sdn module (an IP address pool bound to the network through spec.ipam.ipAddressPoolRef), the virtualization module can automatically allocate IP addresses for the additional VM interfaces and deliver them to the guest OS over DHCP.
Two modes are supported:
-
Automatic (DHCP): If the
ipAddressNamefield isn’t specified in.spec.networks[], the controller automatically creates an IPAddress resource (of theAutotype) bound to the VM throughownerReferences, and passes it to thesdnmodule. Thesdnmodule allocates an address from the pool and delivers it to the guest OS over DHCP. The address is preserved across VM reboots and migrations, because it’s bound to the VM rather than to the pod. For this mode to work, the DHCP client has to be enabled on the corresponding interface in the guest OS. -
Static: If the
ipAddressNamefield is specified in.spec.networks[], the controller uses the IPAddress resource provided by the user (of theStatictype,network.deckhouse.io/v1alpha1). The address is defined by the user and doesn’t change automatically.
If an additional network has no IPAM pool configured, the IPAM feature isn’t enabled. The interface works in L2-only mode, and IP addressing has to be configured manually in the guest OS.
If an IPAM pool is configured for an additional network, don’t configure a static IP address on the additional interface in the guest OS manually (through Cloud-Init). Use the automatic (DHCP) or static (ipAddressName) mode to avoid address conflicts.
If an additional network has an IPAM pool but the IPAddress resource isn’t allocated yet or is in the Pending state (for example, because the address pool is exhausted), the interface is temporarily skipped. The VM starts without it, and the NetworkReady condition reports the error. Once an IP address becomes available, the interface is attached automatically.
- Using the CLI
- Using the web interface
Here is an example VM configuration with automatic IP address allocation for an additional network:
spec:
  networks:
    - type: Main
    - type: ClusterNetwork
      name: corp-net
      # ipAddressName isn't specified → automatic mode (DHCP) is used
Here is an example VM configuration with a static IP address for an additional network:
spec:
  networks:
    - type: Main
    - type: ClusterNetwork
      name: corp-net
      ipAddressName: my-static-ip # Name of the IPAddress resource (SDN)
Here is an example of a static IPAddress resource configuration:
apiVersion: network.deckhouse.io/v1alpha1
kind: IPAddress
metadata:
  name: my-static-ip
  namespace: my-namespace
spec:
  networkRef:
    kind: ClusterNetwork
    name: corp-net
  type: Static
  static:
    ip: 192.168.200.42
The allocated IP address is shown in the VM status:
status:
  ipAddress: 10.66.10.2                     # IP address of the main network.
  virtualMachineIPAddressName: vm-01-main-ip # IPAddress name of the main network.
  networks:
    - type: Main
    - type: ClusterNetwork
      name: corp-net
      macAddress: 32:a6:a1:0a:92:48
      virtualMachineMACAddressName: vm-01-rxzd6
ipAddress: 192.168.200.4 # IP address of the additional network (from IPAM).- Go to the Projects tab and select the project you need.
- Go to Network → SDN → IP pools.
- Click Create.
- In the Create resource window that opens, enter the pool name in the Name field.
- On the Configuration tab, set the lease lifetime in the Lease TTL field, and in the Pools block, set the network (Network), the address ranges (Ranges), and the routes (Routes).
- Click Apply.
Configuring the guest OS for interfaces added on the fly
When an additional network interface is attached to an already running VM, the guest OS has to be configured to bring new network interfaces up automatically and request a DHCP lease. By default, Linux doesn’t start a DHCP client on interfaces added on the fly.
To make such interfaces configure themselves, use one of the following approaches in the guest OS:
-
NetworkManager (Ubuntu, RHEL, CentOS): Configures new interfaces with DHCP automatically, if the
network-managerservice is running. -
A udev rule (Alpine and other systems without
network-manager): Add a udev rule to bring new interfaces up:write_files: - path: /etc/udev/rules.d/90-hotplug-network.rules content: | SUBSYSTEM=="net", ACTION=="add", RUN+="/sbin/ifup %k"
Interfaces present at VM boot (included in the initial network configuration) don’t need any extra setup, because the guest OS configures them at startup through Cloud-Init.
Snapshots, recovery, and cloning
Snapshots let you capture the current state of a resource for later recovery or cloning. A disk snapshot saves only the data of the selected disk, while a virtual machine (VM) snapshot includes its parameters and the state of all its disks.
Consistent snapshots
Snapshots can be consistent or inconsistent. The requiredConsistency parameter is responsible for this, and its default value is true, which means that a consistent snapshot is required.
A consistent snapshot captures a coherent and integral state of the disk data. You can create such a snapshot when one of the following conditions is met:
- the disk isn’t attached to any virtual machine, and then the snapshot is always consistent;
- the virtual machine is powered off;
qemu-guest-agentis installed and running in the guest OS. When the snapshot is created, it temporarily pauses (“freezes”) the file system to keep the data coherent.
An inconsistent snapshot may not reflect a coherent state of the virtual machine disks and its components. Such a snapshot is created if the VM is running and qemu-guest-agent isn’t installed or isn’t running in the guest OS.
If the snapshot manifest explicitly specifies requiredConsistency: false but qemu-guest-agent is running, an attempt to freeze the file system is still made so that the snapshot comes out consistent.
QEMU Guest Agent supports hook scripts that prepare applications for a snapshot without stopping services, keeping the state coherent at the application level. Configuring hook scripts is described in Guest OS agent.
When recovering from such a snapshot, file system integrity problems are possible, because the data state may be incoherent.
Creating disk snapshots
A disk snapshot saves the disk data at the moment of creation and serves as a source for new disks.
Disk snapshots are described by the VirtualDiskSnapshot resource. They can serve as a data source when creating new disks, for example to clone or recover information.
Data integrity is guaranteed when a snapshot is created in one of the following cases:
- The disk isn’t attached to any virtual machine.
- The VM is powered off.
- The VM is running, qemu-guest-agent is installed in the guest OS, and the file system was successfully frozen (the fsfreeze operation).
If data consistency isn’t required (for example, for test scenarios), set the .spec.requiredConsistency parameter of the snapshot to false. The snapshot is then created on a running VM without freezing the file system, including when the disk is attached to it.
A disk snapshot goes through the following phases:
Pending: Waiting for all dependent resources required to create the snapshot to become ready.InProgress: The virtual disk snapshot is being created.Ready: The snapshot was created successfully and the virtual disk snapshot is available for use.Failed: An error occurred while creating the virtual disk snapshot.Terminating: The resource is being deleted.
The .status.conditions block shows the reason for a problem with the resource.
- Using the CLI
- Using the web interface
Here is an example manifest for creating a disk snapshot:
d8 k apply -f - <<EOF
apiVersion: virtualization.deckhouse.io/v1alpha2
kind: VirtualDiskSnapshot
metadata:
  name: linux-vm-root-snapshot
spec:
  requiredConsistency: true
  virtualDiskName: linux-vm-root
EOF
To view the list of disk snapshots, run the following command:
d8 k get vdsnapshotExample output:
NAME                   PHASE     CONSISTENT   AGE
linux-vm-root-snapshot Ready     true         3m2s
The true value in the CONSISTENT column means that the snapshot is consistent. It’s determined automatically from the snapshot creation conditions and isn’t changed manually.
- Go to the Projects tab and select the project you need.
- Go to Virtualization → Disk snapshots.
- Click Create.
- In the Create resource window that opens, enter the snapshot name in the Name field.
- On the Configuration tab, select the disk to take the snapshot from in the Virtual disk name field.
- Enable the Required consistency toggle.
- Click Apply.
- The snapshot status is shown in the Status column.
Recovering disks from snapshots
A new disk is created from a snapshot, and the original disk stays untouched.
- Using the CLI
- Using the web interface
To recover a disk from a previously created disk snapshot, specify the corresponding object as the dataSource:
d8 k apply -f - <<EOF
apiVersion: virtualization.deckhouse.io/v1alpha2
kind: VirtualDisk
metadata:
  name: linux-vm-root
spec:
  # Disk storage parameters.
  persistentVolumeClaim:
    # Specify a size larger than the value.
    size: 10Gi
    # Specify the name of your StorageClass.
    storageClassName: rv-thin-r2
  # The source the disk is created from.
  dataSource:
    type: ObjectRef
    objectRef:
      kind: VirtualDiskSnapshot
      name: linux-vm-root-snapshot
EOF- Go to the Projects tab and select the project you need.
- Go to Virtualization → Disks.
- Click Create.
- In the form that opens, enter the disk name in the Disk name field.
- In the Source field, select the disk snapshot you want to recover from in the drop-down list.
- In the Size field, set a size equal to or larger than the size of the original disk.
- In the Storage class field, select the StorageClass of the original disk.
- Click Create.
- The disk status is shown on its page.
Creating VM snapshots
A virtual machine snapshot is the saved state of a virtual machine at a certain point in time. To create virtual machine snapshots, use the VirtualMachineSnapshot resource.
Detach all images (VirtualImage/ClusterVirtualImage) from a virtual machine before taking its snapshot. Disk images aren’t saved along with the VM snapshot, and their absence in the cluster during recovery can leave the virtual machine unable to start, in the Pending state, waiting for the image to become available.
Creating a virtual machine snapshot fails if at least one of the following conditions is met:
- not all dependent devices of the virtual machine are ready;
- one of the dependent devices is a disk that is being resized.
If the virtual machine has changes pending a restart at the moment the snapshot is taken, the updated configuration goes into the snapshot.
When a snapshot is created, the dynamic IP address of the VM is automatically converted to a static one and saved for recovery. If you don’t need the conversion and the reuse of the old address, set the .spec.keepIPAddress parameter to Never, and the address type stays as it is (Auto or Static).
The following example shows how to create a virtual machine snapshot:
- Using the CLI
- Using the web interface
Here is an example manifest for creating a virtual machine snapshot:
d8 k apply -f - <<EOF
apiVersion: virtualization.deckhouse.io/v1alpha2
kind: VirtualMachineSnapshot
metadata:
  name: linux-vm-snapshot
spec:
  virtualMachineName: linux-vm
  requiredConsistency: true
  keepIPAddress: Never
EOF
After the snapshot is created successfully, its status reflects the list of saved resources.
Example output:
status:
  ...
  resources:
  - apiVersion: virtualization.deckhouse.io/v1alpha2
    kind: VirtualMachine
    name: linux-vm
  - apiVersion: v1
    kind: Secret
    name: cloud-init
  - apiVersion: virtualization.deckhouse.io/v1alpha2
    kind: VirtualDisk
name: linux-vm-root- Go to the Projects tab and select the project you need.
- Go to Virtualization → Virtual machines.
- Select the VM you need from the list and click its name.
- Go to the Snapshots tab.
- Click Add.
- In the form that opens, enter
linux-vm-snapshotin the Snapshot name field. - Enable the Integrity guarantee toggle.
- Click Create.
- The snapshot status is shown on its page.
- The created snapshots are listed on the Snapshots tab of the virtual machine, with the Name, Status, Creation date, and Consistent columns.
Recovering a VM
Recovery returns a machine and its disks to the state saved in a snapshot. It’s started by a VirtualMachineOperation resource of the Restore type, which has three modes:
DryRun: A dry run of the recovery operation, needed to check for possible conflicts, which are shown in the resource status (status.resources).Strict: The strict recovery mode, when the VM has to be recovered exactly as in the snapshot; missing external dependencies can leave the VM inPendingafter recovery.BestEffort: Missing external dependencies (ClusterVirtualImage, VirtualImage) are ignored and removed from the VM configuration.
Recovering a virtual machine from a snapshot is possible only when all of the following conditions are met:
- The VM being recovered is present in the cluster (the VirtualMachine resource exists and its
.metadata.uidmatches the identifier used when the snapshot was created). - The disks being recovered (identified by name) either aren’t attached to other VMs or are absent from the cluster.
- The IP address being recovered either isn’t taken by another VM or is absent from the cluster.
- The MAC addresses being recovered either aren’t used by other VMs or are absent from the cluster.
The disks of the machine are recovered along with it, so the disk specification contains the dataSource parameter with a reference to the disk snapshot needed.
If some resources the VM depends on (for example, VirtualMachineClass, VirtualImage, ClusterVirtualImage) are absent from the cluster but existed at the moment the snapshot was created, the VM stays in the Pending state after recovery. In that case, edit the VM configuration manually and update or remove the missing dependencies.
Don’t cancel a recovery operation from a snapshot, that is, don’t delete the VirtualMachineOperation resource in the InProgress phase, because this can leave the virtual machine being recovered in an inconsistent state.
- Using the CLI
- Using the web interface
Recovery is started by a VirtualMachineOperation resource of the Restore type:
apiVersion: virtualization.deckhouse.io/v1alpha2
kind: VirtualMachineOperation
metadata:
  name: <VMOP_NAME>
spec:
  type: Restore
  virtualMachineName: <VM_NAME>
  restore:
    mode: DryRun | Strict | BestEffort
    virtualMachineSnapshotName: <VM_SNAPSHOT_NAME>
To view information about conflicts when recovering a VM from a snapshot, check the resource status:
d8 k get vmop <VMOP_NAME> -o json | jq '.status.resources'- Go to the Projects tab and select the project you need.
- Go to Virtualization → Virtual machines.
- Select the virtual machine you need from the list and click the ellipsis button.
- In the menu that opens, select Restore.
- In the Machine recovery window that opens, select the snapshot in the Virtual machine snapshot name field.
- In the Recovery mode field, select
StrictorBestEffort. - Click Restore.
Cloning a VM
A virtual machine (VM) clone is created either from an existing VM or from a previously created snapshot of that machine.
The cloned VM gets a new IP address for the cluster network and new MAC addresses for the additional network interfaces (if there are any), so after cloning you have to reconfigure the network parameters of the guest OS.
Labels aren’t copied from the source VM to the clone. This prevents Service traffic (Services select VMs by labels) from being routed to the clone. If the clone has to be part of a Service, add the labels you need after cloning. For example:
d8 k label vm <VM_NAME> label-name=label-valueCloning creates a copy of a VM, so the resources of the new VM have to have unique names. The nameReplacements and customization parameters are used for this:
nameReplacements: Lets you replace the names of existing resources with new ones to avoid conflicts.customization: Sets a prefix or a suffix for the names of all cloned VM resources (disks, IP addresses, and so on).
Here is an example of renaming specific resources:
nameReplacements:
  - from:
      kind: VirtualMachine
      name: <OLD_VM_NAME>
    to:
      name: <NEW_VM_NAME>
  - from:
      kind: VirtualDisk
      name: <OLD_DISK_NAME>
    to:
      name: <NEW_DISK_NAME>
  ...
As a result, a VM named <NEW_VM_NAME> is created, and the specified resources are renamed according to the replacement rules.
Here is an example of adding a prefix or a suffix to all resources:
customization:
  namePrefix: <PREFIX>
  nameSuffix: <SUFFIX>
As a result, a VM named <PREFIX><ORIGINAL_VM_NAME><SUFFIX> is created, and all resources (disks, IP addresses, and so on) get the prefix and the suffix.
You can use one of three modes for the cloning operation:
DryRun: A test run to check for possible conflicts. The results are shown in thestatus.resourcesfield of the corresponding operation resource.Strict: The strict mode, which requires all resources with new names and their dependencies (for example, images) to be present in the VM being cloned.BestEffort: The mode in which missing external dependencies (for example, ClusterVirtualImage, VirtualImage) are automatically removed from the configuration of the VM being cloned.
To view information about the conflicts that arose during cloning, check the status of the operation resource:
# For cloning from an existing VM.
d8 k get vmop <VMOP_NAME> -o json | jq '.status.resources'

# For cloning from a VM snapshot.
d8 k get vmsop <VMSOP_NAME> -o json | jq '.status.resources'
Creating a clone of an existing VM
A clone is assembled from temporary snapshots of a machine, so you don’t have to stop it.
A VM is cloned using the VirtualMachineOperation resource with the Clone operation type, both for powered-off and for running virtual machines. When a running VM is cloned, a consistent snapshot is created automatically, and the clone is then built from it.
During cloning, temporary snapshots are created automatically for the virtual machine and all its disks, and the new VM is assembled from them. After cloning finishes, the temporary snapshots are deleted, so you won’t see them in the resource list. The specification of the cloned disks still keeps a reference (dataSource) to the corresponding snapshot, even though the snapshot itself no longer exists. This is expected behavior and doesn’t indicate a problem, because by the time the clone starts, all the necessary data has already been transferred to the new disks.
Set the .spec.runPolicy: AlwaysOff parameter in the configuration of the VM being cloned to prevent the clone from starting automatically: the clone inherits the behavior of the parent VM.
Before cloning, prepare the guest OS to avoid conflicts of unique identifiers and network settings.
Linux:
- clear
machine-idwith thesudo truncate -s 0 /etc/machine-idcommand (for systemd) or delete the/var/lib/dbus/machine-idfile; - delete the SSH host keys:
sudo rm -f /etc/ssh/ssh_host_*; - clear the network interface configurations (if static settings are used);
- clear the Cloud-Init cache (if it’s used):
sudo cloud-init clean.
Windows:
- run generalization with
sysprepusing the/generalizeparameter, or use tools to clear unique identifiers (SID, hostname, and so on).
- Using the CLI
- Using the web interface
To create a VM clone, use the following resource:
apiVersion: virtualization.deckhouse.io/v1alpha2
kind: VirtualMachineOperation
metadata:
  name: <VMOP_NAME>
spec:
  type: Clone
  virtualMachineName: <name of the VM to be cloned>
  clone:
    mode: DryRun | Strict | BestEffort
    nameReplacements: []
    customization: {}
The nameReplacements and customization parameters are set in the .spec.clone block.
The following example shows cloning a VM named database and the database-root disk attached to it.
An example with renaming specific resources:
apiVersion: virtualization.deckhouse.io/v1alpha2
kind: VirtualMachineOperation
metadata:
  name: clone-database
spec:
  type: Clone
  virtualMachineName: database
  clone:
    mode: Strict
    nameReplacements:
      - from:
          kind: VirtualMachine
          name: database
        to:
          name: database-clone
      - from:
          kind: VirtualDisk
          name: database-root
        to:
          name: database-clone-root
As a result, a VM named database-clone and a disk named database-clone-root are created.
An example with a prefix for all resources:
apiVersion: virtualization.deckhouse.io/v1alpha2
kind: VirtualMachineOperation
metadata:
  name: clone-database
spec:
  type: Clone
  virtualMachineName: database
  clone:
    mode: Strict
    customization:
      namePrefix: clone-
      nameSuffix: -prod
As a result, a VM named clone-database-prod and a disk named clone-database-root-prod are created.
- Go to the Projects tab and select the project you need.
- Go to Virtualization → Virtual machines.
- Select the virtual machine you need from the list and click the ellipsis button.
- In the menu that opens, select Clone.
- In the Machine cloning window that opens, select the snapshot to create the clone from in the Virtual machine snapshot name field. The clone is created from a snapshot, so prepare the snapshot in advance.
- In the Cloning mode field, select
StrictorBestEffort. - If required, set new names for the clone resources in the Customization → Resource renaming block, specifying the resource type, the original name, and the new name.
- Click Clone.
Creating a clone from a VM snapshot
A VM is cloned from a snapshot using the VirtualMachineSnapshotOperation resource with the CreateVirtualMachine operation type.
To create a VM clone from a snapshot, use the following resource:
apiVersion: virtualization.deckhouse.io/v1alpha2
kind: VirtualMachineSnapshotOperation
metadata:
  name: <VMSOP_NAME>
spec:
  type: CreateVirtualMachine
  virtualMachineSnapshotName: <name of the VM snapshot from which to clone>
  createVirtualMachine:
    mode: DryRun | Strict | BestEffort
    nameReplacements: []
    customization: {}
The nameReplacements and customization parameters are configured in the .spec.createVirtualMachine block (general description above).
To view the list of resources saved in a snapshot, run the following command:
d8 k get vmsnapshot <SNAPSHOT_NAME> -o jsonpath='{.status.resources}' | jqWhen a VM is cloned from a snapshot, the disks related to it are also created from the corresponding snapshots, so the disk specification contains the dataSource parameter with a reference to the disk snapshot needed.
The following example shows cloning from a VM snapshot named database-snapshot, which contains the database VM and the database-root disk.
An example with renaming specific resources:
apiVersion: virtualization.deckhouse.io/v1alpha2
kind: VirtualMachineSnapshotOperation
metadata:
  name: clone-database-from-snapshot
spec:
  type: CreateVirtualMachine
  virtualMachineSnapshotName: database-snapshot
  createVirtualMachine:
    mode: Strict
    nameReplacements:
      - from:
          kind: VirtualMachine
          name: database
        to:
          name: database-clone
      - from:
          kind: VirtualDisk
          name: database-root
        to:
          name: database-clone-root
As a result, a VM named database-clone and a disk named database-clone-root are created.
An example with a prefix for all resources:
apiVersion: virtualization.deckhouse.io/v1alpha2
kind: VirtualMachineSnapshotOperation
metadata:
  name: clone-database-from-snapshot
spec:
  type: CreateVirtualMachine
  virtualMachineSnapshotName: database-snapshot
  createVirtualMachine:
    mode: Strict
    customization:
      namePrefix: clone-
      nameSuffix: -prod
As a result, a VM named clone-database-prod and a disk named clone-database-root-prod are created.
Virtual machine pools
Available in commercial DP editions.
The VirtualMachinePool resource maintains a given number of identical virtual machines (VMs) and lets you scale them through the scale subresource, HorizontalPodAutoscaler (HPA), or KEDA. The virtualMachineTemplate.spec field matches the regular VirtualMachineSpec, so a replica is no different from a manually created virtual machine.
The Legacy OS type isn’t supported in a pool, because replicas are differentiated by initialization, which these operating systems don’t have, so every replica would be a byte-for-byte copy of one disk, and for Windows guest operating systems that also means the same SID on the network. A pool template with osType: Legacy is rejected. Create such virtual machines individually.
The following example shows how to create a virtual machine pool:
- Using the CLI
- Using the web interface
Create a pool with the number of replicas you need and a virtual machine template. Pool disks are described in two blocks:
virtualDiskTemplatesdescribes each replica disk once, setting thereclaimpolicy, the size, and the data source.- The
blockDeviceRefsof the template references these disks by name withkind: VirtualDiskand sets the device order, that is, the boot order, exactly as in a regular VirtualMachine.
Every virtualDiskTemplates entry has to appear in blockDeviceRefs exactly once, otherwise DP rejects the pool. Disk template names are unique.
Besides replica disks, blockDeviceRefs can list shared VirtualImage and ClusterVirtualImage images, for example a single ISO or CD-ROM for all replicas. Such images are attached read-only, there’s one of them for the whole pool, and they don’t need an entry in virtualDiskTemplates.
d8 k apply -f - <<EOF
apiVersion: virtualization.deckhouse.io/v1alpha2
kind: VirtualMachinePool
metadata:
  name: runners
  namespace: ci
spec:
  replicas: 3
  scaleDownPolicy: NewestFirst
  virtualMachineTemplate:
    spec:
      runPolicy: AlwaysOn
      virtualMachineClassName: generic
      cpu:
        cores: 2
      memory:
        size: 4Gi
      # Cloud-init: each replica configures itself at first boot (identically for all).
      provisioning:
        type: UserData
        userData: |
          #cloud-config
          users:
            - name: cloud
              sudo: ALL=(ALL) NOPASSWD:ALL
              ssh_authorized_keys:
                - <SSH_PUBLIC_KEY>
      # Devices and boot order (the first one is bootable). VirtualDisk entries
      # reference virtualDiskTemplates by name (per-replica, resolved by the controller);
      # VirtualImage/ClusterVirtualImage is a shared read-only image for all replicas.
      blockDeviceRefs:
        - kind: VirtualDisk
          name: root          # boot disk
        - kind: VirtualDisk
          name: cache
        - kind: ClusterVirtualImage
          name: tools-iso      # shared CD-ROM, attached to every replica
  # Per-replica disk parameters (reclaim/size/source). Each of them has to be listed above.
  virtualDiskTemplates:
    # Writable root disk: one per replica, cloned from an image, deleted along with the replica.
    - name: root
      reclaim:
        onScaleDown: Delete
      spec:
        persistentVolumeClaim:
          size: 30Gi
        dataSource:
          type: ObjectRef
          objectRef:
            kind: VirtualImage
            name: ubuntu
    # Reusable cache: survives a scale-down and is reattached on a scale-up.
    - name: cache
      reclaim:
        onScaleDown: Retain
        keep: 5
        ttl: 30m
      spec:
        persistentVolumeClaim:
          size: 50Gi
EOF
Replicas are named <POOL>-<RANDOM>. Disks follow the same scheme, and a per-replica disk (Delete) is named <REPLICA>-<TEMPLATE> (for example, runners-1b2e84-root), while a reusable one (Retain) gets the <POOL>-<TEMPLATE>-<RANDOM> name. To view the replicas, run d8 k get vm -l vmpool.virtualization.deckhouse.io/pool=runners.
- Go to the Projects tab and select the project you need.
- Go to Virtualization → VM pools.
- Click Create.
- In the Create resource window that opens, enter the pool name in the Name field.
- On the Configuration tab, set the number of replicas in the Replicas field and the replica deletion policy in the Scale Down Policy field.
- In the Virtual Disk Templates block, describe the replica disks, and in the Virtual Machine Template block, describe the virtual machine template.
- Click Apply.
The pool form is built from the VirtualMachinePool resource specification, so the field names match the resource parameters. You can paste a ready specification on the YAML tab.
Attaching a shared CD-ROM (or any shared image) to all replicas
Besides per-replica disks, blockDeviceRefs can reference read-only images, ClusterVirtualImage or VirtualImage. Such an image is shared, and all replicas attach the same file, for example an ISO with tools or drivers. Images aren’t listed in virtualDiskTemplates (they have no per-replica state) and aren’t part of the bijection.
Add the image to blockDeviceRefs at the position you need in the boot order. For an installation ISO, put it before the disk, and for a CD-ROM with tools, after it:
spec:
  virtualMachineTemplate:
    spec:
      blockDeviceRefs:
        - kind: VirtualDisk           # Writable per-replica root disk, boots first.
          name: root
        - kind: ClusterVirtualImage   # Shared read-only CD-ROM, attached to every replica.
          name: tools-iso
  virtualDiskTemplates:
    - name: root
      spec:
        persistentVolumeClaim:
          size: 30Gi
        dataSource:
          type: ObjectRef
          objectRef:
            kind: ClusterVirtualImage
            name: ubuntu
An image is attached to existing replicas the same way as any other device, and a change to blockDeviceRefs applies to a live replica the next time it’s recreated (rotation or scale-up).
Scaling the pool
The number of replicas in a pool changes either manually or automatically, by an autoscaler.
A pool supports the standard scale subresource and publishes status.selector, so HPA reads CPU and memory metrics straight from the replicas without extra plumbing.
Besides CPU and memory, the pool works with custom metrics (Pods/External through custom.metrics.k8s.io/external.metrics.k8s.io) and with KEDA, for example to scale by the length of an external queue.
The spec.scaleDownPolicy field determines which replica is deleted on an unaddressed scale-down:
NewestFirst: The youngest replicas are deleted first.OldestFirst: The oldest replicas are deleted first.Explicit: An unaddressed scale-down is forbidden; replicas can be removed only by name. Use it when only the caller knows which replica can be safely removed (for example, an idle one).
With scaleDownPolicy: Explicit, an autoscaler can only increase the number of replicas, and an unaddressed scale-down through the scale subresource is rejected.
- Using the CLI
- Using the web interface
To change the number of replicas manually, run the following command:
d8 k scale virtualmachinepool/runners -n ci --replicas=8Here is an example of HPA configuration for a pool:
apiVersion: autoscaling/v2
kind: HorizontalPodAutoscaler
metadata:
  name: runners
  namespace: ci
spec:
  scaleTargetRef:
    apiVersion: virtualization.deckhouse.io/v1alpha2
    kind: VirtualMachinePool
    name: runners
  minReplicas: 3
  maxReplicas: 20
  metrics:
    - type: Resource
      resource:
        name: cpu
        target:
          type: Utilization
averageUtilization: 70- Go to the Projects tab and select the project you need.
- Go to Virtualization → VM pools.
- Select the pool you need from the list and click its name.
- On the Configuration tab, set the new value in the Replicas field.
- Click Apply.
- The scaling progress is shown in the pool list, in the Status and Ready columns.
Deleting specific replicas
By default, when a pool scales down, the controller picks which replica to delete itself.
To remove exactly the replicas you specify (and scale the pool down by that number), use the scaleDownWith subresource:
d8 k create --raw \
  /apis/subresources.virtualization.deckhouse.io/v1alpha2/namespaces/ci/virtualmachinepools/runners/scaledownwith \
  -f - <<'EOF'
{"targets": ["runners-1b2e84", "runners-9c0d11"]}
EOF
A plain d8 k delete vm doesn’t scale the pool down, because the controller treats it as a lost replica and creates a replacement.
Reusable disks (reclaim)
The reclaim policy sets what happens to a replica disk when the replica is removed from the pool.
The reclaim.onScaleDown parameter of a virtualDiskTemplates element defines this behavior. reclaim is optional; if it isn’t set, the disk is treated as Delete.
Delete(default): The disk belongs to the virtual machine and is deleted along with it; nothing is left after the replica.Retain: The disk belongs to the pool, survives the replica, and is reattached to the next one on a scale-up. It suits state that’s expensive to recreate and has to survive VM recreation, so that scaling back up is warm rather than cold.
keep and ttl configure the pool of free Retain disks (they apply only to Retain):
keep: How many recently freed disks to always keep warm for an instant scale-up.ttldoesn’t apply to them.ttl: How long a free disk lives beyond the warm buffer before garbage collection.
Examples:
# Ephemeral disk: deleted along with the replica (Delete by default).
- name: root
  spec:
    persistentVolumeClaim: { size: 30Gi }
    dataSource: { type: ObjectRef, objectRef: { kind: VirtualImage, name: ubuntu } }

# Reusable disk: keep 3 warm for a fast scale-up, collect the rest after 1h of idling.
- name: cache
  reclaim:
    onScaleDown: Retain
    keep: 3
    ttl: 1h
  spec:
    persistentVolumeClaim: { size: 100Gi }

# Reusable disk without a limit: always reused, never deleted automatically (no ttl).
- name: data
  reclaim:
    onScaleDown: Retain
  spec:
    persistentVolumeClaim: { size: 20Gi }
Invalid combinations are rejected on creation and modification. The keep and ttl parameters are allowed only with Retain, and keep > 0 requires ttl, because without ttl nothing is collected and keep has no effect. A Retain disk without ttl keeps all freed disks indefinitely; limit it with ttl if that isn’t what you need.
Pool limitations and specifics
Here are the limitations and non-obvious pool behaviors worth remembering during operation.
- Removing an entry from
virtualDiskTemplatesdeletes its disks. ForRetaindisks, this destroys reusable data, so remove a template only when it’s no longer needed. - The pool maintains the number of replicas, not their health. An existing but unhealthy VM isn’t recreated, a restart at the VM level brings it back. A
Stoppedreplica is preserved rather than replaced, and only a fully deleted replica is recreated. Retaindisks are shared between replicas. On a scale-up, a new replica can get a freed disk of another replica along with its data; there’s no hard binding between a replica and a disk.- A change to
virtualDiskTemplates[].specaffects only new disks, except forsize, which grows existing ones (shrinking isn’t allowed).dataSource,storageClassName, and the rest don’t apply to disks that already exist. - Each replica has its own copy of every disk from
virtualDiskTemplates. A shared read-only image, VirtualImage or ClusterVirtualImage, for example a single ISO, can be attached to all replicas by listing it in theblockDeviceRefsof the template, while a writable disk isn’t shared between replicas. - An edit to the
blockDeviceRefsof the template (reordering, adding, or removing a shared image) applies to new replicas; live replicas keep their current devices until they’re recreated (rotation or scale-up), as with other template changes that require a restart. - Template changes that require a restart apply only after the replica restarts, according to
.spec.disruptions.restartApprovalModein the template.
GPU devices
GPU device passthrough is an experimental feature available in commercial DP editions.
DP attaches physical GPU devices to virtual machines using DRA (Dynamic Resource Allocation). A device is requested by a reference to a GPUClass in the .spec.gpus block of the VirtualMachine resource.
An administrator prepares the GPUClass resources, so ask them which classes are available in the cluster.
To request a GPU device, add the .spec.gpus block to the machine specification:
apiVersion: virtualization.deckhouse.io/v1alpha2
kind: VirtualMachine
metadata:
  name: linux-vm
spec:
  # ... other VM settings ...
  gpus:
    - gpuClassName: nvidia-h100
In the gpuClassName parameter, specify the name of an existing GPUClass resource. To attach several devices, add more elements to the list, their order doesn’t matter. A single machine takes no more than 16 devices.
A change to the .spec.gpus block applies only after the virtual machine restarts.
USB devices
USB device passthrough is available in commercial DP editions.
DP supports USB device passthrough to virtual machines (VMs) using DRA (Dynamic Resource Allocation). The physical device is connected to a cluster node, and the virtual machine works with it as if the device were plugged into the machine itself.
An administrator connects the device to a node and makes it available to your namespace. After that, a USBDevice resource appears in the namespace, and you attach it to a virtual machine. If the device you need isn’t in the list, contact the administrator.
The administrator takes care of the node and cluster version requirements, so they don’t depend on you.
Project devices (USBDevice)
USBDevice is a namespaced resource that represents a USB device available for attaching to virtual machines in a given namespace. It appears automatically after an administrator assigns the device to the namespace.
An example of viewing the USB devices in a namespace:
d8 k get usbdevice -n my-projectExample output:
NAME              NODE     MANUFACTURER   PRODUCT       ATTACHED   AGE
logitech-webcam   node-2   Logitech       Webcam C920   False      10m
The resource keeps the vendor and product identifiers, the bus, the device number, the serial number, the speed, and the rest of the device details in the .status.attributes block.
USBDevice conditions
Two conditions in the .status.conditions block describe the device state.
The Ready condition shows whether the device is ready for use, and takes one of the following reasons:
Ready: The device is ready for use.NotReady: The device exists but isn’t ready.NotFound: The device is absent from the node.
The Attached condition shows whether the device is attached to a virtual machine:
AttachedToVirtualMachine: The device is attached to a VM.Available: The device is free and can be attached.DetachedForMigration: The device is detached for the duration of a VM migration and is attached again on the target node.NoFreeUSBIPPort: The device is requested by a virtual machine, but the target node has no free USBIP ports left, so the condition has theFalsestatus.
Attaching a USB device to a VM
A device is attached to and detached from a machine without stopping it. A USB device is automatically passed through over the network (USBIP) to the node where the machine runs, so you don’t have to place the machine on the node with the device manually.
During a VM migration, the USB device briefly disconnects and reconnects on the new node at the moment the machine switches over. If the migration fails, the device stays on the old node.
- Using the CLI
- Using the web interface
Add the device to the .spec.usbDevices parameter of the VirtualMachine resource:
d8 k apply -f - <<EOF
apiVersion: virtualization.deckhouse.io/v1alpha2
kind: VirtualMachine
metadata:
  name: linux-vm
spec:
  # ... other VM settings ...
  usbDevices:
    - name: logitech-webcam
EOF
After the VM is created or updated, the USB device is attached to the specified virtual machine.
Infrastructure requirements, USBIP port limits, and device discovery on nodes are described in the admin guide.
- Go to the Projects tab and select the project you need.
- Go to Virtualization → Virtual machines.
- Select the VM you need from the list and click its name.
- On the Configuration tab, scroll down to the USB devices section and click Add.
- In the Attach USB device window that opens, select the device in the Select USB device field and click Add.
- Click the Save button that appears.
The USB devices available in the project are shown in Virtualization → USB devices: the resource name, status, manufacturer, product, serial number, node, bus, and device number.
PCI devices
PCI device passthrough is available in commercial DP editions.
PCI device passthrough lets you use a physical device of a node in a virtual machine (VM), for example an industrial controller, a hardware security module, a capture card, or an FPGA. The device works in the guest operating system under its own driver, so install that driver in the guest system yourself.
Devices are granted to a project by the administrator, who also handles the requirements for the nodes and the cluster versions.
Attaching a PCI device to a VM
The devices that the administrator has made available to your project appear in the namespace as PCIDevice resources. To attach such a device to a machine, follow these steps.
-
Choose a device among the available ones:
d8 k get pcidevice -n my-projectExample output:
NAME                                            NODE     ADDRESS        ATTACHED   AGE
pci-4f2c0b1e8d9a3c5b7e1f0a2d4c6b8e0f1a3c5d7e    node-1   0000:3b:00.0   False      10m
If the list is empty, contact the administrator so that they assign a device to your namespace.
-
Add the device to the
.spec.pciDevicesparameter of the VirtualMachine resource:d8 k apply -f - <<EOF apiVersion: virtualization.deckhouse.io/v1alpha2 kind: VirtualMachine metadata: name: linux-vm spec: # ... other VM settings ... pciDevices: - name: pci-4f2c0b1e8d9a3c5b7e1f0a2d4c6b8e0f1a3c5d7e EOFDevices are attached when the machine starts, so a change to this parameter requires its restart.
-
Make sure that the device is attached to the machine:
d8 k get vm linux-vm -o jsonpath='{.status.pciDevices}'The
truevalue in thereadyfield means that the device is available, and thetruevalue in theattachedfield means that the device is attached to the running machine. Once the machine starts, the device appears in the guest system, for example in thelspcioutput.
To detach a device, remove it from the .spec.pciDevices parameter and restart the machine. Until then, the device stays occupied even if the machine is stopped, so you can’t attach it to another one.
If the device is removed from the node, the machine doesn’t start and stays in the Pending phase. In the .status.pciDevices parameter, such a device stops being ready, but it stays with the machine as long as its specification lists it. DP doesn’t stop a running machine in the meantime, including when the device becomes unavailable to the project.
Limitations
When attaching PCI devices, consider the following limitations:
- A machine with a PCI device starts only on the node of that device and can’t be moved by live migration, so it has to be stopped when the node is put into maintenance.
- All PCI devices of a machine have to be on the same node, otherwise the specification is rejected.
- A device is attached to one machine only. If another one already lists it, DP rejects your specification.
- A machine takes no more than eight PCI devices.
- A network card that’s passed through works around the cluster network subsystem. It doesn’t appear in the
.spec.networksparameter, and DP neither assigns nor tracks its IP and MAC addresses.