Step-by-step installation instructions are available in the Getting started section.
This page provides an overview of installing Deckhouse Platform (DP).
Installation methods
You can install DP using a CLI installer, which is available as a container image and based on the dhctl utility.
Installation options
You can install DP in the following ways::
-
In a supported cloud. The installer automatically creates and configures all required resources (including virtual machines, network objects, etc.), deploys a Kubernetes cluster, and installs DP. A full list of supported cloud providers is available in the Integration with IaaS section.
-
On bare-metal servers (including hybrid clusters) or in unsupported clouds. The installer configures the servers or virtual machines specified in the configuration, deploys a Kubernetes cluster, and installs DP. Step-by-step instructions for bare metal are available in Getting started → Deckhouse Platform for bare metal.
-
In an existing Kubernetes cluster. The installer deploys DP and integrates it with the current infrastructure. Step-by-step instructions for an existing cluster are available in Getting started → Deckhouse Platform in existing cluster.
Installation requirements
To estimate the resources required for Deckhouse Platform installation, refer to the following guides:
Before installation, ensure the following:
-
For bare-metal clusters (including hybrid clusters) and installations in unsupported clouds: the server runs an OS from the supported OS list (or a compatible version) and is accessible via SSH with a key.
-
For supported clouds: the required resource quotas are available and access credentials to the cloud infrastructure are prepared (provider-specific).
-
If there are infrastructure-level restrictions on network communication, ensure that the requirements described in the Network interaction of the platform components section are met.
-
There is access to the Deckhouse container registry (official
registry.deckhouse.io, or a mirror).
Additional requirements for virtualization
If you plan to run virtual machines (VMs) in the cluster, its nodes have to meet additional requirements. Take them into account when planning the cluster, because some of them can’t be met after the installation.
Nodes that run virtual machines have to be physical servers (bare metal). Installation on virtual machines is allowed for demonstration purposes only, requires nested virtualization to be enabled, and isn’t covered by technical support.
- Every node that will run VMs needs a CPU supporting Intel-VT (VMX) or AMD-V (SVM) instructions, with hardware virtualization enabled in the BIOS/UEFI settings.
- All cluster nodes have to run the same Linux kernel version. Version differences lead to incompatible system calls and resource handling, which makes live migration of VMs unstable.
- Astra Linux nodes require platform version 1.8.3 or higher: earlier versions contain a bug that interferes with virtualization.
- VM disks and images are created on top of PersistentVolume resources, so the cluster needs one or several supported storages: local or replicated SDS storage, Ceph, NFS, TATLIN.UNIFIED (Yadro), Huawei Dorado, or HPE 3par. Also set the default StorageClass.
- Choose the subnets that VMs will get IP addresses from in advance. They are set by the
virtualMachineCIDRsparameter and must not overlap the pod (podSubnetCIDR) and service (serviceSubnetCIDR) address spaces. - A cluster with virtualization is designed for
1000nodes and50000virtual machines.
The hardware requirements for the nodes match the general DKP requirements listed above.
Preparing the Configuration
Before installation, you need to prepare the installation configuration file and, if needed, a post-bootstrap script.
Installation configuration file
The installation configuration file is a set of YAML documents that contains DP settings and manifests for cluster objects and resources to be created after installation. The configuration file is used by the CLI installer and is passed via the --config parameter (see below).
Required and optional objects/resources that may be needed in the installation configuration file:
-
InitConfiguration (required): Initial configuration parameters necessary to start DP.
Starting with DP 1.75, use the ModuleConfig
deckhouseto configure access to the DP container registry. Configuring access with InitConfiguration (viaimagesRepo,registryDockerCfg,registryScheme, andregistryCAparameters) is considered a legacy method. -
ClusterConfiguration: General cluster parameters, such as Kubernetes (control plane components) version, network settings, CRI parameters, etc. Required, except when DP is installed into an already existing Kubernetes cluster.
-
StaticClusterConfiguration: Parameters for a cluster deployed on bare-metal servers (including hybrid clusters) or in unsupported clouds. Required, except when DP is installed into an already existing Kubernetes cluster.
To add worker node groups (the NodeGroup object), you may also need StaticInstance and SSHCredentials.
-
<PROVIDER>ClusterConfiguration: Parameters for integration with a cloud provider. Required when integrating DP with a supported cloud infrastructure.When integrating with Deckhouse Virtualization, the DVPClusterConfiguration resource is not used. It is replaced by the
cloud-provider-dvpModuleConfig and related resources described in Layouts and configuration in DVP.Examples of resources configuring integration with a cloud provider:
- AWSClusterConfiguration: Amazon Web Services
- AzureClusterConfiguration: Microsoft Azure
- DVPClusterConfiguration: Deckhouse Virtualization Platform
- GCPClusterConfiguration: Google Cloud Platform
- HuaweiCloudClusterConfiguration: Huawei Cloud
- OpenStackClusterConfiguration: OpenStack, OVHcloud, Selectel, VK Cloud
- VsphereClusterConfiguration: VMware vSphere
- VCDClusterConfiguration: VMware Cloud Director
- YandexClusterConfiguration: Yandex Cloud
- ZvirtClusterConfiguration: zVirt
To add cloud nodes, you also need <PROVIDER>InstanceClass objects (for example YandexInstanceClass for Yandex Cloud) that describe VM configuration in the node group (the NodeGroup object).
-
DP module configurations.
Each module is configured (and can be enabled or disabled) with its own ModuleConfig (for example, ModuleConfig
user-authnfor theuser-authnmodule). Parameters that are allowed in the ModuleConfig object are described in the respective module documentation under “Configuration” (for example, configuration of theuser-authnmodule).A list of all Deckhouse Platform modules is available in the Modules section.
Some modules may be enabled and preconfigured automatically depending on the selected installation option and cluster configuration (for example, modules that provide control plane and networking functionality).
Modules often configured during installation:
global: Global DP settings for parameters used by default by all modules and components (DNS name template, StorageClass, module component placement settings, etc.).deckhouse: Container registry access settings, the desired release channel, and other parameters.user-authn: Unified authentication.cni-cilium: Cluster networking (for example, used when installing DP on bare metal or in an air-gapped environment);virtualization: Running virtual machines in the cluster, enabled during the installation or later.
If the cluster is created with nodes dedicated to specific workload types (for example, system or monitoring nodes), it is recommended to explicitly set the
nodeSelectorparameter in module configurations that use persistent storage volumes (for example, in thenodeSelectorparameter of theprometheusModuleConfig for theprometheusmodule). -
IngressNginxController: Parameters of the HTTP/HTTPS load balancer (Ingress controller).
-
NodeGroup: Node group parameters. Required to add worker nodes.
-
Objects for authentication and authorization such as ClusterAuthorizationRule, AuthorizationRule, User, Group, and DexProvider.
See authentication and authorization documentation for details.
Post-bootstrap script
The installer allows you to run a custom script on one of the master nodes after installation (post-bootstrap script). This script can be used for:
- Additional cluster configuration
- Collecting diagnostic information
- Integrating with external systems or other tasks
The path to the post-bootstrap script can be specified using the --post-bootstrap-script-path parameter when running the CLI installer.
Installing
When installing a commercial edition of Deckhouse Platform from the official container registry registry.deckhouse.io, you must first log in with your license key:
docker login -u license-token registry.deckhouse.io
The command to run the installer container from the public Deckhouse container registry:
docker run --pull=always -it [<MOUNT_OPTIONS>] registry.deckhouse.io/deckhouse/<DECKHOUSE_REVISION>/install:<RELEASE_CHANNEL> bash
Where:
<DECKHOUSE_REVISION>: DP edition. For example,eefor Enterprise Edition,cefor Community Edition, etc.<MOUNT_OPTIONS>: Parameters for mounting files into the installer container, such as:- SSH access keys
- Configuration file
- Resource file, etc.
<RELEASE_CHANNEL>: Release channel in kebab-case format:alpha: Alpha channelbeta: Beta channelearly-access: Early Access channelstable: Stable channelrock-solid: Rock Solid channel
Here is an example of a command to run the DP Community Edition installer container from the Stable release channel:
docker run -it --pull=always \
  -v "$PWD/config.yaml:/config.yaml" \
  -v "$PWD/dhctl-tmp:/tmp/dhctl" \
  -v "$HOME/.ssh/:/tmp/.ssh/" registry.deckhouse.io/deckhouse/ce/install:stable bash
DP installation is performed within the installer container using the dhctl command:
- To start the installation of DP with the deployment of a new cluster (for all cases except installing into an existing cluster), use the command
dhctl bootstrap. - To install DP into an already existing cluster, use the command
dhctl bootstrap-phase install-deckhouse.
To learn more about the available parameters, run dhctl bootstrap -h.
Example of running a DP installation with cloud cluster deployment:
dhctl bootstrap \
  --ssh-user=<SSH_USER> --ssh-agent-private-keys=/tmp/.ssh/<SSH_PRIVATE_KEY_FILE> \
  --config=/config.yml
Where:
/config.yml: Installation configuration file.<SSH_USER>: Username for SSH connection to the server.--ssh-agent-private-keys: Private SSH key file for SSH connection.<SSH_PRIVATE_KEY_FILE>: Name of private key. For example, for a key with RSA encryption it can beid_rsa, and for a key with ED25519 encryption it can beid_ed25519.
Pre-installation checks
Starting with version 1.74, DP modules are installed as images in the EROFS format that are mounted read-only, which protects them from being modified after installation. This mechanism is enabled automatically if the erofs filesystem is registered in the kernel on the node running the DP controller (a master node by default). DP loads this kernel module only on nodes with containerd v2, so if master nodes use containerd v1, the operating system has to load erofs on its own. Otherwise, DP will install modules the regular way, without protecting their integrity and without a dedicated alert. For details, refer to “Integrity protection of DP modules”.
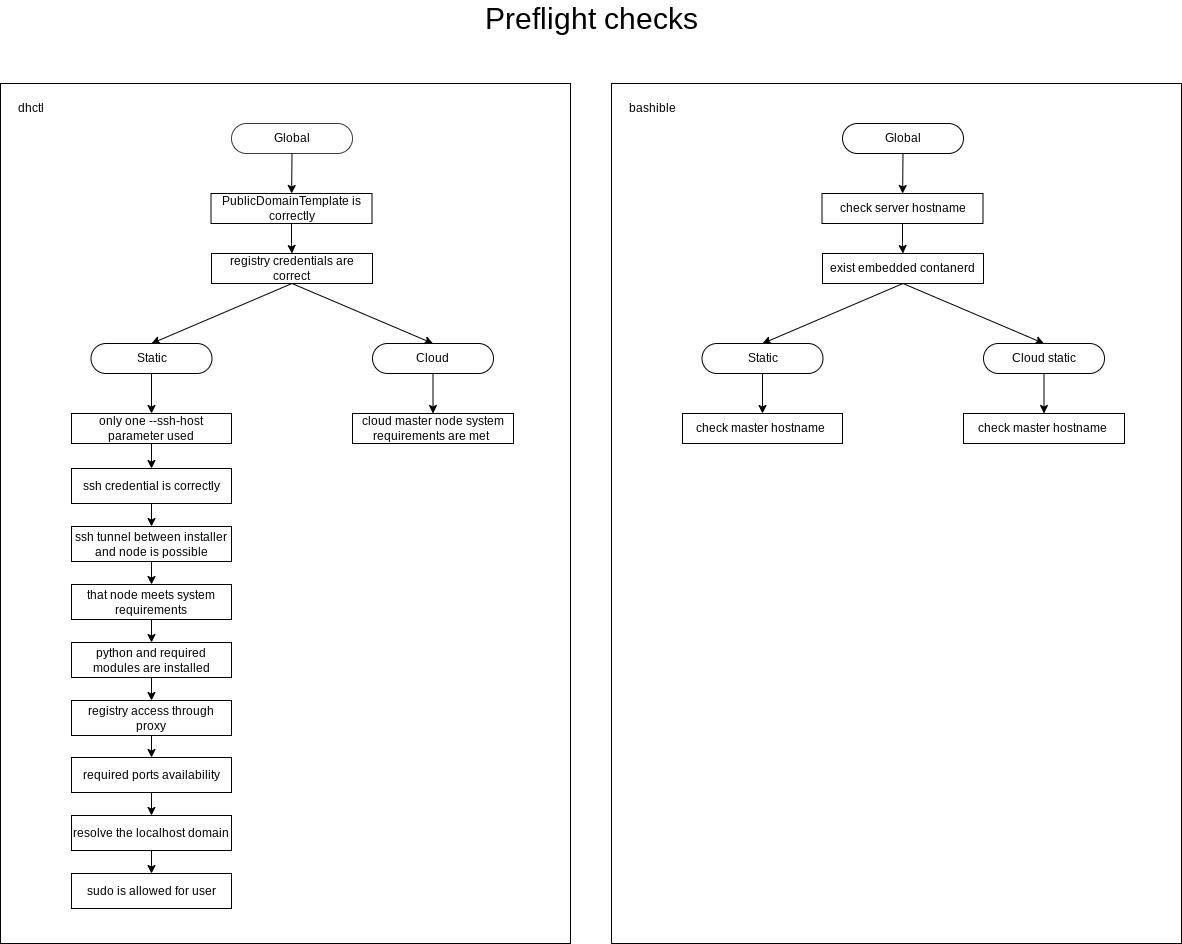
List of checks performed by the installer before starting Deckhouse Platform installation:
- General checks:
- The values of the parameters
publicDomainTemplateandclusterDomaindo not match. - The authentication data for the container registry specified in the installation configuration is correct.
- The host name meets the following requirements:
- The length does not exceed 63 characters.
- It consists only of lowercase letters.
- It does not contain special characters (hyphens
-and periods.are allowed, but they cannot be at the beginning or end of the name).
- The server (VM) has a supported container runtime (
containerd) installed. - The host name is unique within the cluster.
- The server’s system time is correct.
- The address spaces for Pods (
podSubnetCIDR) and services (serviceSubnetCIDR) do not intersect.
- The values of the parameters
- Checks for static and hybrid cluster installation:
- Only one
--ssh-hostparameter is specified. For static cluster configuration, only one IP address can be provided for configuring the first master node. - SSH connection is possible using the specified authentication data.
- SSH tunneling to the master node server (or VM) is possible.
- The server (VM) selected for the master node installation must meet the minimum system requirements:
- At least 4 CPU cores.
- At least 8 GB of RAM.
- At least 60 GB of disk space with 400+ IOPS performance.
- Linux kernel version 5.8 or newer.
- One of the package managers installed:
apt,apt-get,yum, orrpm. - Access to standard OS package repositories.
- When using
ContainerdV2as the default container runtime on cluster nodes:- Support for
CgroupsV2. - Systemd version
244. - Support for the
erofskernel module.
- Support for
- Python (Python 3 or Python 2) must be available on the server (VM) intended for the master node. The standard Python modules used by the installer must also be available:
- For HTTP request handling:
urllib.request(Python 3) orurllib2(Python 2) - For HTTP error handling:
urllib.error(Python 3) orurllib2(Python 2) - For working with configuration files:
configparser(Python 3) orConfigParser(Python 2) - For HTTP server:
http.server(Python 3) orSimpleHTTPServer(Python 2) - For TCP server:
http.server(Python 3) orSocketServer(Python 2)
- For HTTP request handling:
- The container registry is accessible through a proxy (if proxy settings are specified in the installation configuration).
- On the server (VM) intended for the master node and on the host from which the installer is launched, port
22/TCP(network access from a personal computer) must be accessible, as it is required for the installation process. For details, see the Network interaction of the platform components section. - DNS must resolve
localhostto IP address127.0.0.1. - The user has
sudoprivileges on the server (VM). - Required ports for the installation must be open:
- Port
22/TCPbetween the host running the installer and the server. - No port conflicts with those used by the installation process.
- Port
- The server (VM) has the correct time.
- The user
deckhousemust not exist on the server (VM). - The address spaces for Pods (
podSubnetCIDR), services (serviceSubnetCIDR), and internal network (internalNetworkCIDRs) do not intersect.
- Only one
- Checks for cloud cluster installation:
- The configuration of the virtual machine for the master node meets the minimum requirements.
- The cloud provider API is accessible from the cluster nodes.
- The configuration for Yandex Cloud with NAT Instance is verified.
Aborting the installation
If the installation was interrupted or issues occurred during the installation process in a supported cloud, there might be leftover resources created during the installation. To remove them, run the following command within the installer container:
dhctl bootstrap-phase abort
The configuration file provided through the --config parameter when running the installer must be the same that was used during the initial installation.
Installing virtualization
Virtualization is enabled by the virtualization ModuleConfig resource and deploys its components to the d8-virtualization namespace. You can either include the resource in the installation configuration file or apply it in a ready cluster.
Enabling virtualization restarts kubelet, containerd, and the network module agents on every node that is expected to run virtual machines. This is required to set up connectivity between containerd and the DVCR image storage.
A minimal configuration defines the image storage size and the subnets that virtual machines get addresses from:
apiVersion: deckhouse.io/v1alpha1
kind: ModuleConfig
metadata:
  name: virtualization
spec:
  enabled: true
  version: 1
  settings:
    dvcr:
      storage:
        type: PersistentVolumeClaim
        persistentVolumeClaim:
          size: 50G
    virtualMachineCIDRs:
      - 10.66.10.0/24
The other parameters are covered in the module settings reference.
To check if virtualization is ready, run the following command:
d8 k get modules virtualization
Example output:
NAME             WEIGHT   SOURCE      PHASE   ENABLED   READY
virtualization   900      deckhouse   Ready   True      True
The module phase should be Ready.
Placement of virtualization components across nodes
How components are distributed across nodes depends on the cluster configuration. A cluster may have only master nodes running both control plane components and workloads; master and worker nodes; master, system, and worker nodes; or other combinations. Worker nodes here are the nodes without restrictions (taints) that would prevent regular workloads from running.
Deckhouse Platform (DP) distributes the components by priority, and if the cluster has a suitable node type, the component lands on it. What each component is responsible for is described in Virtualization subsystem.
| Component name | Node group | Comment |
|---|---|---|
virt-operator-* |
system/master | |
virt-api-* |
master | |
virt-controller-* |
system/worker | |
virt-handler-* |
Nodes with KVM | |
virtualization-api-* |
master | |
virtualization-controller-* |
master | |
dvcr-* |
system | Storage has to be available on the node. With no system nodes, the component lands on a worker node. |
virtualization-audit-* |
master | Available in commercial DP editions. |
virtualization-dra-* |
Dedicated nodes | Available in commercial DP editions. |
vm-route-forge-* |
All cluster nodes |
The virt-handler-* component runs only on the nodes where DP detected KVM support and set the virtualization.deckhouse.io/kvm-enabled label, and the virtualization-dra-* component runs only on nodes labeled with virtualization.deckhouse.io/usbip.
The components that create and upload virtual machine images and disks run only while that work is in progress:
| Component name | Node group | Comment |
|---|---|---|
d8v-vi-importer-*, d8v-cvi-importer-* |
system/worker | Uploads an image from an external source or another resource to the image storage. |
d8v-vi-uploader-*, d8v-cvi-uploader-* |
system/worker | Accepts the file that you upload from the CLI or the web interface. |
d8v-vd-pvc-importer-*, d8v-vi-pvc-importer-* |
system/worker | Moves an image from the image storage to a disk volume. |
d8v-pvc-pvc-source-importer-* |
system/worker | Serves the data of the source volume over the network when a disk is cloned. |
d8v-pvc-pvc-target-importer-* |
system/worker | Receives the data on the target volume when a disk is cloned. |
d8v-vi-bounder-* |
system/worker | Keeps the volume on the required node while an image is created on it. |
Cluster with taints on all nodes
Sometimes taints are configured on every cluster node, which is how an administrator explicitly controls where workloads land. In such a configuration, keep the following in mind:
-
When creating a VirtualDisk, pay attention to the
volumeBindingModeof the StorageClass. WithImmediate, the PersistentVolume is created right after the disk is created, before the virtual machine is scheduled. Make sure the storage can create volumes on the nodes allowed for virtual machines by the placement parameters, includingnodeSelector,tolerations, and the settings in thespecof the virtual machine or the VirtualMachineClass. Otherwise, the disk may end up on a node where the virtual machine can’t start. WithWaitForFirstConsumer, the volume is created on the node the virtual machine is scheduled to, and the problem doesn’t occur. -
VirtualImage and ClusterVirtualImage rely on the temporary components from the table above. They have a toleration for the
dedicated.deckhouse.io=systemtaint. -
The cluster has to have a
systemNodeGroup, or the administrator adds thededicated.deckhouse.io=systemtaint to selected nodes without creating a NodeGroup. Without such nodes, these components won’t be scheduled, and images won’t reach theReadyphase.
Air-gapped environment, working via proxy and using external registries
For more details on installing and updating DP in an air-gapped environment, see the “Installing DP in an air-gapped environment” and “Updating DP in an air-gapped environment” guides.
Installing from an external (third-party) registry
Available in the following editions: SE, SE+, EE.
DP can be installed from an external container registry or via a proxy registry inside an air-gapped environment.
DP supports Basic and Bearer token authentication schemes for container registries (Basic is tried first; if it fails, Bearer is used).
If a reverse proxy is placed in front of the registry, it must correctly forward the Registry API v2 header Docker-Distribution-API-Version: registry/2.0. Otherwise the Basic check may fail, and the subsequent Bearer attempt may fail with the error couldn't find bearer realm parameter.
The following container registries were verified and are guaranteed to work: Nexus, Harbor, Artifactory, CNCF Distribution, Quay.
When working with external registries, do not use an administrator account to access them from DP. Create a dedicated read-only account limited to the required repository in the registry. Refer to an example of creating such an account.
There are several options for configuring access to external container registries during cluster installation:
- Starting from DP version 1.75 — using the
deckhouseModuleConfig. - Prior to DP version 1.75 — using InitConfiguration (considered a legacy method, refer to the example below).
To configure access using the deckhouse ModuleConfig, specify the external registry access parameters in the settings.registry section.
Specify the parameters for accessing a third-party registry in the settings.registry section of the ModuleConfig deckhouse.
Example:
apiVersion: deckhouse.io/v1alpha1
kind: ModuleConfig
metadata:
  name: deckhouse
spec:
  version: 1
  enabled: true
  settings:
    registry:
      mode: Direct
      direct:
        imagesRepo: test-registry.io/some/path
        scheme: HTTPS
        username: <username>
        password: <password>
        ca: <CA>
Nexus configuration notes
When interacting with a docker-type repository in Nexus (for example, using docker pull or docker push commands), you must specify the address in the following format: <NEXUS_URL>:<REPOSITORY_PORT>/<PATH>.
Using the URL value from the Nexus repository settings is not allowed.
When using the Nexus repository manager, the following requirements must be met:
- A proxy Docker repository must be created (“Administration” → “Repository” → “Repositories”):
- The
Maximum metadata ageparameter is set to0.
- The
- Access control must be configured:
- Create a role named Nexus (“Administration” → “Security” → “Roles”) with the following privileges:
nx-repository-view-docker-<repository>-browsenx-repository-view-docker-<repository>-read
- Create a user (“Administration” → “Security” → “Users”) and assign them the Nexus role.
- Create a role named Nexus (“Administration” → “Security” → “Roles”) with the following privileges:
To configure Nexus, follow these steps:
-
Create a proxy Docker repository (“Administration” → “Repository” → “Repositories”) that points to the public Deckhouse container registry.
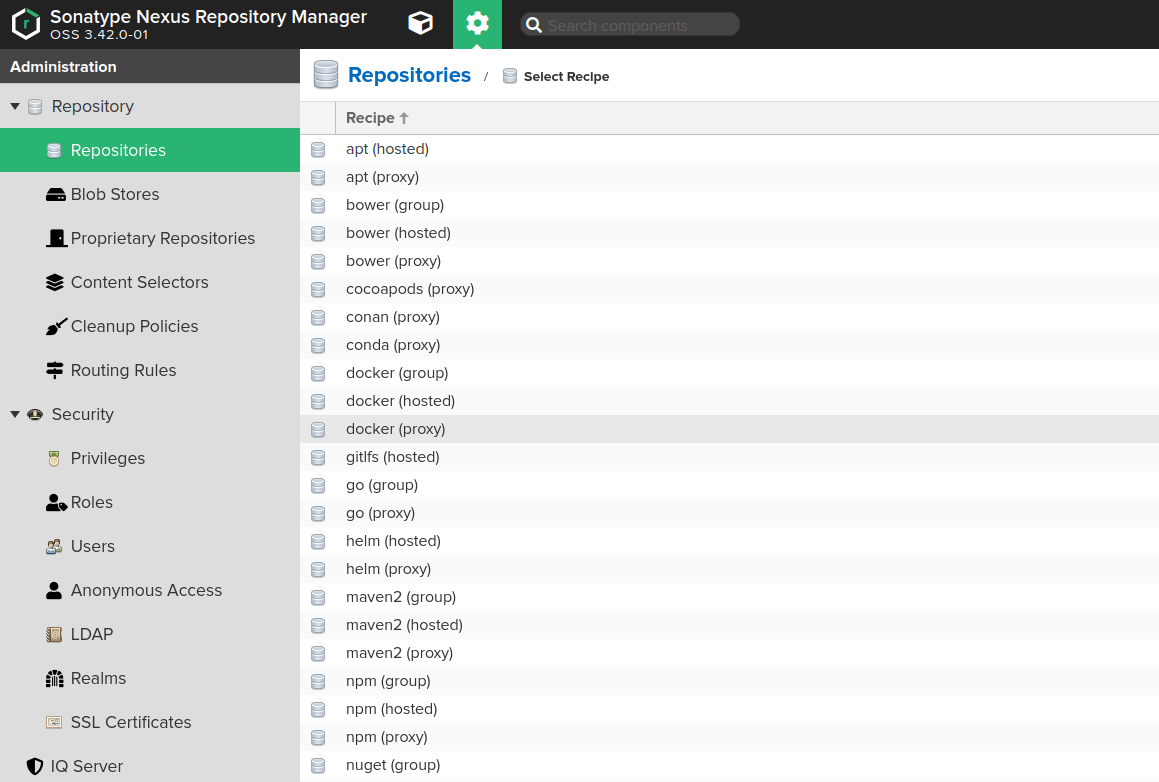
- Fill out the repository creation form with the following values:
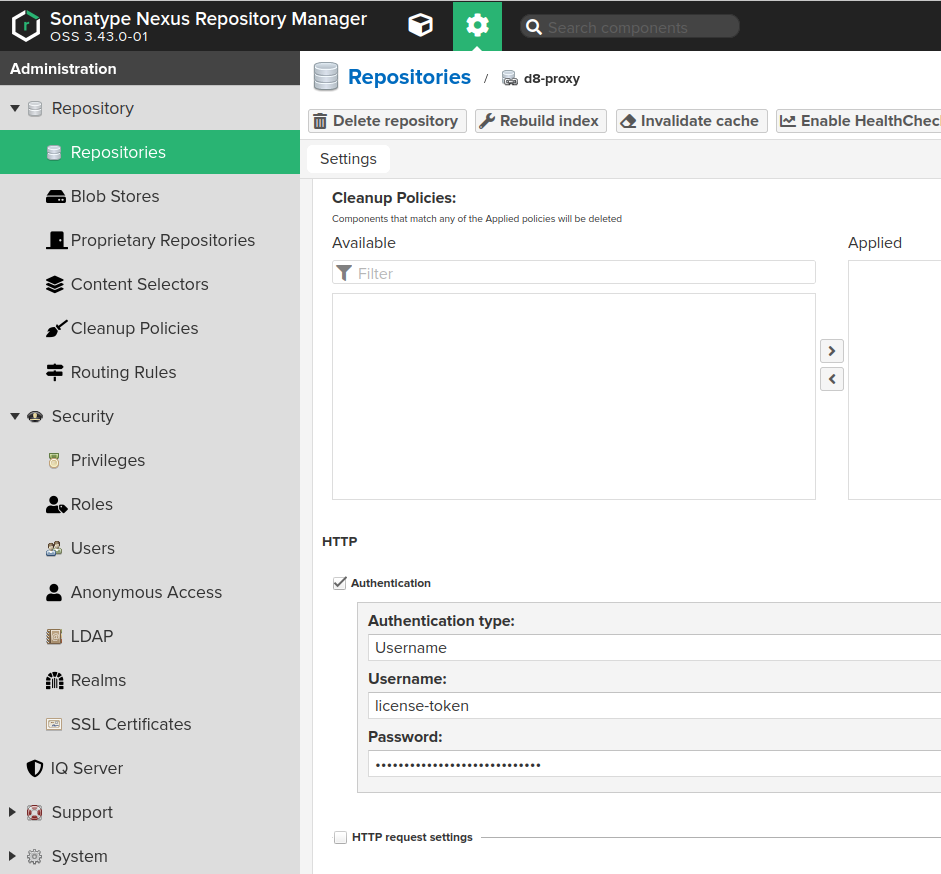
Name: the desired repository name, e.g.,d8-proxy.Repository Connectors / HTTPorHTTPS: a dedicated port for the new repository, e.g.,8123or another.Remote storage: must be set tohttps://registry.deckhouse.io/.Auto blocking enabledandNot found cache enabled: can be disabled for debugging; otherwise, enable them.Maximum Metadata Age: must be set to0.- If using a commercial edition of Deckhouse Platform, enable the
Authenticationcheckbox and fill in the following:Authentication Type:Username.Username:license-token.Password: Your Deckhouse Platform license key.
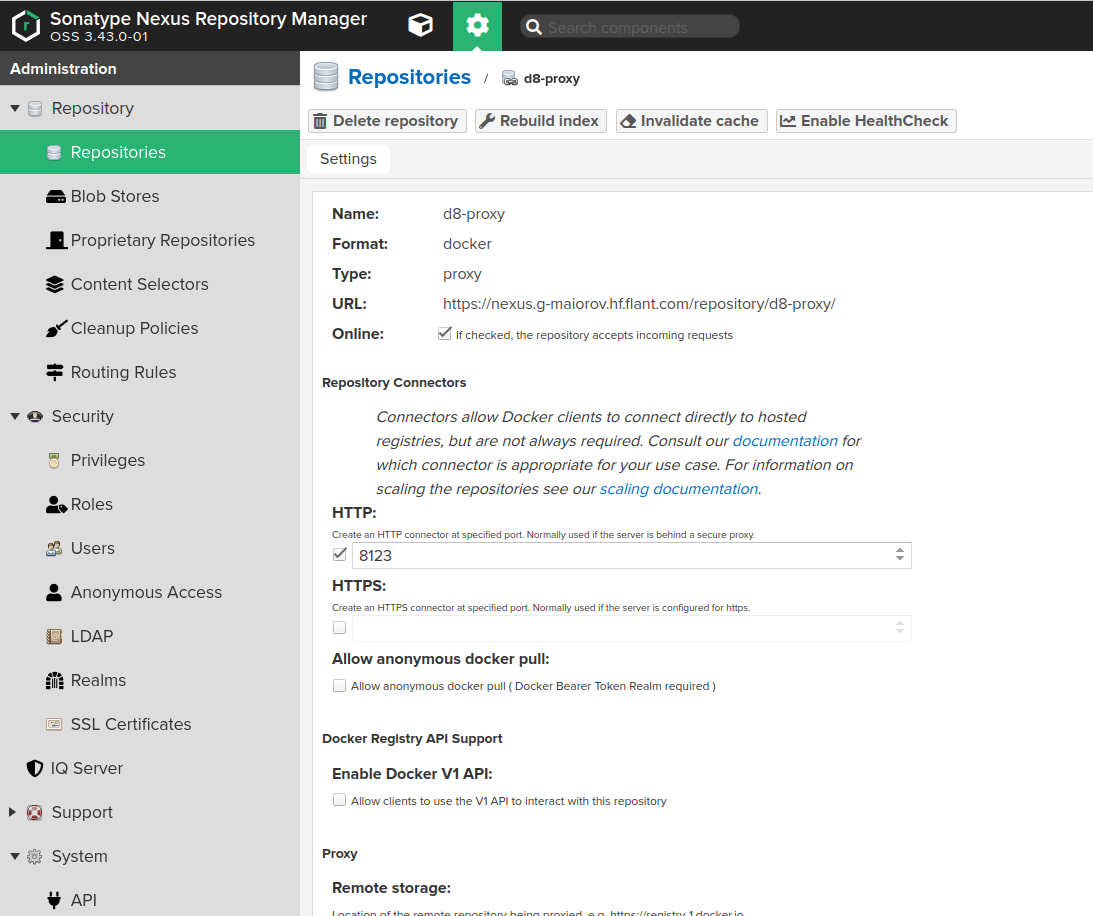
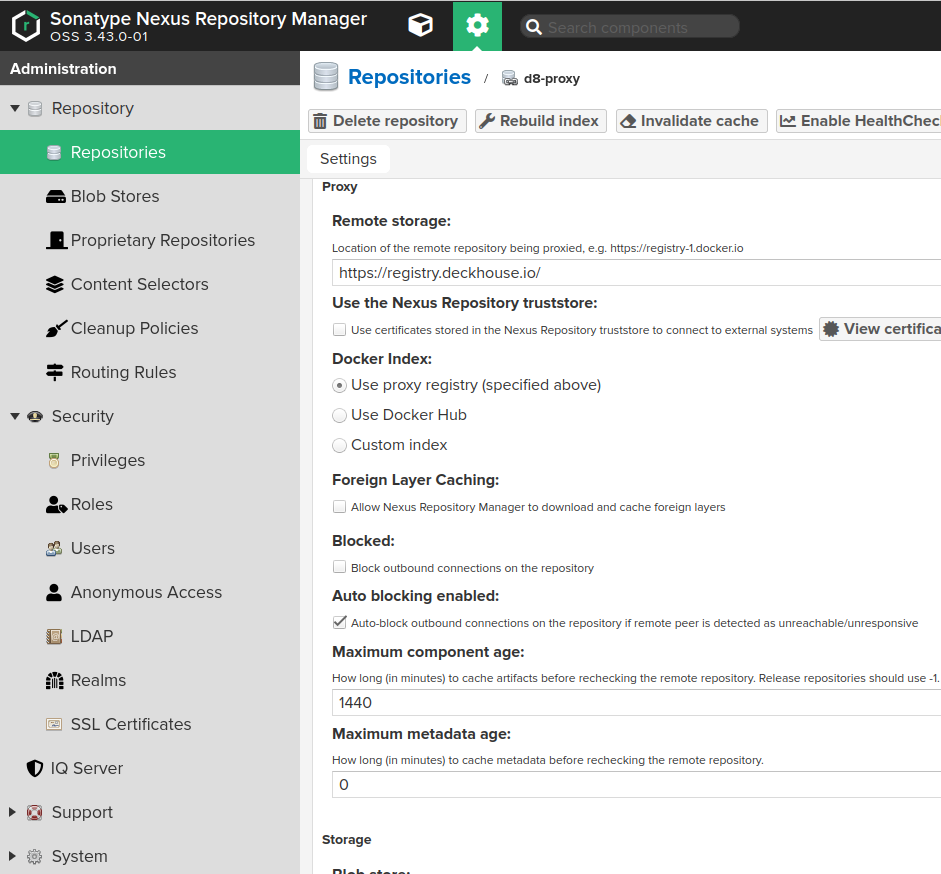
- Configure Nexus access control to allow DP to access the created repository:
-
Create a Nexus role (“Administration” → “Security” → “Roles”) with the following privileges:
nx-repository-view-docker-<repository>-browseandnx-repository-view-docker-<repository>-read.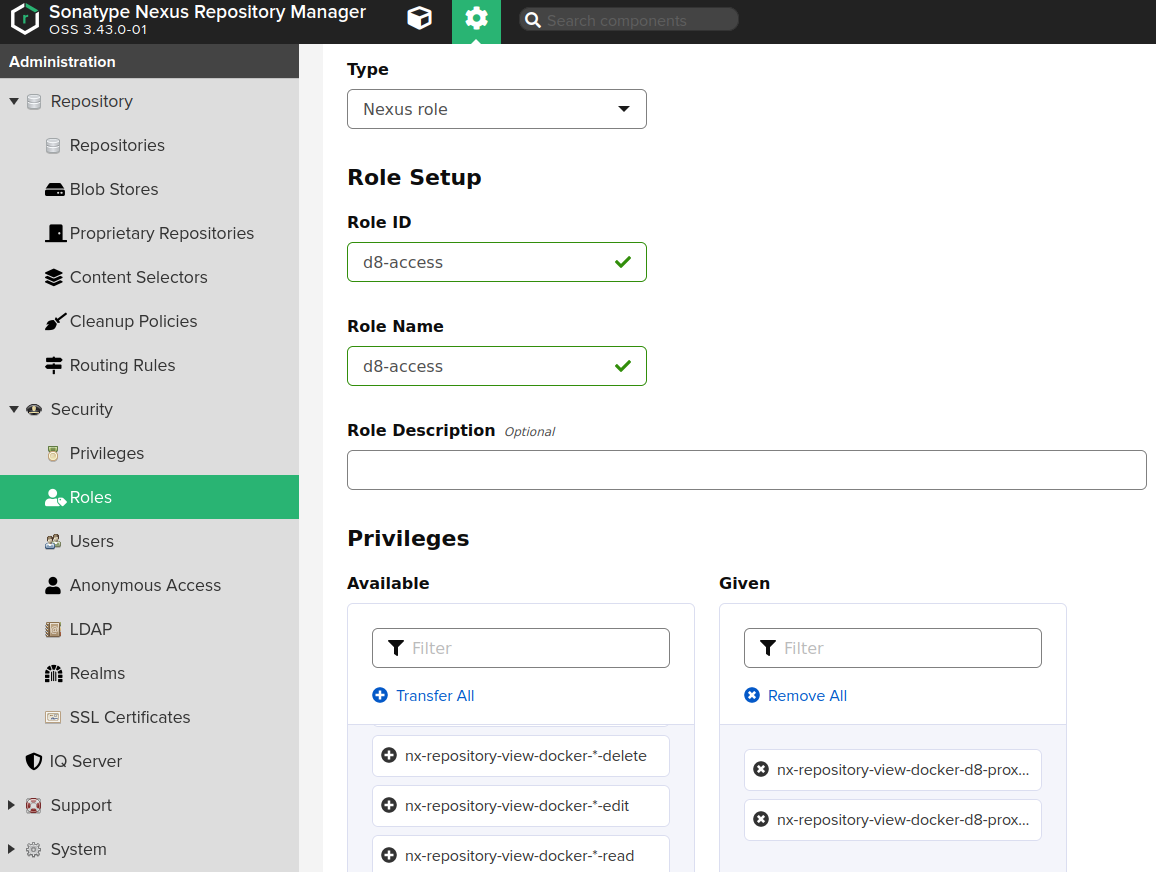
-
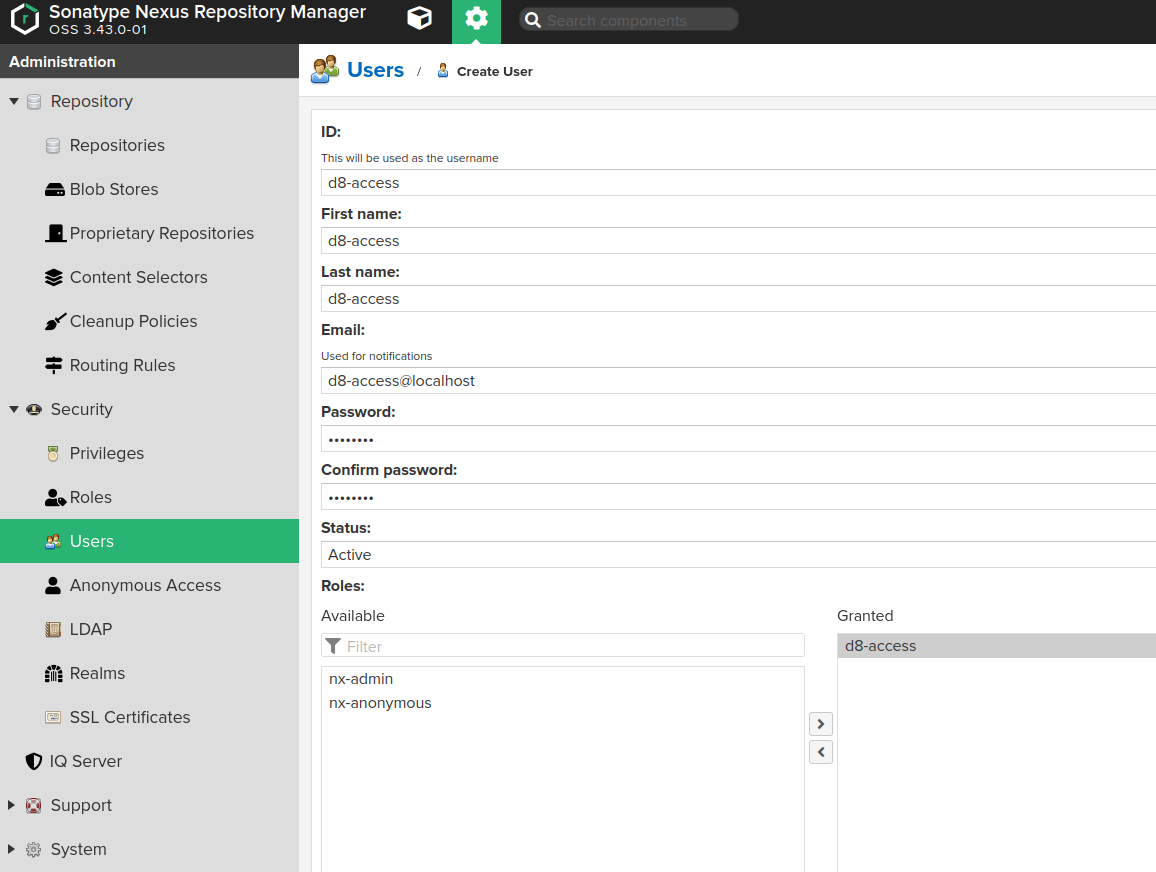
Create a user (“Administration” → “Security” → “Users”) and assign them the role created above.
-
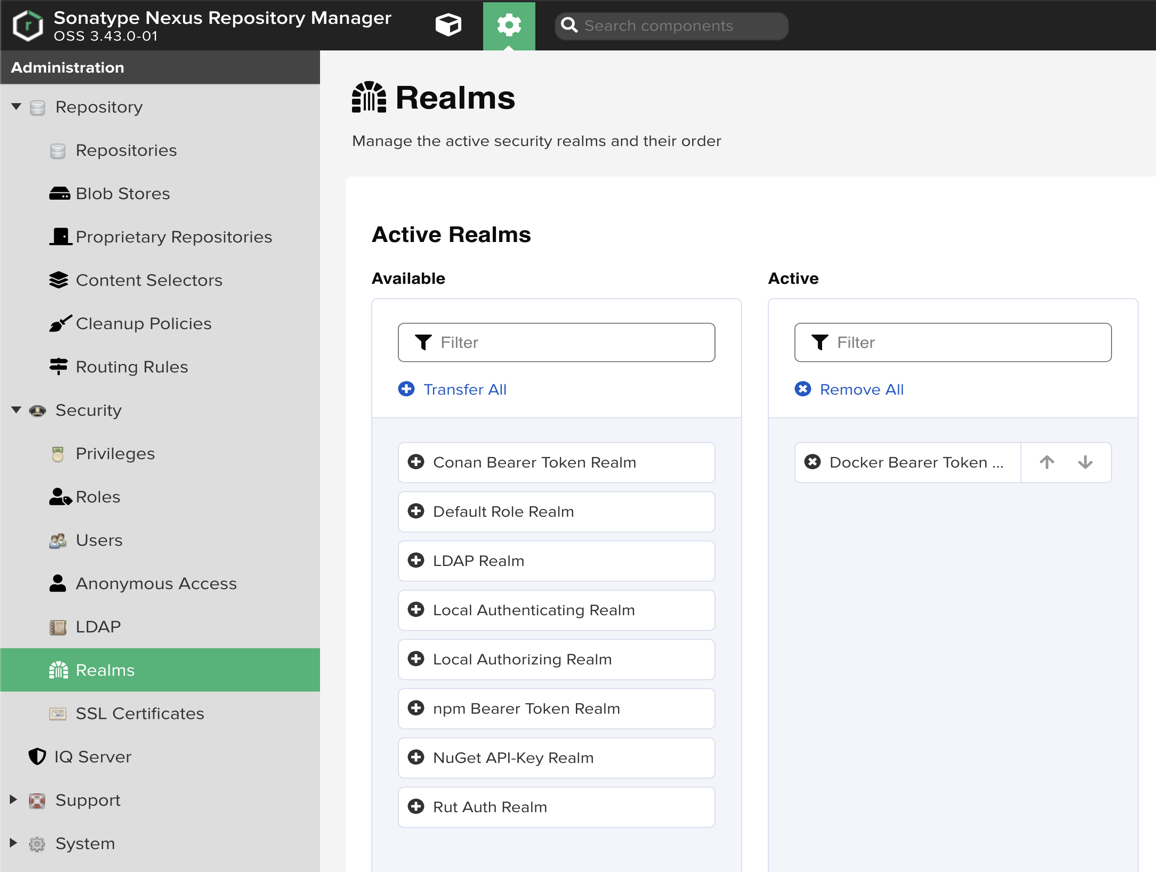
Enable Docker Bearer Token Realm (“Administration” → “Security” → “Realms”):
- The Docker Bearer Token Realm must be in the Active list (on the right), not in Available (on the left).
- If it is not in Active:
- Find it in the Available list.
- Move it to Active using the arrow button.
- Click Save.
- Restart Nexus (it is required for the changes to take effect).
-
As a result, DP images will be available at a URL as follows: https://<NEXUS_HOST>:<REPOSITORY_PORT>/deckhouse/ee:<d8s-version>.
Harbor configuration notes
Use the Harbor Proxy Cache feature.
- Configure the registry access:
- In the side menu, navigate to “Administration” → “Registries” and click “New Endpoint” to add a new endpoint for the registry.
- In the “Provider” dropdown list, select “Docker Registry”.
- In the “Name” field, enter an endpoint name of your choice.
- In the “Endpoint URL” field, enter
https://registry.deckhouse.io. - In the “Access ID” field, enter
license-token. - In the “Access Secret” field, enter your Deckhouse Platform license key.
- Set any remaining parameters as necessary.
- Click “OK” to confirm creation of a new endpoint for the registry.

- Create a new project:
- In the side menu, navigate to “Projects” and click “New Project” to add a project.
- In the “Project Name” field, enter a project name of your choice (for example,
d8s). This name will be a part of the URL. - In the “Access Level” field, select “Public”.
- Enable “Proxy Cache” and in the dropdown list, select the registry created earlier.
- Set any remaining parameters as necessary.
- Click “OK” to confirm creation of a new project.
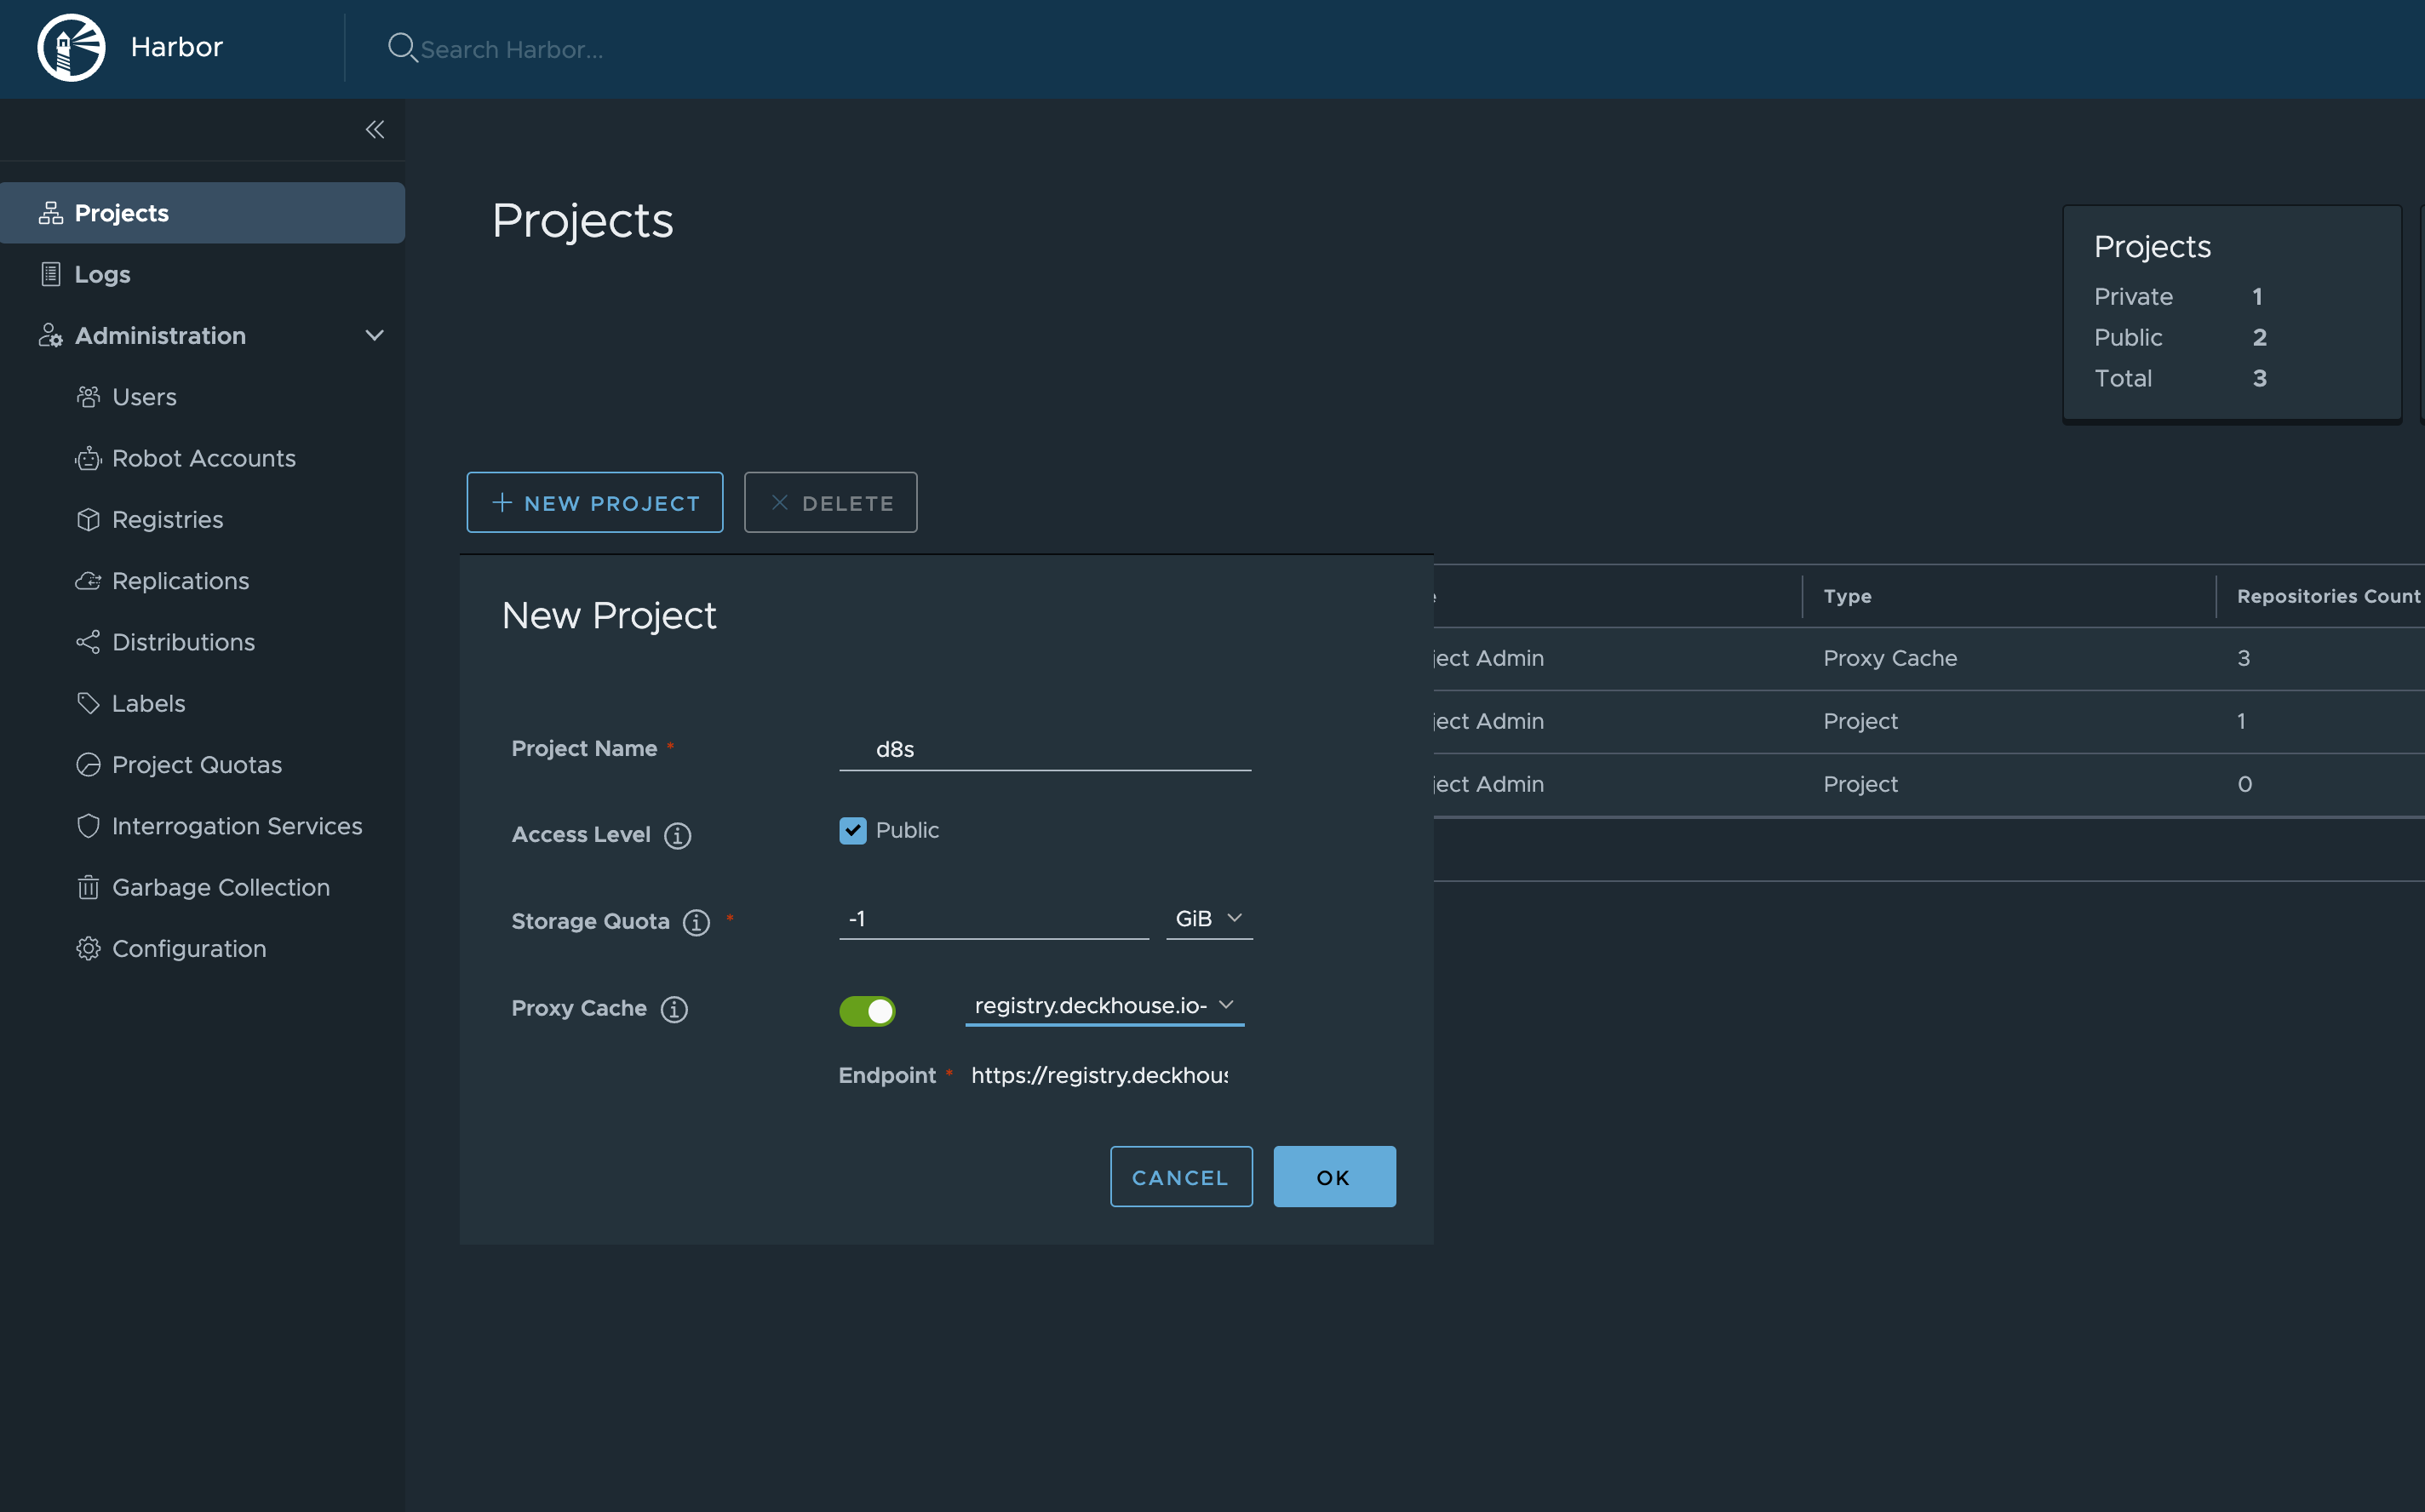
Once Harbor is configured, DP images will be available at a URL as follows: https://your-harbor.com/d8s/deckhouse/ee:{d8s-version}.
Manual loading of DP images and vulnerability DB into a private registry
The d8 mirror utility is not available for use with the Community Edition (CE) and Basic Edition (BE).
You can check the current status of versions in the release channels at releases.deckhouse.io.
-
Download DP images to a dedicated directory using the
d8 mirror pullcommand.By default,
d8 mirror pulldownloads only the current versions of DP, vulnerability scanner databases (if included in the DP edition), and officially delivered modules. For example, for Deckhouse Platform 1.59, only version 1.59.12 will be downloaded, as it is sufficient for upgrading the platform from 1.58 to 1.59.Run the following command (specify the edition code and license key) to download the current version images:
d8 mirror pull \
  --source='registry.deckhouse.io/deckhouse/<EDITION>' \
  --license='<LICENSE_KEY>' /home/user/d8-bundle
Where:
--source: Address of the Deckhouse container registry.<EDITION>: Deckhouse Platform edition code (for example,ee,se,se-plus). By default, the--sourceparameter refers to the Enterprise Edition (ee) and can be omitted.--license: Parameter for specifying the Deckhouse Platform license key for authentication in the official container registry.<LICENSE_KEY>: Deckhouse Platform license key./home/user/d8-bundle: Directory where the image packages will be placed. It will be created if it does not exist.
If the image download is interrupted, rerunning the command will resume the download, provided no more than one day has passed since the interruption.
Example command to download all DP EE versions starting from version 1.59 (specify your license key):
d8 mirror pull \
--license='<LICENSE_KEY>' \
--since-version=1.59 /home/user/d8-bundle
Example command to download the current DP SE versions (specify your license key):
d8 mirror pull \
--license='<LICENSE_KEY>' \
--source='registry.deckhouse.io/deckhouse/se' \
/home/user/d8-bundle
Example command to download DP images from an external registry:
d8 mirror pull \
--source='corp.company.com:5000/sys/deckhouse' \
--source-login='<USER>' --source-password='<PASSWORD>' /home/user/d8-bundle
Example command to download the vulnerability scanner database package:
d8 mirror pull \
--license='<LICENSE_KEY>' \
--no-platform --no-modules /home/user/d8-bundle
Example command to download all available additional module packages:
d8 mirror pull \
--license='<LICENSE_KEY>' \
--no-platform --no-security-db /home/user/d8-bundle
Example command to download module packages
strongholdandsecrets-store-integration:d8 mirror pull \ --license='<LICENSE_KEY>' \ --no-platform --no-security-db \ --include-module stronghold \ --include-module secrets-store-integration \ /home/user/d8-bundleExample command to download
strongholdmodule with semver^constraint from version 1.2.0:d8 mirror pull \ --license='<LICENSE_KEY>' \ --no-platform --no-security-db \ --include-module stronghold@1.2.0 \ /home/user/d8-bundleExample command to download
secrets-store-integrationmodule with semver~constraint from version 1.1.0:d8 mirror pull \ --license='<LICENSE_KEY>' \ --no-platform --no-security-db \ --include-module secrets-store-integration@~1.1.0 \ /home/user/d8-bundleExample command to download exact version of
strongholdmodule 1.2.5 and publish to all release channels:d8 mirror pull \ --license='<LICENSE_KEY>' \ --no-platform --no-security-db \ --include-module stronghold@=v1.2.5 \ /home/user/d8-bundle
-
On the host with access to the container registry where DP images should be uploaded, copy the downloaded DP image bundle and install the Deckhouse CLI.
-
Upload DP images to the registry using the
d8 mirror pushcommand.The
d8 mirror pushcommand uploads images from all packages located in the specified directory. If you only want to push specific packages, you can either run the command separately for each TAR image bundle by specifying the direct path to it, or temporarily remove the.tarextension from unwanted files or move them out of the directory.Example command to upload image packages from the
/mnt/MEDIA/d8-imagesdirectory (provide authentication data if required):d8 mirror push /mnt/MEDIA/d8-images 'corp.company.com:5000/sys/deckhouse' \ --registry-login='<USER>' --registry-password='<PASSWORD>'Before uploading the images, make sure that the target path in the container registry exists (in the example,
/sys/deckhouse) and that the account used has write permissions.If you’re using Harbor, you won’t be able to upload images to the root of a project. Use a dedicated repository within the project to store DP images.
-
After uploading the images to the registry, you can proceed with installing DP. Use the getting-started guide.
When running the installer, use the address of your own image registry (where the images were uploaded earlier) instead of the official public DP container registry. For the example above, the installer image address will be
corp.company.com:5000/sys/deckhouse/install:stableinstead ofregistry.deckhouse.io/deckhouse/ee/install:stable.In the
registrysection of ModuleConfigdeckhouse, use your registry address and authorization data (starting with DP 1.75). The legacy method is to use InitConfiguration (parametersimagesRepo,registryDockerCfg).
Creating a cluster and running DP without using release channels
This method should only be used if your private (isolated) registry does not contain images with release channel metadata.
If you need to install DP with automatic updates disabled:
- Use the installer image tag corresponding to the desired version. For example, to install release
v1.44.3, use the imageyour.private.registry.com/deckhouse/install:v1.44.3. - Specify the appropriate version number in the
deckhouse.devBranchparameter of InitConfiguration.Do not specify the
deckhouse.releaseChannelparameter in InitConfiguration.
If you want to disable automatic updates in an already running DP installation (including patch updates), remove the releaseChannel parameter from the deckhouse module configuration.
Using a proxy server
Available in the following editions: BE, SE, SE+, EE.
To configure DP to work with a proxy server, use the proxy parameter of the ClusterConfiguration resource.
Example:
apiVersion: deckhouse.io/v1
kind: ClusterConfiguration
clusterType: Cloud
cloud:
  provider: OpenStack
  prefix: main
podSubnetCIDR: 10.111.0.0/16
serviceSubnetCIDR: 10.222.0.0/16
kubernetesVersion: "Automatic"
cri: "Containerd"
clusterDomain: "cluster.local"
proxy:
  httpProxy: "http://user:password@proxy.company.my:3128"
  httpsProxy: "https://user:password@proxy.company.my:8443"
Automatic proxy variable loading for users in CLI
Starting from version 1.67, the /etc/profile.d/d8-system-proxy.sh file is no longer configured in DP to set proxy variables for users.
To automatically load proxy variables for users in CLI, use the NodeGroupConfiguration resource:
apiVersion: deckhouse.io/v1alpha1
kind: NodeGroupConfiguration
metadata:
  name: profile-proxy.sh
spec:
  bundles:
    - '*'
  nodeGroups:
    - '*'
  weight: 99
  content: |
    {{- if .proxy }}
      {{- if .proxy.httpProxy }}
    export HTTP_PROXY={{ .proxy.httpProxy | quote }}
    export http_proxy=${HTTP_PROXY}
      {{- end }}
      {{- if .proxy.httpsProxy }}
    export HTTPS_PROXY={{ .proxy.httpsProxy | quote }}
    export https_proxy=${HTTPS_PROXY}
      {{- end }}
      {{- if .proxy.noProxy }}
    export NO_PROXY={{ .proxy.noProxy | join "," | quote }}
    export no_proxy=${NO_PROXY}
      {{- end }}
    bb-sync-file /etc/profile.d/profile-proxy.sh - << EOF
    export HTTP_PROXY=${HTTP_PROXY}
    export http_proxy=${HTTP_PROXY}
    export HTTPS_PROXY=${HTTPS_PROXY}
    export https_proxy=${HTTPS_PROXY}
    export NO_PROXY=${NO_PROXY}
    export no_proxy=${NO_PROXY}
    EOF
    {{- else }}
    rm -rf /etc/profile.d/profile-proxy.sh
    {{- end }}